Bulbs
Flower Basics
Flower Beds & Specialty Gardens
Flower Garden
Garden Furniture
Garden Gnomes
Garden Seeds
Garden Sheds
Garden Statues
Garden Tools & Supplies
Gardening Basics
Green & Organic
Groundcovers & Vines
Growing Annuals
Growing Basil
Growing Beans
Growing Berries
Growing Blueberries
Growing Cactus
Growing Corn
Growing Cotton
Growing Edibles
Growing Flowers
Growing Garlic
Growing Grapes
Growing Grass
Growing Herbs
Growing Jasmine
Growing Mint
Growing Mushrooms
Orchids
Growing Peanuts
Growing Perennials
Growing Plants
Growing Rosemary
Growing Roses
Growing Strawberries
Growing Sunflowers
Growing Thyme
Growing Tomatoes
Growing Tulips
Growing Vegetables
Herb Basics
Herb Garden
Indoor Growing
Landscaping Basics
Landscaping Patios
Landscaping Plants
Landscaping Shrubs
Landscaping Trees
Landscaping Walks & Pathways
Lawn Basics
Lawn Maintenance
Lawn Mowers
Lawn Ornaments
Lawn Planting
Lawn Tools
Outdoor Growing
Overall Landscape Planning
Pests, Weeds & Problems
Plant Basics
Rock Garden
Rose Garden
Shrubs
Soil
Specialty Gardens
Trees
Vegetable Garden
Yard Maintenance
How to Build a Vertical Garden or Living Wall
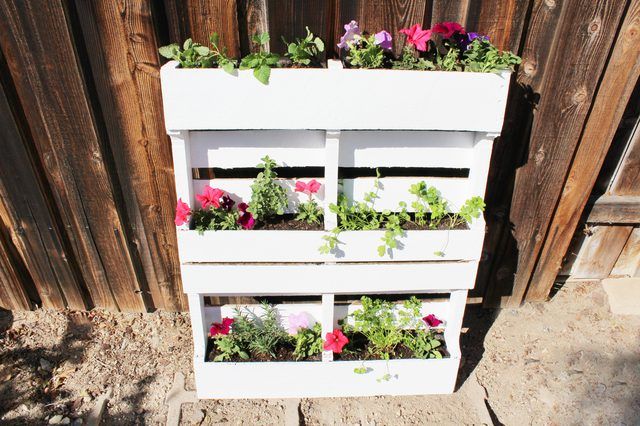
How to Build a Vertical Garden or Living Wall. If you're short on space in your backyard, patio or balcony, but yearn to have more greenery and colorful foliage, build a vertical garden. Not only are they space-saving, but they are versatile in that you can move them wherever you want to allow the plants to get as much sunlight as needed. You...
If you're short on space in your backyard, patio or balcony, but yearn to have more greenery and colorful foliage, build a vertical garden. Not only are they space-saving, but they are versatile in that you can move them wherever you want to allow the plants to get as much sunlight as needed. You can even mount them to a wall to create a "living wall" effect.
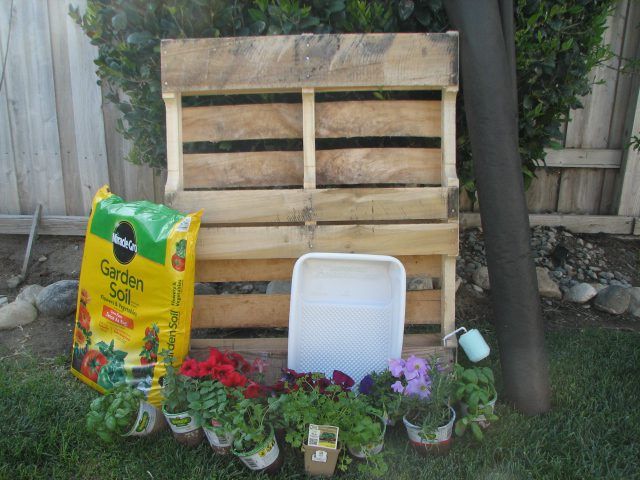
To complete this project, you'll need the following supplies:
Pallet
Sandpaper (medium grit)
Paint tray
Paint tray liners, 2
1 quart exterior paint primer
1 quart exterior water-based paint
3-inch paint roller
3-inch semi-smooth paint roller covers with 3/8-inch nap, 2
Polypropylene landscape fabric, 1 roll
Staple gun
Staples
Scissors
Plants
Potting soil
Trowel
L-brackets (optional)
Note: When obtaining a pallet, make sure to read the label and check for the symbol HT, which means it was heat-treated and safe for gardening use. Do not use pallets that are labeled MB, which means it was treated with methyl bromide and is potentially toxic.
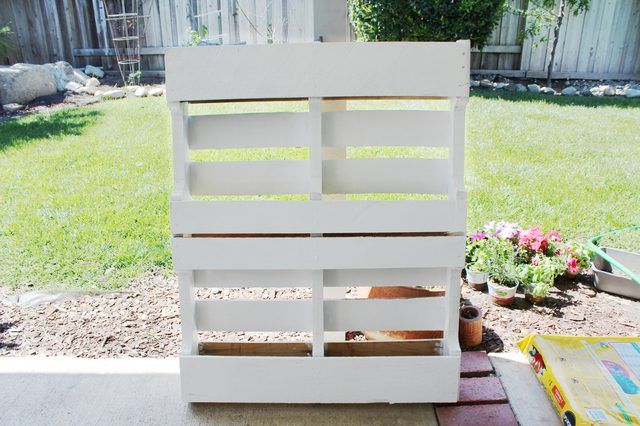
Before adding the primer, clean off the back of the pallet -- the side with the wider openings in between each of the slats -- using sandpaper to get rid of any grease or grime. To remove most of the rough texture and make the pallet smoother, use a coarser grit sandpaper. Pour some primer into a lined paint tray. Apply the primer using the paint roller to all surfaces that will show. Wait for the first coat to dry; then apply a second coat. Allow the primer to dry, following the manufacturer's directions.
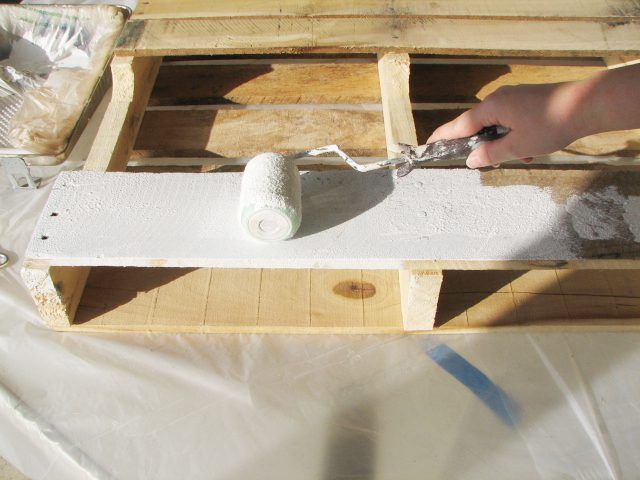
Replace the liner in the paint tray and pour some paint into the tray. Replace the paint roller cover and paint the same surfaces to which you applied the primer. Allow the paint to thoroughly dry.
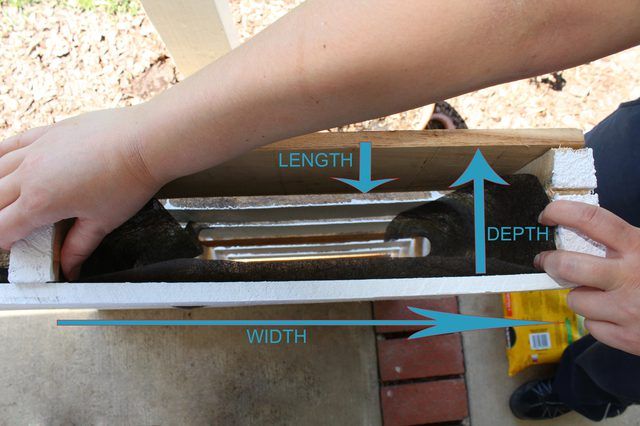
You'll need to cut a fabric piece to create a basket in each opening of the pallet. Pallets vary in size, so you'll need to determine how much fabric is necessary to create each basket in the pallet. Measure the length, width and depth as shown. Double all of the measurements. Add the length and depth measurements together. Add the width and depth measurements together. Cut out the polypropylene landscape fabric according to these measurements.
For example: Let's say you have a length of 6 inches, a width of 10 inches and a depth of 4 inches. You would double the length to get 12 inches, double the width to get 20 inches and double the depth to get 8 inches. You would then add the length and depth to get 20 inches and add the width and depth to get 28 inches. Then, you'd cut your fabric to be 20 inches by 28 inches. In this project, there are six baskets, so six 20-by-28-inch fabric pieces were cut.
Start by making the top two baskets. Lay the fabric flush inside one edge of the pallet and staple it along the top edge of the wood. Secure with a staple about every 2 inches. Continue stapling the black fabric around the corner to the other side, forming a basket with the fabric. Keep the edges as flush as possible and staple every 2 inches. You may have to fold over certain parts to keep a clean look or even trim off some of the black fabric.
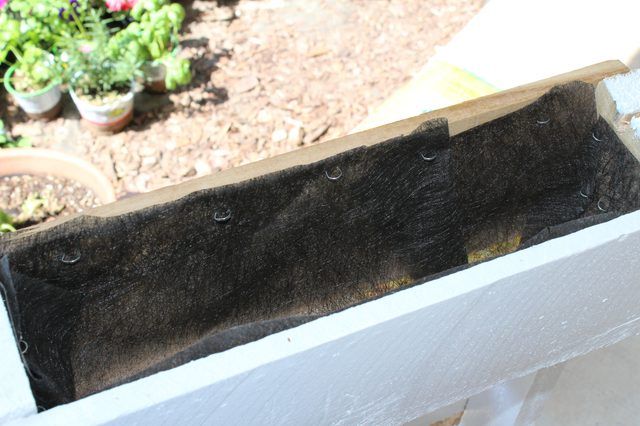
Staple the remaining fabric pieces to the pallet openings to make the remaining baskets.
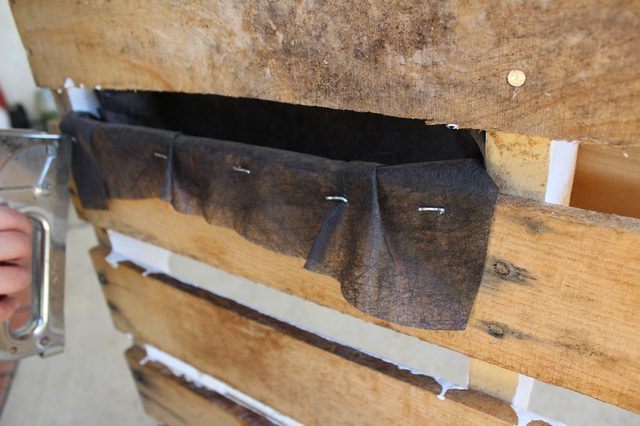
Tip: An easier way to attach the lower baskets is to cut the length about an inch longer so you can pull it taut and staple it to the back of the pallet as shown.
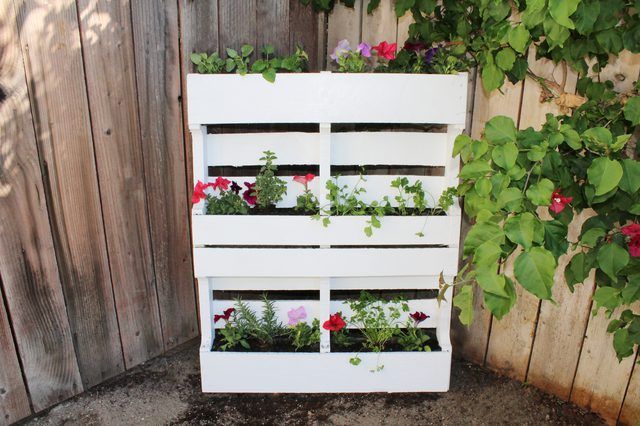
Add the potting soil and the plants -- a variety of herbs and flowers were used in this project. Start by filling the baskets halfway with soil and then transfer the plants, following the directions on the plants' labels. When transferring the plants, keep the soil loose to help the roots breathe. Add more soil around the plants, filling the basket until the soil is about 1/4 inch from the top. Don't water the plants until you've placed the pallet where you want it to stay, as the water will add excess weight.
Tip: There is no need to add drainage holes since the polypropylene landscaping fabric is porous and allows water to drain and air to circulate.
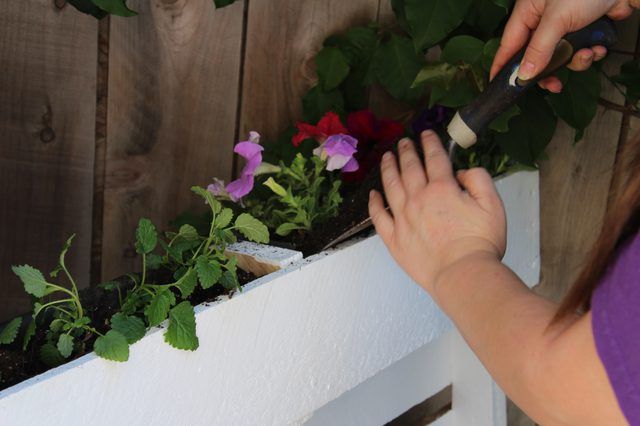
Set up the finished pallet where you want it to stay. It's probably best set up outside so the excess water will drip to the ground when you water it, and the plants will get plenty of sunlight. Lean it against a fence or mount it on a wall with L-brackets for a "living wall" effect; the choice is yours. Once you've situated your vertical garden where you'd like it, water the plants thoroughly.
Since this is a container garden above ground, the soil will tend to dry out more quickly. Daily watering may be required.


