Bulbs
Flower Basics
Flower Beds & Specialty Gardens
Flower Garden
Garden Furniture
Garden Gnomes
Garden Seeds
Garden Sheds
Garden Statues
Garden Tools & Supplies
Gardening Basics
Green & Organic
Groundcovers & Vines
Growing Annuals
Growing Basil
Growing Beans
Growing Berries
Growing Blueberries
Growing Cactus
Growing Corn
Growing Cotton
Growing Edibles
Growing Flowers
Growing Garlic
Growing Grapes
Growing Grass
Growing Herbs
Growing Jasmine
Growing Mint
Growing Mushrooms
Orchids
Growing Peanuts
Growing Perennials
Growing Plants
Growing Rosemary
Growing Roses
Growing Strawberries
Growing Sunflowers
Growing Thyme
Growing Tomatoes
Growing Tulips
Growing Vegetables
Herb Basics
Herb Garden
Indoor Growing
Landscaping Basics
Landscaping Patios
Landscaping Plants
Landscaping Shrubs
Landscaping Trees
Landscaping Walks & Pathways
Lawn Basics
Lawn Maintenance
Lawn Mowers
Lawn Ornaments
Lawn Planting
Lawn Tools
Outdoor Growing
Overall Landscape Planning
Pests, Weeds & Problems
Plant Basics
Rock Garden
Rose Garden
Shrubs
Soil
Specialty Gardens
Trees
Vegetable Garden
Yard Maintenance
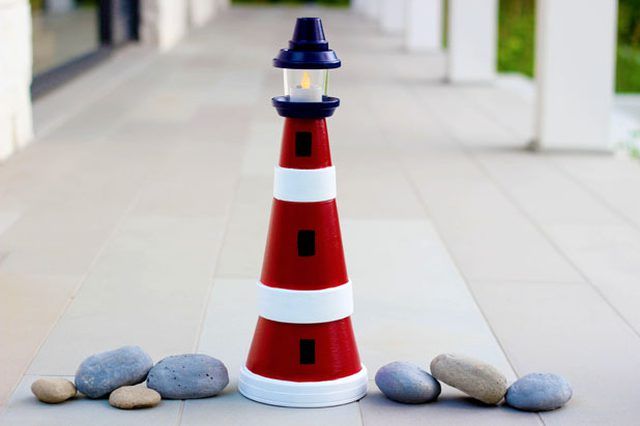
How to Make a Clay Pot Lighthouse
How to Make a Clay Pot Lighthouse. Lighthouses are a popular decorating motif not only because of their nautical roots, but because they symbolize safe harbor and protection. This lighthouse made from terra cotta clay pots is surprisingly easy to assemble, and it even features a lantern on top to cast a warm glow. You can place it in the garden as...
Lighthouses are a popular decorating motif not only because of their nautical roots, but because they symbolize safe harbor and protection. This lighthouse made from terra cotta clay pots is surprisingly easy to assemble, and it even features a lantern on top to cast a warm glow. You can place it in the garden as a decoration, or use it as a centerpiece for a beach gathering.
WATCH THE VIDEO TUTORIAL
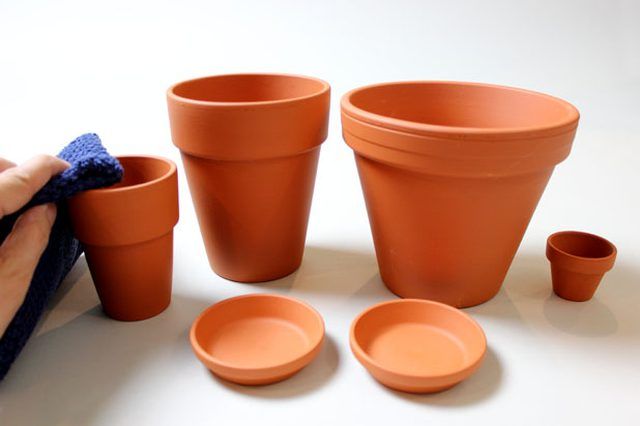
Things You'll Need
4 clay pots (1 large, 1 medium, 1 small, 1 extra small)
2 clay saucers, small
Outdoor acrylic paint in your choice of colors
Permanent adhesive
Glass votive holder
Flameless battery-operated tea light
Paint brushes
Step 1
You will need four clay pots for this project. They can be any size you wish, as long as they are in four incremental sizes � large, medium, small and extra small. Begin by cleaning the pots with a damp cloth to remove any dust or debris.
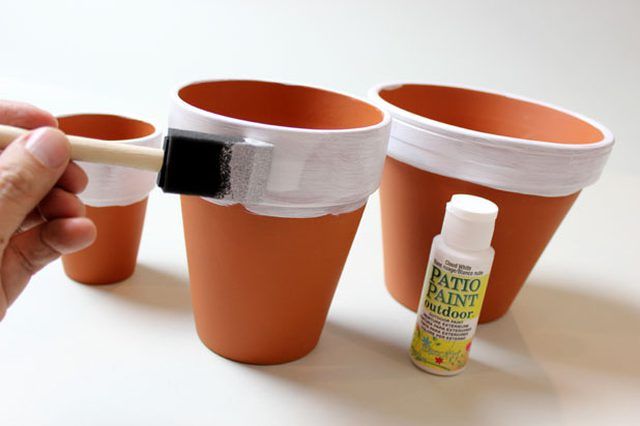
Step 2
Using outdoor acrylic paint, which is weatherproof to withstand the elements, paint the rim of the clay pots one color, and the body of the pots another. I chose to paint the rims white. Apply three coats, allowing the paint to dry between coats. For now, only paint the large, medium and small pots.
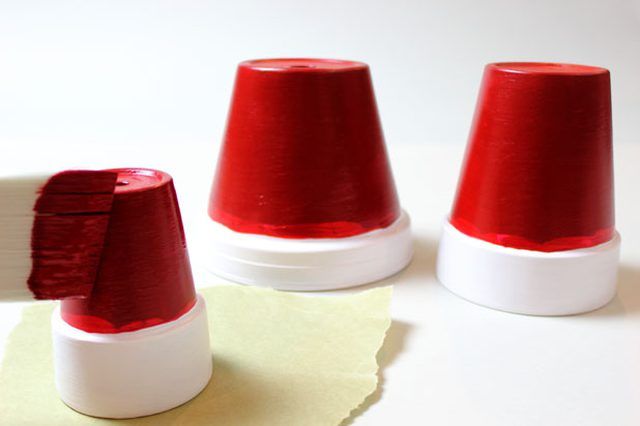
Step 3
After the paint on the rims is dry, paint the body of the clay pots. I chose to paint them red since some of the most striking lighthouses in real life are red. As with the white paint, apply three coats, allowing the paint to dry between coats. It is OK if you see the brush strokes -- these add to the vintage look of the lighthouse.
Step 4
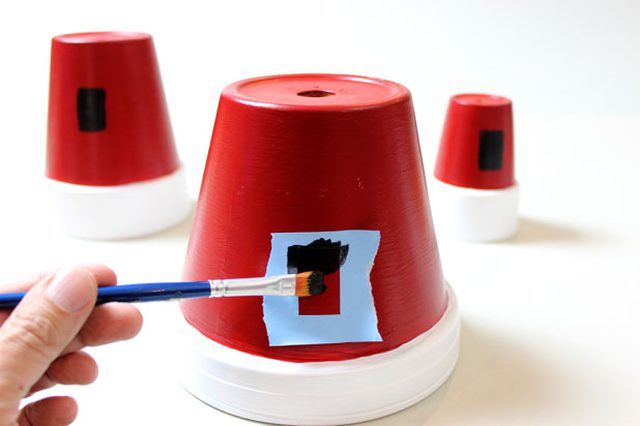
Using black paint and a small brush, paint rectangles on the pots to create windows. If you do not feel comfortable drawing the windows freehand, create a rectangular stencil with some masking tape, painting within the stencil. If you do use a stencil, a dryer brush works better than a wet brush, as less paint is likely to bleed under the tape.
Step 5
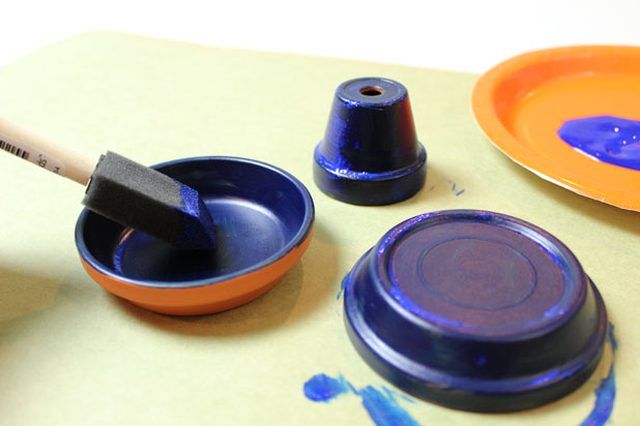
Paint both sides of the saucers a contrasting color. I chose a navy blue. Also paint the extra small clay pot the same color of the saucers. These three elements will be used to create the lantern on top of the lighthouse.
Step 6
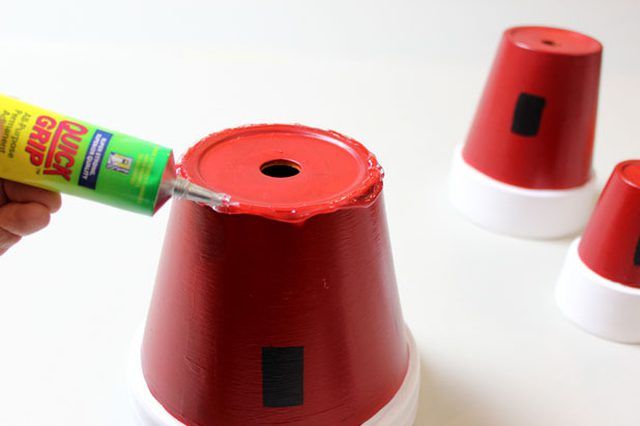
Position the large clay pot upside down and squeeze some permanent adhesive around the edge of the pot's bottom � which is now on top. Also, apply some adhesive inside the rim of the medium pot. Make sure it's only on the inside of the medium pot. You do not want any adhesive showing.
Step 7
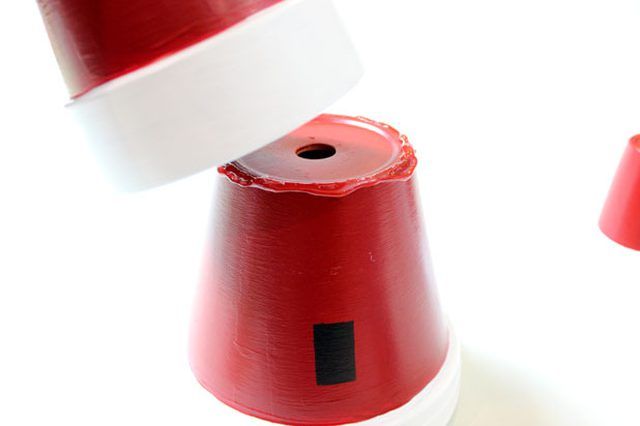
Place the medium clay pot upside down on top of the large one so the pots make contact where the adhesive was placed. Make sure the medium pot is sitting level on the larger one. Repeat this step with the small clay pot, attaching it to the medium one with adhesive. Follow the directions on the adhesive package for the recommended drying time.
Step 8
Squeeze some adhesive on the base of the small clay pot and position one of the clay saucers on top of it.
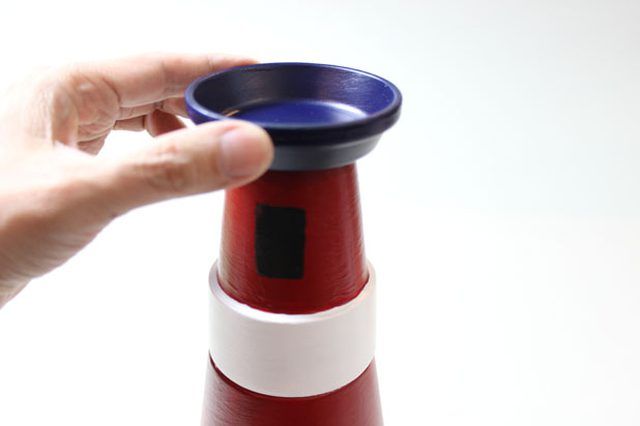
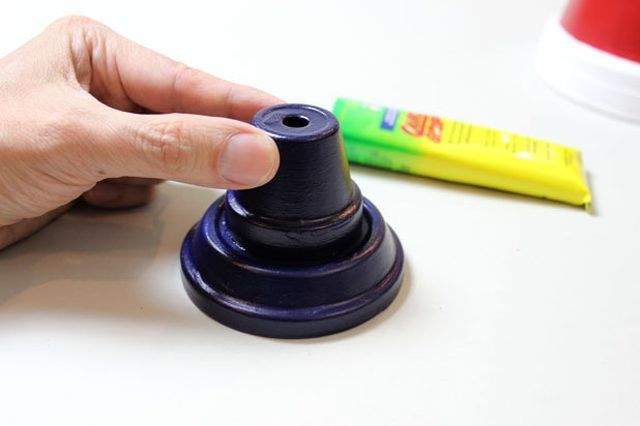
Step 9
Apply some adhesive to the rim of the extra small clay pot and glue it to the second saucer, which is also inverted. This is the cap of the lighthouse's lantern.
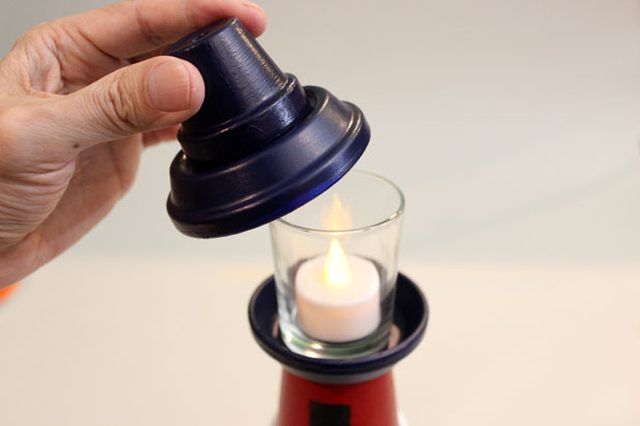
Step 10
Place a glass votive holder in the saucer on top of the lighthouse, and put a flameless battery-operated tea light in it. Cover the votive holder with the cap from the last step, and your lighthouse is complete.
Step 1
For more creative ideas on what you can do with clay pots, check out these fun projects:
Learn How to Mosaic a Clay Pot
Create Chalkboard Patterned Terra Cotta Pots
Tricks for Weathering Terra Cotta Pots -- Plus, How to Make It Into a Table!
Cute Ideas for Painting Flower Pots


