Bulbs
Flower Basics
Flower Beds & Specialty Gardens
Flower Garden
Garden Furniture
Garden Gnomes
Garden Seeds
Garden Sheds
Garden Statues
Garden Tools & Supplies
Gardening Basics
Green & Organic
Groundcovers & Vines
Growing Annuals
Growing Basil
Growing Beans
Growing Berries
Growing Blueberries
Growing Cactus
Growing Corn
Growing Cotton
Growing Edibles
Growing Flowers
Growing Garlic
Growing Grapes
Growing Grass
Growing Herbs
Growing Jasmine
Growing Mint
Growing Mushrooms
Orchids
Growing Peanuts
Growing Perennials
Growing Plants
Growing Rosemary
Growing Roses
Growing Strawberries
Growing Sunflowers
Growing Thyme
Growing Tomatoes
Growing Tulips
Growing Vegetables
Herb Basics
Herb Garden
Indoor Growing
Landscaping Basics
Landscaping Patios
Landscaping Plants
Landscaping Shrubs
Landscaping Trees
Landscaping Walks & Pathways
Lawn Basics
Lawn Maintenance
Lawn Mowers
Lawn Ornaments
Lawn Planting
Lawn Tools
Outdoor Growing
Overall Landscape Planning
Pests, Weeds & Problems
Plant Basics
Rock Garden
Rose Garden
Shrubs
Soil
Specialty Gardens
Trees
Vegetable Garden
Yard Maintenance
How to Make Steps in a Garden Slope
How to Make Steps in a Garden Slope. It is peaceful and relaxing to walk through a beautiful, sloping flower garden. But without steps on a steep slope, it can feel more like a mountain hike than a stroll. Making the steps takes some time and some hard work but is well worth it when you're finished. Not only does it add character to your garden, it...
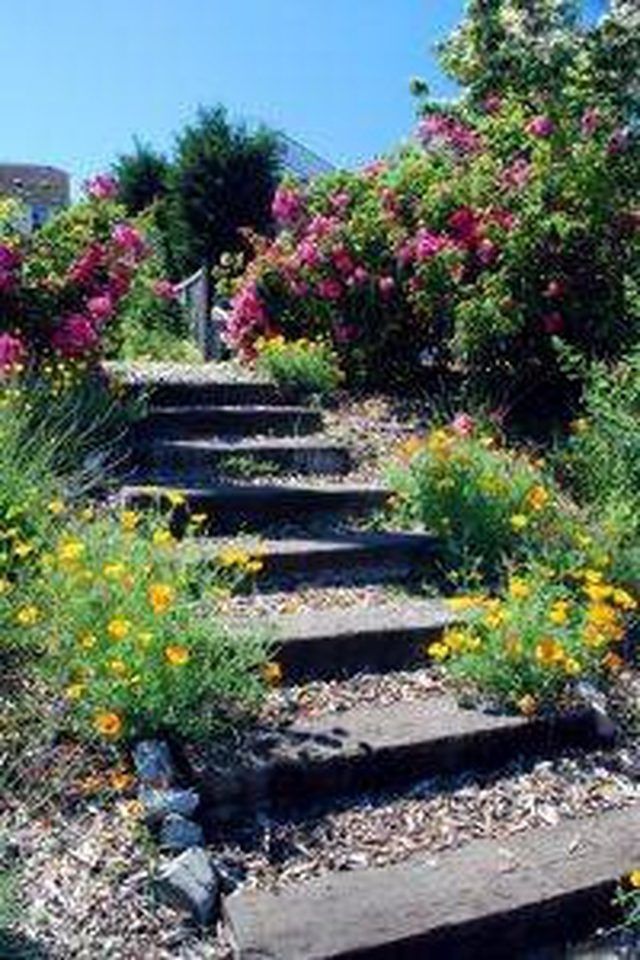
It is peaceful and relaxing to walk through a beautiful, sloping flower garden. But without steps on a steep slope, it can feel more like a mountain hike than a stroll. Making the steps takes some time and some hard work but is well worth it when you're finished. Not only does it add character to your garden, it makes it easier to view the entire area. You might want to recruit a friend or two to help you out, and pick a dry weekend to get the work done.
Things You'll Need
Material for steps (2-by-12 boards, slate, paving stones)
Shovel
Rake
Mulch
Landscape fabric
Utility knife
Saw, if using wood
Plastic landscape border
Plan your steps by choosing a material that will blend in with your landscape. Wood looks most natural in the setting but may need to be replaced at some point, whereas slate or paving stones will last forever. If you choose wood, purchase pressure-treated boards, cut them to the width of the desired path and use a wood sealant on them before installation.
Starting at the bottom, ground level, go up about 3 inches and dig back the width of the material plus 10 inches. For instance, if using a 2-by-12 board, dig back 22 inches.
Slightly slope your riser back toward the next step, up 5 inches. Repeat digging for the next step and every step thereafter until you reach the top of your slope. Always dig out; do not fill in, or it may not be strong enough to hold the step. You want this to look as natural as possible, so perfect measuring is not necessary.
Cut the landscaping fabric to the width of the path and run it from the top to the bottom, forming it to each step. Have someone help you from the other side, and try not to walk on the dug-out steps yet. Cut plastic border in 10-inch strips, two for each step.
Place your first board or paver on the bottom step from the front. Place a piece of plastic boarder on each side from the step back (10 inches). Fill in the 10 inches with mulch. Repeat, moving up the steps.
Plant flower bushes or green bushes alongside the steps to keep the ground from eroding around them and to hide the plastic border.


