Bulbs
Flower Basics
Flower Beds & Specialty Gardens
Flower Garden
Garden Furniture
Garden Gnomes
Garden Seeds
Garden Sheds
Garden Statues
Garden Tools & Supplies
Gardening Basics
Green & Organic
Groundcovers & Vines
Growing Annuals
Growing Basil
Growing Beans
Growing Berries
Growing Blueberries
Growing Cactus
Growing Corn
Growing Cotton
Growing Edibles
Growing Flowers
Growing Garlic
Growing Grapes
Growing Grass
Growing Herbs
Growing Jasmine
Growing Mint
Growing Mushrooms
Orchids
Growing Peanuts
Growing Perennials
Growing Plants
Growing Rosemary
Growing Roses
Growing Strawberries
Growing Sunflowers
Growing Thyme
Growing Tomatoes
Growing Tulips
Growing Vegetables
Herb Basics
Herb Garden
Indoor Growing
Landscaping Basics
Landscaping Patios
Landscaping Plants
Landscaping Shrubs
Landscaping Trees
Landscaping Walks & Pathways
Lawn Basics
Lawn Maintenance
Lawn Mowers
Lawn Ornaments
Lawn Planting
Lawn Tools
Outdoor Growing
Overall Landscape Planning
Pests, Weeds & Problems
Plant Basics
Rock Garden
Rose Garden
Shrubs
Soil
Specialty Gardens
Trees
Vegetable Garden
Yard Maintenance
How to Build a Sidewalk With Pebbles on Top
How to Build a Sidewalk With Pebbles on Top. A sidewalk or other concrete surface that appears to have a top layer of small pebbles is also known as concrete with an exposed aggregate surface. This type of surfacing is enjoyed for its appearance and its increased slip resistance. Although it might be tempting to tamp pebbles into the freshly poured...
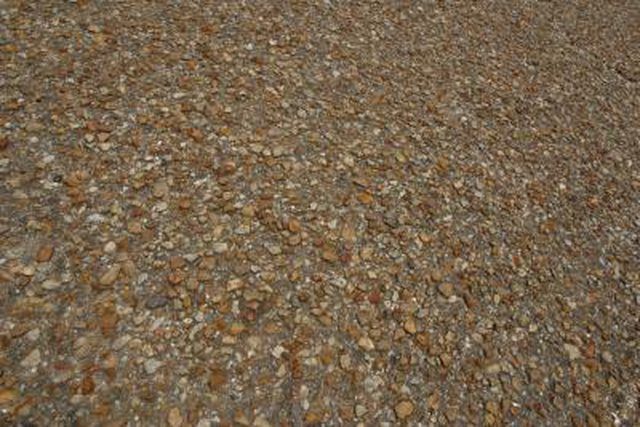
A sidewalk or other concrete surface that appears to have a top layer of small pebbles is also known as concrete with an exposed aggregate surface. This type of surfacing is enjoyed for its appearance and its increased slip resistance. Although it might be tempting to tamp pebbles into the freshly poured concrete surface, this method would create air bubbles in the concrete and make the pebbles vulnerable to loosening. Instead, the aggregate should be mixed into the concrete and then exposed.
Things You'll Need
Concrete forms or boards
Nails
Hammer
Concrete mix
Aggregate (pea gravel or desired pebbles)
Nylon stiff-bristled broom
Hose with spray nozzle
Exposed aggregate sealer
Paint roller
Roller tray
Build or place forms for the sidewalk as for a normal poured concrete sidewalk. Use 2-by-6s, 2-by-10s or plywood for the body of the forms, depending on the scope of the project, and lace wooden stakes to brace the forms in place. Oil the forms with a form lubricant or motor oil.
Prepare the concrete for the pour. Rather than use only standard sand or gravel aggregate, mix in the desired aggregate.
Pour the concrete into the form and level the top of the poured concrete with a wooden board.
Check the surface of the pour regularly to determine whether the aggregate is ready to be exposed. Do this by lightly brushing a small area of the concrete surface with a stiff-bristled broom. When the concrete is ready, this brushing will remove surface mortar without overexposing or dislodging the pebbles.
Spray the surface of the poured concrete gently with water.
Brush the surface lightly with the stiff-bristled nylon broom to loosen a thin layer of concrete.
Repeat this gentle spraying and brushing until the aggregate is exposed to the desired depth. Let the sidewalk cure as with standard concrete.
Apply an exposed aggregate sealer to the concrete surface about three weeks after the pour to keep aggregates from loosening. Ensure that the surface is clean and use a paint roller to apply the sealer.
Tips & Warnings
Because timing the washing and brushing of the concrete surface is critical, this method may not be suitable for large projects or when there are time constraints. For greater flexibility with timing, spray the sidewalk surface with a chemical surface retarder immediately after the concrete is poured and finished. Application of a retarder delays set and allows the surface to be worked up to about a day after the pour.


