Bulbs
Flower Basics
Flower Beds & Specialty Gardens
Flower Garden
Garden Furniture
Garden Gnomes
Garden Seeds
Garden Sheds
Garden Statues
Garden Tools & Supplies
Gardening Basics
Green & Organic
Groundcovers & Vines
Growing Annuals
Growing Basil
Growing Beans
Growing Berries
Growing Blueberries
Growing Cactus
Growing Corn
Growing Cotton
Growing Edibles
Growing Flowers
Growing Garlic
Growing Grapes
Growing Grass
Growing Herbs
Growing Jasmine
Growing Mint
Growing Mushrooms
Orchids
Growing Peanuts
Growing Perennials
Growing Plants
Growing Rosemary
Growing Roses
Growing Strawberries
Growing Sunflowers
Growing Thyme
Growing Tomatoes
Growing Tulips
Growing Vegetables
Herb Basics
Herb Garden
Indoor Growing
Landscaping Basics
Landscaping Patios
Landscaping Plants
Landscaping Shrubs
Landscaping Trees
Landscaping Walks & Pathways
Lawn Basics
Lawn Maintenance
Lawn Mowers
Lawn Ornaments
Lawn Planting
Lawn Tools
Outdoor Growing
Overall Landscape Planning
Pests, Weeds & Problems
Plant Basics
Rock Garden
Rose Garden
Shrubs
Soil
Specialty Gardens
Trees
Vegetable Garden
Yard Maintenance
How to Landscape With Uneven Ground
How to Landscape With Uneven Ground. Many homeowners face the challenge of landscaping an area with uneven ground. While the dips and swells add dimension to a simple lawn, they also make it difficult to install a patio, walkway or other paved feature. Choose a design and materials that give you flexibility to work with the yard’s natural...
Many homeowners face the challenge of landscaping an area with uneven ground. While the dips and swells add dimension to a simple lawn, they also make it difficult to install a patio, walkway or other paved feature. Choose a design and materials that give you flexibility to work with the yard�s natural contours, and consider drainage conditions when selecting plants and other growth.
Things You'll Need
Paper
Pencil
Colored pencils
Ropes
Tape measure
Stepping stones
Shovel
Course sand
Wood board
Flat shovel
Landscape timbers
Drill
Sledgehammer
Rebar
Brackets
Screws
Weed barrier fabric
Topsoil
Plants
Mulch
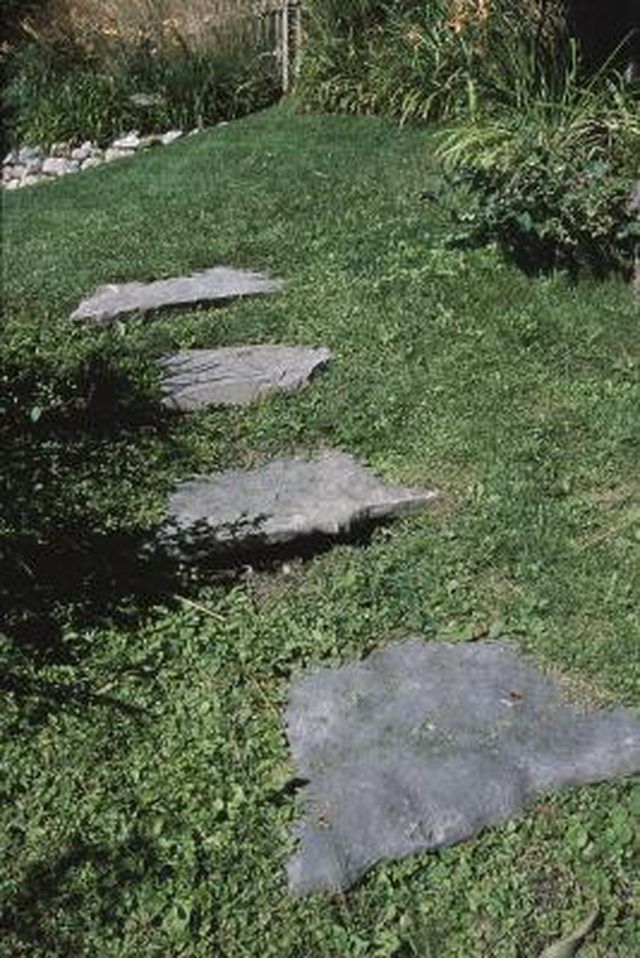
Lay a Stepping Stone Path
Create a simple sketch of your yard with paper and pencil, and circle the high and low areas with different colors. Draw a course for a walkway, and mark a sunny location for a plant bed and any other features you�d like to add. If you have specific shrubs or flowers in mind, choose the spot based on the needed growing conditions. For instance, high areas tend to be dry, while low areas are good for flood-tolerant plants.
Lay ropes on the ground to mark the sides of the walkway. Measure the width using a tape measure, and adjust the ropes so the width is 36 inches for a secondary trail or 4 feet for a main walkway.
Place stepping stones or large pieces of slate between the ropes, spaced about eight inches apart. Set the stones to the side of one rope, maintaining the spacing. Dig out the grass and topsoil beneath the location for each stone with a shovel. Remove enough soil to fit a 1-inch deep base plus the thickness of the stones.
Spread a 1-inch thick bed of course sand in the hole for each stone. Drag the side of a board over the surface of the sand to make it smooth.
Drop the stepping stones into their holes directly on top of the sand. Use some of the soil you removed earlier to fill in any gaps between the stones and the ground, and pack the dirt down so the stones are stable.
Build a Raised Garden
Mark the borders for a raised plant bed with ropes or a hose. To access the plants from all sides, consider making it a 4-foot square. Use a flat shovel to remove the top layer of grass and roots from the location, and dig down the high area until it is level with the lowest side of the garden area.
Set landscape timbers on each side until you have enough to stack to the desired height of your garden. Drill pilot holes through each stack of timbers on a slight angle. Stack the first side of timbers, and use a sledgehammer to drive rebar through the holes into the ground to stabilize them. Repeat this for each side, aligning the ends to make a 45-degree angle. Drill brackets and screws to the inside corners of the timbers to attach the adjacent sides.
Line the bottom and inside walls with weed barrier fabric.
Fill in the hollow square with the soil you removed for the walkway. Use native topsoil to fill the remaining expanse. Dig a hole for each plant as deep as the root ball plus one inch. Place the plants in the holes, and cover them with soil. Spread two inches of mulch over the surface to prevent erosion.


