Bulbs
Flower Basics
Flower Beds & Specialty Gardens
Flower Garden
Garden Furniture
Garden Gnomes
Garden Seeds
Garden Sheds
Garden Statues
Garden Tools & Supplies
Gardening Basics
Green & Organic
Groundcovers & Vines
Growing Annuals
Growing Basil
Growing Beans
Growing Berries
Growing Blueberries
Growing Cactus
Growing Corn
Growing Cotton
Growing Edibles
Growing Flowers
Growing Garlic
Growing Grapes
Growing Grass
Growing Herbs
Growing Jasmine
Growing Mint
Growing Mushrooms
Orchids
Growing Peanuts
Growing Perennials
Growing Plants
Growing Rosemary
Growing Roses
Growing Strawberries
Growing Sunflowers
Growing Thyme
Growing Tomatoes
Growing Tulips
Growing Vegetables
Herb Basics
Herb Garden
Indoor Growing
Landscaping Basics
Landscaping Patios
Landscaping Plants
Landscaping Shrubs
Landscaping Trees
Landscaping Walks & Pathways
Lawn Basics
Lawn Maintenance
Lawn Mowers
Lawn Ornaments
Lawn Planting
Lawn Tools
Outdoor Growing
Overall Landscape Planning
Pests, Weeds & Problems
Plant Basics
Rock Garden
Rose Garden
Shrubs
Soil
Specialty Gardens
Trees
Vegetable Garden
Yard Maintenance
How to Transplant Bromeliad Pups
How to Transplant Bromeliad Pups. It is surprising to many gardeners that most of the dazzling, exotic blooming bromeliads are deceptively easy to grow and maintain. The colorful flowers often last for months on the plant, which also remains attractive for another year or two. Most bromeliad species slowly take on a shabby appearance and eventually...
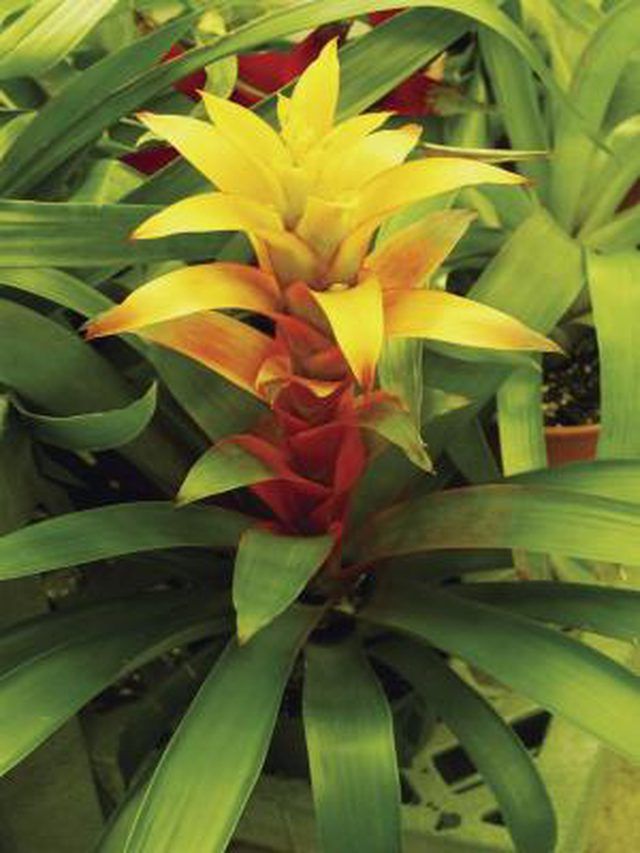
It is surprising to many gardeners that most of the dazzling, exotic blooming bromeliads are deceptively easy to grow and maintain. The colorful flowers often last for months on the plant, which also remains attractive for another year or two. Most bromeliad species slowly take on a shabby appearance and eventually die once they complete the blooming cycle. The lovely plant is not a total loss, since it will undoubtedly send up at least a few offshoots, or pups, from its base. This vegetative method of reproduction is the quickest and easiest way for home gardeners to propagate bromeliads. You will soon have plenty of healthy pups to transplant and replace the plant you started with, and they will bloom within one to three years.
Things You'll Need
Clean serrated knife
3-inch pot
Orchid mix
Pencils
Fertilizer
Monitor the growth of the bromeliad pups. You can safely separate them from the mother plant when they�re from one third to one half the size of the parent.
Cut the pup off where it attaches to the mother plant with a clean serrated knife. The pup may have already developed some roots of its own, or it may not have. Either condition is fine, because a rootless bromeliad pup will readily grow new roots once you plant it.
Plant the bromeliad pup in a 3-inch pot of loose, well-draining medium such as an orchid mix. Do not cover the lowest leaves with soil.
Poke three or four pencils into the soil around the bromeliad pup to support it until it is well established and develops a strong root system of its own.
Feed the mother plant a half-ration of your usual fertilizer. Don�t throw it out after you remove the pups, even if doesn�t look very pretty anymore. Taking pups often induces bromeliads to produce even more viable offspring until they die.
Place the bromeliad transplant in a warm room with bright indirect light. Do not expose it to harsh or direct sunlight while it is rooting.
Water the pup just enough to keep the potting medium evenly moist but never soggy or wet. Don�t allow it to completely dry out. If it is a variety with cups within the leaves, keep the cups full of water. Mist the pup daily.
Tips & Warnings
Remove the bromeliad from its pot if its appearance is extremely shabby and unappealing, before you take the pups. This will make it easier to work with and you can discard it after you remove the offshoots.


