Bulbs
Flower Basics
Flower Beds & Specialty Gardens
Flower Garden
Garden Furniture
Garden Gnomes
Garden Seeds
Garden Sheds
Garden Statues
Garden Tools & Supplies
Gardening Basics
Green & Organic
Groundcovers & Vines
Growing Annuals
Growing Basil
Growing Beans
Growing Berries
Growing Blueberries
Growing Cactus
Growing Corn
Growing Cotton
Growing Edibles
Growing Flowers
Growing Garlic
Growing Grapes
Growing Grass
Growing Herbs
Growing Jasmine
Growing Mint
Growing Mushrooms
Orchids
Growing Peanuts
Growing Perennials
Growing Plants
Growing Rosemary
Growing Roses
Growing Strawberries
Growing Sunflowers
Growing Thyme
Growing Tomatoes
Growing Tulips
Growing Vegetables
Herb Basics
Herb Garden
Indoor Growing
Landscaping Basics
Landscaping Patios
Landscaping Plants
Landscaping Shrubs
Landscaping Trees
Landscaping Walks & Pathways
Lawn Basics
Lawn Maintenance
Lawn Mowers
Lawn Ornaments
Lawn Planting
Lawn Tools
Outdoor Growing
Overall Landscape Planning
Pests, Weeds & Problems
Plant Basics
Rock Garden
Rose Garden
Shrubs
Soil
Specialty Gardens
Trees
Vegetable Garden
Yard Maintenance
How to Build a Brush Cutter
How to Build a Brush Cutter. Brush cutters are garden and estate management power tools. They are used to cut fields, thickets and heavy brush. Depending on the degree of power available, brush cutters can typically be expected to cut saplings and brier trunks up to 1 inch in diameter. Tractor powered models -- called bush hogs -- can typically...
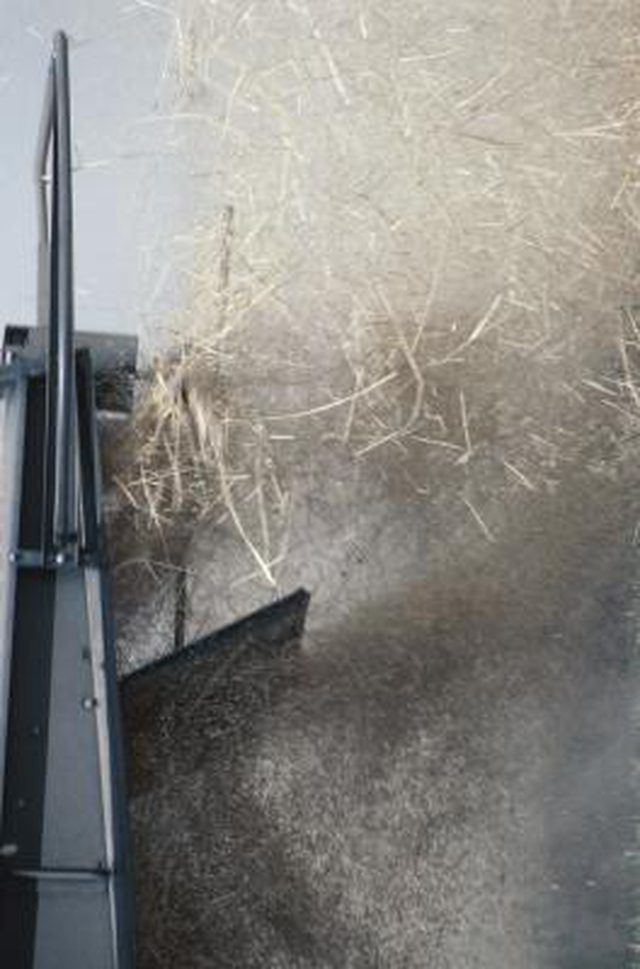
Brush cutters are garden and estate management power tools. They are used to cut fields, thickets and heavy brush. Depending on the degree of power available, brush cutters can typically be expected to cut saplings and brier trunks up to 1 inch in diameter. Tractor powered models -- called bush hogs -- can typically handle saplings and heavy brush up to 4 inches in diameter. For beginning applications in brush cutting, the conversion of a lawn mower to a brush cutter is often the easiest solution.
Things You'll Need
5-hp lawn mower
Tape measure or ruler
Wrench
Straightedge
Permanent marker
Acetylene torch and tanks
Heavy steel file
Steel vise
Hammer
Drain all gasoline and oil from the mower and leave the cap off the gas tank for 30 minutes.
Measure the vertical distance between the upper surface of the blade and the underside of the cowling or cover on the mower.
Remove the blade from the mower with an appropriate-size wrench.
Set the mower on a work surface that can handle torch use in its vicinity or near its surface.
Draw a straight line across the entire front of the mower's upper surface. It should be 3 inches forward of the blade spindle and parallel to the axels. Mark it with a straightedge and permanent marker. Draw another pair of lines perpendicular to that line, 2 inches from the front wheel connections on the mower and extending forward from the horizontal line.
Cut along the 3 lines with the torch to remove a front quadrant of the cowling or cover of the mower. Use a heavy file to clean up the edges.
Place the blade in a steel vise and measure and mark a point midway between the center of the hole in the blade and the blade tip. Do this on both ends of the blade. Use an acetylene torch to heat the midpoint of the blade to a steel-work temperature -- recognized by its cherry red color. Use a heavy hammer to pound an angle that effectively lifts the blade about an inch from its previous vertical when mounted in the mower. (Note: this distance must not allow the blade to come within less than 1/2 inch of the cover.)
Mount the blade on the mower and check its blade height in relation to the cowling or cover. If necessary, reheat and adjust the cant in the blade.
Refill the fuel and oil tanks on the mower and start it. Check for excessive vibration -- indicating a needed adjustment in the blade cant. If it is vibrating badly stop the mower, remove the blade and hold it level to determine the source of the vibration. Reheat and alter the blade as necessary.
Tips & Warnings
Test the brush cutter on progressively larger-thickness brush.
Wear eye and hearing protection when working with metal and operating power equipment.


