Bulbs
Flower Basics
Flower Beds & Specialty Gardens
Flower Garden
Garden Furniture
Garden Gnomes
Garden Seeds
Garden Sheds
Garden Statues
Garden Tools & Supplies
Gardening Basics
Green & Organic
Groundcovers & Vines
Growing Annuals
Growing Basil
Growing Beans
Growing Berries
Growing Blueberries
Growing Cactus
Growing Corn
Growing Cotton
Growing Edibles
Growing Flowers
Growing Garlic
Growing Grapes
Growing Grass
Growing Herbs
Growing Jasmine
Growing Mint
Growing Mushrooms
Orchids
Growing Peanuts
Growing Perennials
Growing Plants
Growing Rosemary
Growing Roses
Growing Strawberries
Growing Sunflowers
Growing Thyme
Growing Tomatoes
Growing Tulips
Growing Vegetables
Herb Basics
Herb Garden
Indoor Growing
Landscaping Basics
Landscaping Patios
Landscaping Plants
Landscaping Shrubs
Landscaping Trees
Landscaping Walks & Pathways
Lawn Basics
Lawn Maintenance
Lawn Mowers
Lawn Ornaments
Lawn Planting
Lawn Tools
Outdoor Growing
Overall Landscape Planning
Pests, Weeds & Problems
Plant Basics
Rock Garden
Rose Garden
Shrubs
Soil
Specialty Gardens
Trees
Vegetable Garden
Yard Maintenance
How to Build a Japanese Garden Bridge
How to Build a Japanese Garden Bridge. A Japanese garden bridge can add charm to any garden. This bridge can be placed over a flowing stream or along a garden pathway. Building this type of bridge isn't challenging, and with the right materials and tools, the job can be completed within a day. There are many different styles and materials used in...
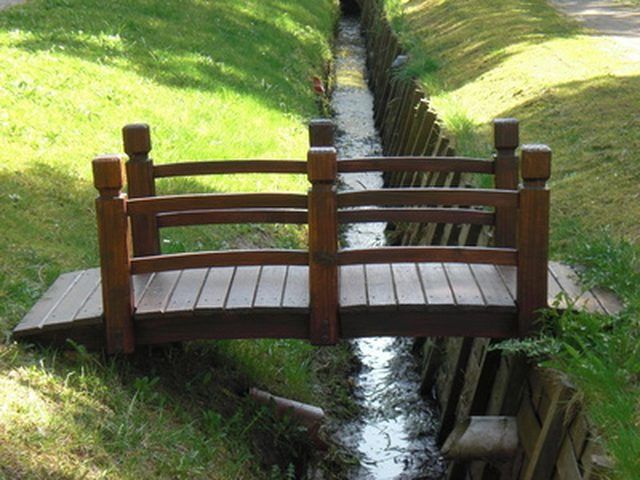
A Japanese garden bridge can add charm to any garden. This bridge can be placed over a flowing stream or along a garden pathway. Building this type of bridge isn't challenging, and with the right materials and tools, the job can be completed within a day. There are many different styles and materials used in the construction of these structures, but the common theme is a slight uprising curve over the length of the bridge.
Things You'll Need
Tape measure
Two curved beams 4 to 8 inches square of adequate span in length
Adequate supply of 2-inch by 4-inch or 2-inch by 6-inch cross planks
Circular saw
Adequate supply of deck screws 2-1/2-inch
Electric screw gun
Stain
Paint brush
Rags
Electric drill
12-inch wood drill bit
Hammer
Adequate supply of 1/2-inch bolts 12-inches long
Adequate supply of 1/2-inch flat washers
Adequate supply of 1/2-inch nuts
1/2-inch end wrench
Measure the spot where the bridge will go. If the bridge will be placed over a stream, measure the distance from bank to bank with a tape measure. Use this measurement to determine how long the underlying support beams will have to be to span the stream.
Place two curved, wood beams of adequate length, at least 4 inches to 8 inches wide, on the ground the proper width apart with the arching side up in the air. Make sure the beams run parallel to each other and are as far apart as your bridge will be wide.
Cut each cross plank to length with a circular saw. Place the first cross plank across the width span from beam to beam, lining up the ends of each plank flush with the outer edge of the underlying beams. Screw both ends of the plank down to the beams with four deck screws with an electric screw gun. Repeat this process until you have floored the entire bridge span with cross planks.
Choose a color of stain for your Japanese garden bridge, and apply the stain with an oil paintbrush. Wipe off excess stain material with a rag. Allow the stain to dry.
Add handrails to each side of the bridge. Measure the height from the deck of the bridge, then cut at least six 4-inch-by-4-inch posts for your handrail. Space these upright posts along the outer beam spanning your bridge, placing a minimum of three posts on each side of the bridge.
Drill 1/2-inch holes through the base of each handrail supporting post and through the bridge beams using an electric drill with a 12-inch wood drill bit. Hammer 1/2-inch diameter bolts, at least 12 inches long, through the post and the beam from the outside of the bridge inward. Thread a flat washer and nut onto bolt until tight using a 1/2-inch end wrench.
Screw 2-inch-by-6-inch hand rails to the top of the upright hand rail supporting posts with two 2 1/2-inch deck screws per post. Stain the upright posts and handrails using your oil brush, and clean off excess stain with a rag.
Tips & Warnings
Decide if you will use 2-inch-by-4-inch or 2-inch-by-6-inch cross planks for your bridge, and then determine how many boards you'll need to floor the width and length spans of the underlying beams.


