Bulbs
Flower Basics
Flower Beds & Specialty Gardens
Flower Garden
Garden Furniture
Garden Gnomes
Garden Seeds
Garden Sheds
Garden Statues
Garden Tools & Supplies
Gardening Basics
Green & Organic
Groundcovers & Vines
Growing Annuals
Growing Basil
Growing Beans
Growing Berries
Growing Blueberries
Growing Cactus
Growing Corn
Growing Cotton
Growing Edibles
Growing Flowers
Growing Garlic
Growing Grapes
Growing Grass
Growing Herbs
Growing Jasmine
Growing Mint
Growing Mushrooms
Orchids
Growing Peanuts
Growing Perennials
Growing Plants
Growing Rosemary
Growing Roses
Growing Strawberries
Growing Sunflowers
Growing Thyme
Growing Tomatoes
Growing Tulips
Growing Vegetables
Herb Basics
Herb Garden
Indoor Growing
Landscaping Basics
Landscaping Patios
Landscaping Plants
Landscaping Shrubs
Landscaping Trees
Landscaping Walks & Pathways
Lawn Basics
Lawn Maintenance
Lawn Mowers
Lawn Ornaments
Lawn Planting
Lawn Tools
Outdoor Growing
Overall Landscape Planning
Pests, Weeds & Problems
Plant Basics
Rock Garden
Rose Garden
Shrubs
Soil
Specialty Gardens
Trees
Vegetable Garden
Yard Maintenance
DIY Cement Planters
DIY Cement Planters. Planters come in all shapes and sizes---what they don't come with is an affordable price tag. Fortunately stylish but affordable planters can be made in a weekend thanks to inexpensive and readily available materials such as ready-mix cement and cardboard boxes. In fact, with a little time, patience and some creativity,...

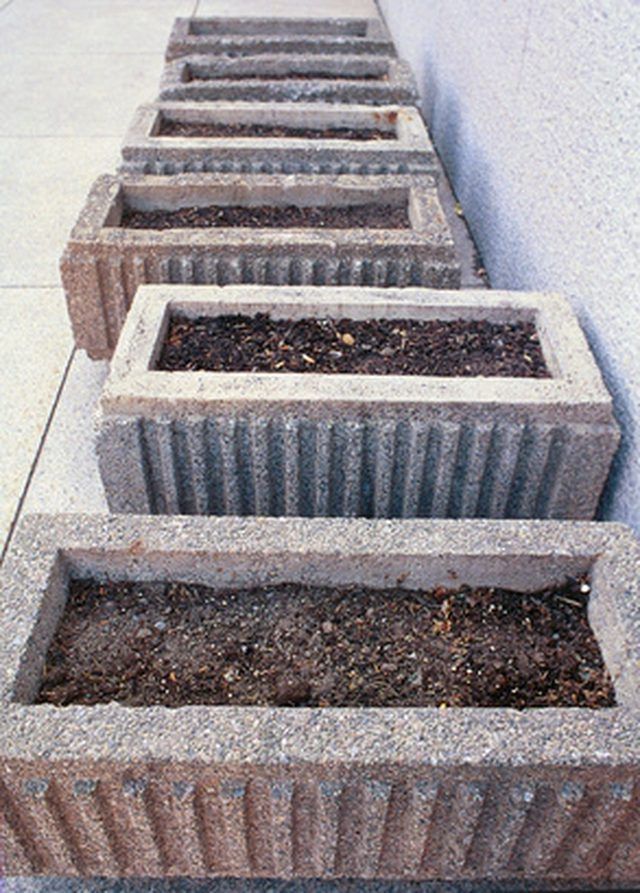
Planters come in all shapes and sizes---what they don't come with is an affordable price tag. Fortunately stylish but affordable planters can be made in a weekend thanks to inexpensive and readily available materials such as ready-mix cement and cardboard boxes. In fact, with a little time, patience and some creativity, anyone can create unique planters that won't break the budget.
Things You'll Need
Heavy-weight cardboard boxes in various sizes
Masking tape
Wheelbarrow
80 lb. bag of ready-mix cement
Water
Garden trowel
Disposable plastic pitcher or bowl
Scrub brush
Drill
Masonry bit
Optional -- 10 oz. bottle of liquid cement tint, 2 gallon plastic bucket
Preparing
Collect your mold materials. Plan to make several planters at one time in an assembly-line fashion as ready-mix cement comes in large quantities.
Decide how large you want your cement planters to be. Collect a variety of heavy-weight cardboard boxes in various shapes and sizes. These boxes will form the mold for your cement planter, so try out combinations, nesting boxes inside each other to find a good fit.
Pair shallow boxes with other shallow boxes and tall boxes with other tall boxes. Consider corrugated cardboard boxes too, as the fluting will leave an attractive pattern on the outside of your cement planter.
Tape the outside seams of the boxes with masking tape for added strength. Remove any tape or loose cardboard from the inside of the largest cardboard box as these will leave impressions in your cement. Have your boxes ready before mixing your cement.
Mixing
Mix your cement. Decide if you want to tint the cement an attractive color or leave it raw. If tinting, mix one 10 oz. container of liquid cement tint with 5 quarts of water in a 2 gallon plastic bucket.
Open an 80 lb. bag of ready-mix cement and pour it into your wheelbarrow. Add the 5 quarts of tinted water to the ready-mix cement and combine thoroughly with a garden trowel.
Mix your ready-mix cement with water until you reach the right consistency. The mixture should be similar to a thick pudding.
Pouring
Start pouring. Grab your first mold set (two nested boxes) and remove the small box from inside the larger box and set the small box aside. Set the large box next to the wheelbarrow.
Scoop up some of the cement mixture with a plastic bowl or pitcher. Pour the cement mixture into the larger box, avoiding the sides of the box. Fill the larger cardboard box until the bottom is covered with a half inch to an inch of cement, depending on the size of your planter.
Pick up the small box and position it inside the larger box, sitting it on the bed of cement within the larger box. Use the plastic bowl or pitcher and scoop up some of the cement mixture. Pour the cement within the space between the walls of the two boxes. Fill the space as deep as you wish to make your planter.
Tap the outsides of the larger box with your trowel to encourage any air bubbles to escape and to settle the cement evenly around the outside of the smaller box.
Make other planters in a similar fashion, using other nesting box combinations and the cement. Work quickly before the cement has a chance to harden. Rinse off your garden trowel and rinse out your wheelbarrow after your molds are filled.
Curing
Allow the cement to cure. Leave the cement planter molds to set overnight for a quick air cure.
Remove the cardboard boxes the following day. Wet the boxes with water to loosen the cardboard and peel it away from the cement. Scrub bits of cardboard from the surface of your cement planters using a scrub brush.
Drill three small drainage holes in the bottom of each planter with a drill and a masonry bit.
Set your planter in a shady location and allow it to cure another five days before adding soil and plants.
Tips & Warnings
You can apply sealant to your cement planter after it has cured to add a shiny gloss to the exterior.