Bulbs
Flower Basics
Flower Beds & Specialty Gardens
Flower Garden
Garden Furniture
Garden Gnomes
Garden Seeds
Garden Sheds
Garden Statues
Garden Tools & Supplies
Gardening Basics
Green & Organic
Groundcovers & Vines
Growing Annuals
Growing Basil
Growing Beans
Growing Berries
Growing Blueberries
Growing Cactus
Growing Corn
Growing Cotton
Growing Edibles
Growing Flowers
Growing Garlic
Growing Grapes
Growing Grass
Growing Herbs
Growing Jasmine
Growing Mint
Growing Mushrooms
Orchids
Growing Peanuts
Growing Perennials
Growing Plants
Growing Rosemary
Growing Roses
Growing Strawberries
Growing Sunflowers
Growing Thyme
Growing Tomatoes
Growing Tulips
Growing Vegetables
Herb Basics
Herb Garden
Indoor Growing
Landscaping Basics
Landscaping Patios
Landscaping Plants
Landscaping Shrubs
Landscaping Trees
Landscaping Walks & Pathways
Lawn Basics
Lawn Maintenance
Lawn Mowers
Lawn Ornaments
Lawn Planting
Lawn Tools
Outdoor Growing
Overall Landscape Planning
Pests, Weeds & Problems
Plant Basics
Rock Garden
Rose Garden
Shrubs
Soil
Specialty Gardens
Trees
Vegetable Garden
Yard Maintenance
How to Repot Croton
How to Repot Croton. Croton is a colorful evergreen shrub. Its foliage is thick and waxy green, with yellow accents. The plant is commonly grown as a house plant, and so needs to be repotted from time to time. Repotting can be a stressful time for house plants, and the croton, especially tends to "pout" or lose foliage after it is placed in a new...
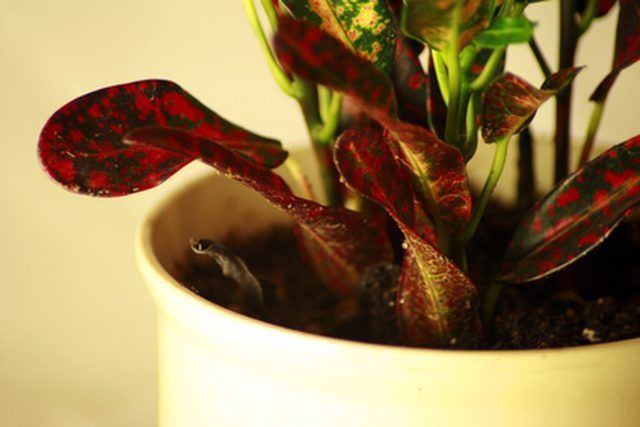
Croton is a colorful evergreen shrub. Its foliage is thick and waxy green, with yellow accents. The plant is commonly grown as a house plant, and so needs to be repotted from time to time. Repotting can be a stressful time for house plants, and the croton, especially tends to "pout" or lose foliage after it is placed in a new container. With appropriate care the plant will rebound from the stress of repotting, but if not given the right attention, the plant may not survive.
Things You'll Need
Croton
Pot
Soil
Scissors
Fertilizer
Ensure that your plant is a good candidate for repotting. A croton should never be replanted unnecessarily. Plants should be replanted annually during the first three years of life. As a mature plant, they should only be repotted as necessary, when the root ball has outgrown its current container.
Get prepared to repot the croton by buying a pot about 2 inches larger in diameter than the current one, and appropriate soil. Croton soil should be placed in a humus-rich soil. Loam-based potting compost is best.
Wait until the plant is actively growing. During this time it is easiest for the plant to reestablish in its new environment.
Supporting the plant by the soil around the stem, lift the plant and turn it upside down. Pull the pot off the top of the roots. You may have to bump the pot against a hard surface a few times to break things lose so that the pot can be removed.
Inspect the roots. They should be light colored and firm.
Trim any roots suffering root rot from the plant. Root rot is caused by overwatering and affected roots will be discolored and squishy, and may have a foul odor.
Cut roots to encourage growth. Cut any roots which grow in a circular pattern around the root mass. Make three or four cuts vertically from the bottom of the root ball up into its center, these should go up into the bottom third of the root mass.
Put a layer of soil into the bottom of the pot. Set the new plant in the pot, and cover the root ball with soil.
Water the pot to settle the soil around the root mass. When appropriately watered a 1/2 inch of space should exist between the surface of the soil and the top rim of the pot.
Wait two to three weeks before fertilizing, then apply a 20-20-20 fertilizer to the plant once a month.


