Bulbs
Flower Basics
Flower Beds & Specialty Gardens
Flower Garden
Garden Furniture
Garden Gnomes
Garden Seeds
Garden Sheds
Garden Statues
Garden Tools & Supplies
Gardening Basics
Green & Organic
Groundcovers & Vines
Growing Annuals
Growing Basil
Growing Beans
Growing Berries
Growing Blueberries
Growing Cactus
Growing Corn
Growing Cotton
Growing Edibles
Growing Flowers
Growing Garlic
Growing Grapes
Growing Grass
Growing Herbs
Growing Jasmine
Growing Mint
Growing Mushrooms
Orchids
Growing Peanuts
Growing Perennials
Growing Plants
Growing Rosemary
Growing Roses
Growing Strawberries
Growing Sunflowers
Growing Thyme
Growing Tomatoes
Growing Tulips
Growing Vegetables
Herb Basics
Herb Garden
Indoor Growing
Landscaping Basics
Landscaping Patios
Landscaping Plants
Landscaping Shrubs
Landscaping Trees
Landscaping Walks & Pathways
Lawn Basics
Lawn Maintenance
Lawn Mowers
Lawn Ornaments
Lawn Planting
Lawn Tools
Outdoor Growing
Overall Landscape Planning
Pests, Weeds & Problems
Plant Basics
Rock Garden
Rose Garden
Shrubs
Soil
Specialty Gardens
Trees
Vegetable Garden
Yard Maintenance
How to Process Oats at Home
How to Process Oats at Home. Homesteaders and small farmers may grow oats on soil with ample sunlight, in both spring and fall for a two-season harvest. Even when grown in small patches, oats processed at home can provide nutrient-rich meals for both humans and animals. For oats, processing includes harvesting, sheaving, shocking, threshing,...
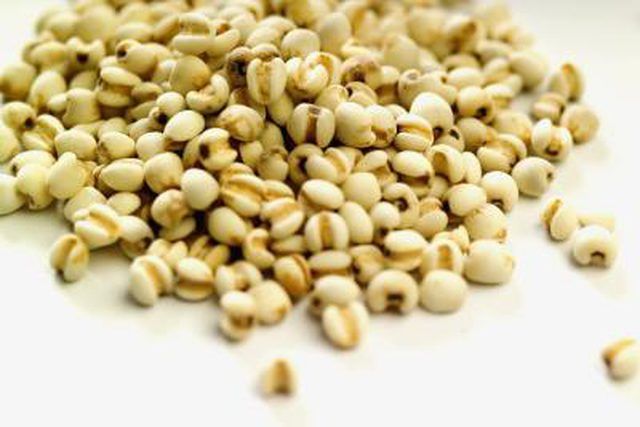
Homesteaders and small farmers may grow oats on soil with ample sunlight, in both spring and fall for a two-season harvest. Even when grown in small patches, oats processed at home can provide nutrient-rich meals for both humans and animals. For oats, processing includes harvesting, sheaving, shocking, threshing, roasting, hulling or milling, and winnowing, if you plan to feed humans. Most animals, except chickens, will eat unhulled oats and straw. Some householders and farmers also grow oats as a cover crop, or "green manure," to nourish and protect the soil during the winter, and harvest and process the remainder in midsummer.
Things You'll Need
Scythe or sickle
Threshing flail
Large, clean sheet
Bushel baskets
Screening or mesh
Burr or roller mill
Oven
Cookie sheet
Mesh storage bin
Wait until oats are mature, about 3 feet high for most varieties, before you begin harvest. Harvest your oats when you expect at least 24 to 48 hours of rain-free weather.
Cut the oat grass stems with the plant heads intact, using a scythe or sickle. You may use the grasses for forage and the cleaned oat heads for human food after you�ve processed the oats. The typical oat head will yield 30 or more grains inside their outside covering, or hull.
Allow the cut oat plants, called oat straw, to cure and dry on the ground for a day or two. Oats retain more moisture when they are growing than many other grain crops and will need more drying time.
Gather the dry oat straw into loose bundles or sheaves. One bundle should be about as much as you can carry easily under one arm. Combine two bundles to form a larger sheaf.
Form five long pieces of oat straw into a bundle. Twist the pieces tightly together to form a rope. Wrap the rope around the middle of the oat bundle and tuck the end under to secure. Repeat for all bundles or sheaves.
Stand the sheaves upright with the bottoms and tops flared out to form shocks. Shocks are long, narrow rows of sheaves running in a north-south direction. This allows maximum air flow for more efficient drying.
Thresh the oat stacks when they are completely dry. Drying oats may take at least two weeks. Spread out a large clean sheet on a level patch of dry ground. Unbind the oat sheaf onto the sheet. Flail, or hit, the straw over and over until the oat grains separate from the stems.
Separate the oat grains, sill in their hard hulls, from the straw. Store the straw for animal feed or mulch.
Loosen the oat hulls in the oven if you plan to eat the oats. Roast the oats on a cookie sheet in an oven at 180 degrees for 90 minutes. The hull will puff up and begin to break away from the edible oat groat inside.
Use a burr mill or a roller mill to carefully grind the oat hull away from the groat. Collect everything, groat and hulls, into bushel baskets and cover with screening or mesh until you are ready to winnow.
Wait for a dry, breezy day to separate, or winnow, your oats and hulls. Spread out a sheet on a flat, dry ground. Bring out your bushel baskets.
Winnow the oats. Toss your hands full of the oats and chaff into the air. The breeze will carry away the hulls and the heavier grains will fall onto the sheet.
Collect your oats. Store in a cool, dry place in a bin made of fine mesh to allow air to circulate.
Tips & Warnings
You can feed yourself and your animals by planting two crops of oats each year. Plant in the spring and harvest in the fall for human consumption. Plant in the fall and allow the animals to forage and feed on the growing oats as a pasture cover crop.
Mice and rats will find and eat your harvest if you wait too long to thresh and winnow. Plan your post-harvest activities to free up your time to get your oats into safe storage quickly.


