Bulbs
Flower Basics
Flower Beds & Specialty Gardens
Flower Garden
Garden Furniture
Garden Gnomes
Garden Seeds
Garden Sheds
Garden Statues
Garden Tools & Supplies
Gardening Basics
Green & Organic
Groundcovers & Vines
Growing Annuals
Growing Basil
Growing Beans
Growing Berries
Growing Blueberries
Growing Cactus
Growing Corn
Growing Cotton
Growing Edibles
Growing Flowers
Growing Garlic
Growing Grapes
Growing Grass
Growing Herbs
Growing Jasmine
Growing Mint
Growing Mushrooms
Orchids
Growing Peanuts
Growing Perennials
Growing Plants
Growing Rosemary
Growing Roses
Growing Strawberries
Growing Sunflowers
Growing Thyme
Growing Tomatoes
Growing Tulips
Growing Vegetables
Herb Basics
Herb Garden
Indoor Growing
Landscaping Basics
Landscaping Patios
Landscaping Plants
Landscaping Shrubs
Landscaping Trees
Landscaping Walks & Pathways
Lawn Basics
Lawn Maintenance
Lawn Mowers
Lawn Ornaments
Lawn Planting
Lawn Tools
Outdoor Growing
Overall Landscape Planning
Pests, Weeds & Problems
Plant Basics
Rock Garden
Rose Garden
Shrubs
Soil
Specialty Gardens
Trees
Vegetable Garden
Yard Maintenance
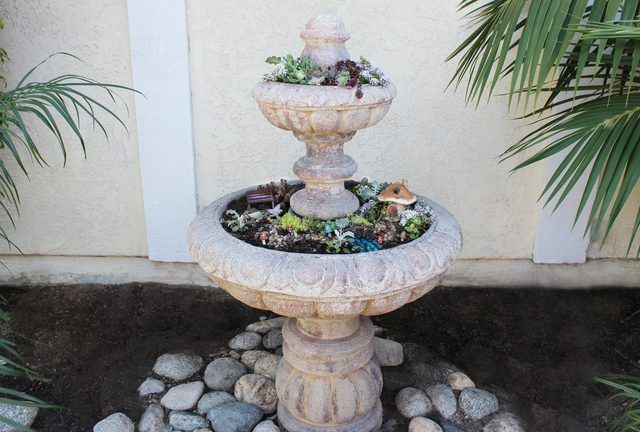
How to Convert a Fountain Into a Garden Planter
How to Convert a Fountain Into a Garden Planter. While fountains can serve as mesmerizing water displays, they can also be an expensive eyesore on your water bill and less than ideal for those living in drought conditions. A more energy-efficient option is to turn your fountain into a beautiful garden planter. Transform it into a piece of art by...
While fountains can serve as mesmerizing water displays, they can also be an expensive eyesore on your water bill and less than ideal for those living in drought conditions. A more energy-efficient option is to turn your fountain into a beautiful garden planter. Transform it into a piece of art by adding details like a mini-village and other adornments like decorative pebbles.
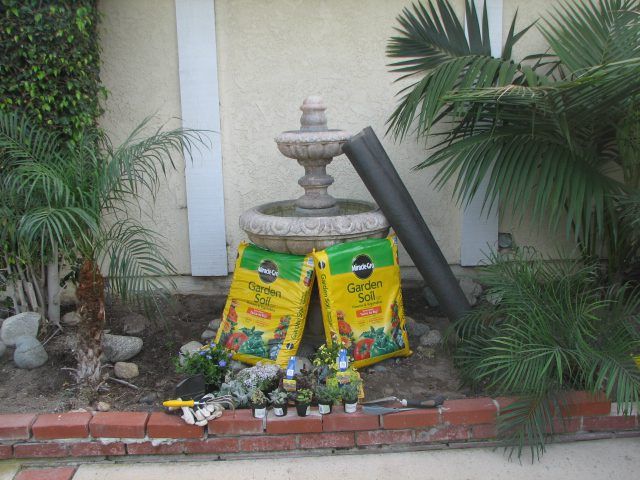
Make sure you have the following supplies:
Fountain
Polypropylene landscape fabric, 1 roll
Scissors
Potting soil
Trowel
Plants/flowers
Miniature village pieces (optional)
Pebbles and glass beads (optional)
Micro LED lights (optional)
Note: When choosing the fountain, choose one that has a basin that is at least several inches deep to accommodate shallow-rooted plants.
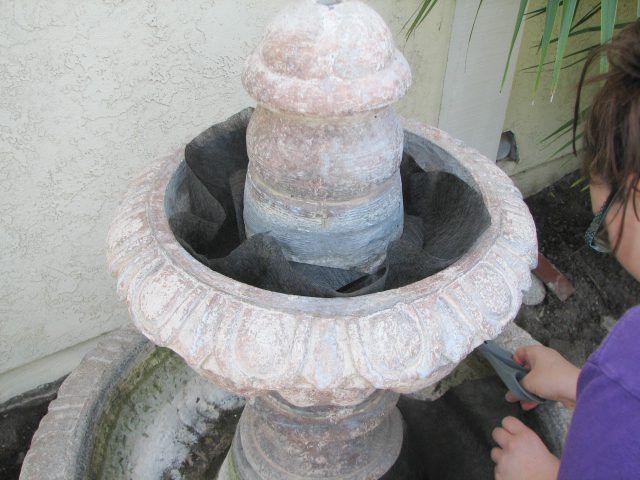
If you have a water supply leading to the fountain, make sure to turn it off first. Clear the fountain of any debris or water. Measure the circumference of the fountain basins and cut strips of landscape fabric to fit around them. It's best to add a couple of inches to the length and trim where necessary rather than being too short on a cut. Place the fabric strips into the basins. Doing this will cover any holes, preventing dirt from getting to the piping or motor, if you have either. This will also make it easier to turn the fountain back to its normal function, if you choose to do so at a later date. Trim away any fabric that hangs over the edge of the basin.
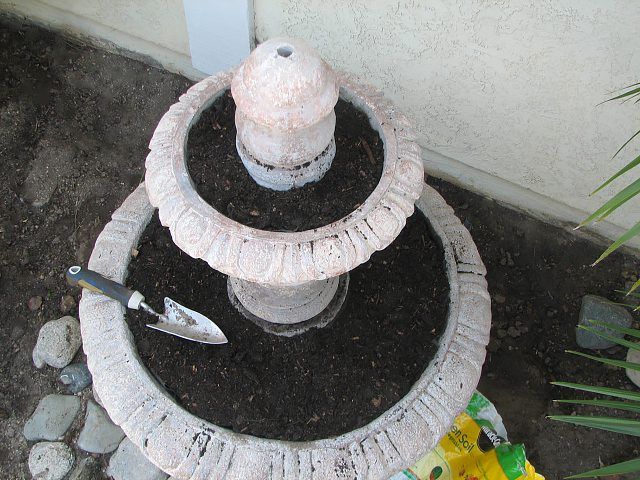
Now that you have landscape fabric covering any holes, fill the basins about two-thirds full with potting soil.
Tip: Since there are no drainage holes, you can choose to add a layer of pebbles before adding the soil to create better drainage.
Plan where your plants will be placed. If you decide to build a little village, set those pieces up first and plan the plants around the village. Cut strips of landscape fabric to make pathways to various parts of the village (as shown). These strips of fabric will keep the pebbles from getting lost in the soil when you create the pebble pathways later. If you don't build a village, plan the spacing of plants, designating the larger plants for the larger basin and the smaller plants for the smaller basin. Vary the color, texture and height of the plants in your layout for visual interest.
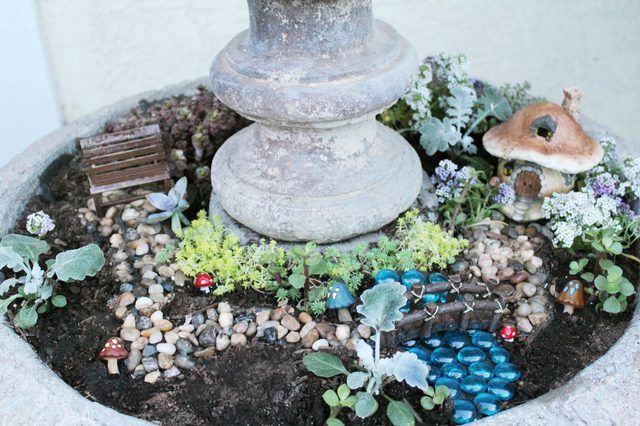
When choosing what type of plants to use, try sticking to plants with shallow roots since your fountain basin is likely shallow. Succulents and cacti are an ideal choice and tend not to grow too much or need much maintenance. They also fare better than most plants in heavy amounts of sun. For a little bit of color, try using alyssum flowers -- their size is also in scale with the village.
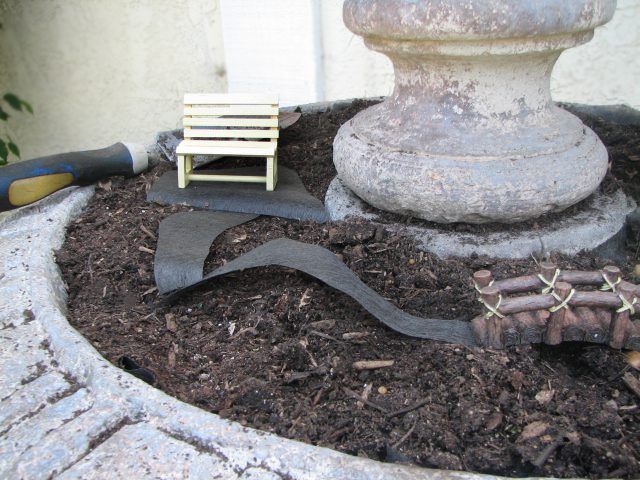
Loosen the roots of each plant and place them in the soil, wiggling each plant to settle it into place. Once you've arranged all of your plants/flowers, fill in the areas around the plant roots with more soil. If you opted to create a village, place pebbles on top of the strips of landscape fabric to create pebble walkways. Place any additional adornments around the village such as colorful mini mushrooms and blue glass beads under the bridge to create a babbling brook effect. Water the plants once you're done planting the flowers and placing the village pieces.
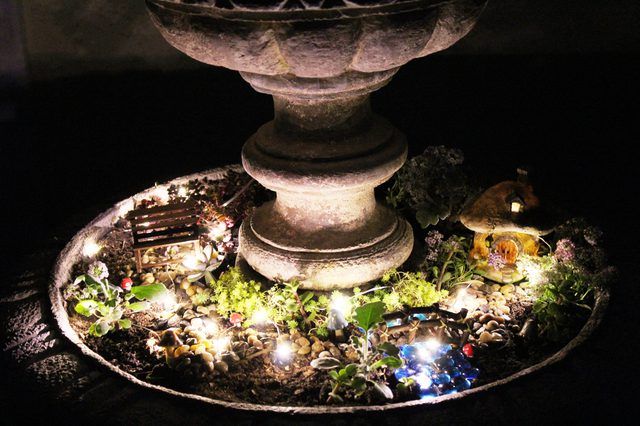
You can also add micro LED lights to give the planter an impressive nighttime look. Space the lights evenly around the perimeter of the basins. If you planted a mini-village, place lights along the walkways and around any houses to make it look like someone is home.


