Bulbs
Flower Basics
Flower Beds & Specialty Gardens
Flower Garden
Garden Furniture
Garden Gnomes
Garden Seeds
Garden Sheds
Garden Statues
Garden Tools & Supplies
Gardening Basics
Green & Organic
Groundcovers & Vines
Growing Annuals
Growing Basil
Growing Beans
Growing Berries
Growing Blueberries
Growing Cactus
Growing Corn
Growing Cotton
Growing Edibles
Growing Flowers
Growing Garlic
Growing Grapes
Growing Grass
Growing Herbs
Growing Jasmine
Growing Mint
Growing Mushrooms
Orchids
Growing Peanuts
Growing Perennials
Growing Plants
Growing Rosemary
Growing Roses
Growing Strawberries
Growing Sunflowers
Growing Thyme
Growing Tomatoes
Growing Tulips
Growing Vegetables
Herb Basics
Herb Garden
Indoor Growing
Landscaping Basics
Landscaping Patios
Landscaping Plants
Landscaping Shrubs
Landscaping Trees
Landscaping Walks & Pathways
Lawn Basics
Lawn Maintenance
Lawn Mowers
Lawn Ornaments
Lawn Planting
Lawn Tools
Outdoor Growing
Overall Landscape Planning
Pests, Weeds & Problems
Plant Basics
Rock Garden
Rose Garden
Shrubs
Soil
Specialty Gardens
Trees
Vegetable Garden
Yard Maintenance
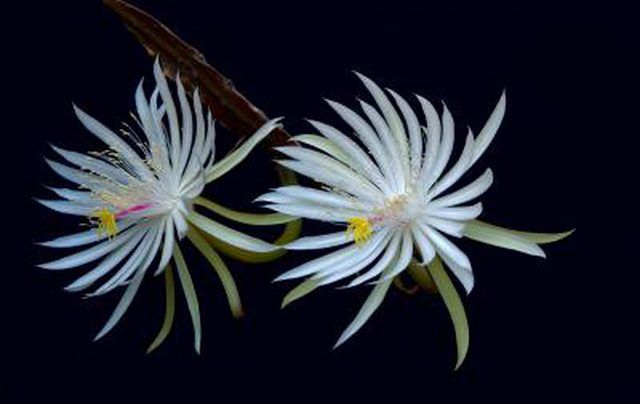
How to Grow Epiphyllum Oxypetalum
How to Grow Epiphyllum Oxypetalum. At first glance, Epiphyllum oxypetalum, commonly called queen of the night, Dutchman's pipe or orchid cactus, may offer little by way of aesthetics, with its base of round green stems that sprout into long, thin, flat vines. If grown against a wall or trellis, these bendable vines will wind their way up vertical...
At first glance, Epiphyllum oxypetalum, commonly called queen of the night, Dutchman's pipe or orchid cactus, may offer little by way of aesthetics, with its base of round green stems that sprout into long, thin, flat vines. If grown against a wall or trellis, these bendable vines will wind their way up vertical structures. If you're willing to correctly care for this succulent plant, you'll get your reward when it produces midnight-blooming, fragrant, cup-shaped flowers in summer. This tropical plant grows outdoors in in U.S. Department of Agriculture plant hardiness zones 10 through 11. Queen of the night requires fast-draining soil, partial shade and dry conditions.
Things You'll Need
Watering can
10-10-10 water-soluble fertilizer
Pruning shears or pruning snips
70 percent isopropyl rubbing alcohol
Bowl
Plastic wrap
Neem oil
Spray bottle
Yellow sticky traps
1/4-inch wooden dowel
Clothespin
Pot
Fast-draining potting soil
Garden hose
Pressure tank sprayer
Step 1
Place the potted queen of the night in a room that maintains a temperature above 50 degrees Fahrenheit. Position the plant in a spot that receives bright, indirect sunlight for at least six hours per day. Keep the plant away from heating or cooling vents to prevent damage from fluctuating temperatures.
Step 2
Water the queen of the night when the soil becomes dry to a depth of at least 3 inches during the spring and summer while the plant shows active growth. Pour water from a watering can directly into the pot's soil, avoiding wetting the plant's leaves and stems as much as possible. Fill the pot full of water. Wait for the water to drain down into the soil. Fill the pot one to two more times with water, waiting between each re-fill for the soil to absorb the water completely, to evenly moisten the soil. Never water the plant so frequently that the soil stays soggy or waterlogged.
Step 3
Increase watering frequency during the queen of the night's blooming period to keep the soil constantly moist but not soggy. Water when the plant when the top surface of the soil begins to dry. Reduce watering in fall and winter when the plant's growth slows. Wait until the soil dries completely before watering the plant. Never wait until the plant's foliage begins to wilt before watering during this dormant period.
Step 4
Mix 1/2 teaspoon of 10-10-10 water-soluble fertilizer with 1 gallon water in a watering can. Fill the pot full of the fertilizer solution, pouring the liquid slowly to avoid splashing the queen of the night every three weeks during its active growth period in the spring and summer. Decrease applications to once every four weeks in fall and winter as plant growth slows. Apply the fertilizer at a rate of 1/4 teaspoon per 1 gallon water during this dormant period. Once the queen of the night starts growing again, increase the amount of fertilizer and frequency.
Step 5
Cut off any broken, damaged or diseased stems whenever you see them with a pair of pruning shears or pruning snips. Soak the tool's blades for five minutes in a solution consisting equal quantities 70 percent isopropyl alcohol and water before use. Let the tools air dry before making any cuts. Position each pruning cut 1/4 inch above the stem's nearest joint or base. Sterilize the tool again after each cut into diseased plant tissue to avoid spreading the disease.
Step 6
Remove flowers once they close and appear wilted and droopy. Cut through the flower stem 1/4 inch above the point where it join's with the plant's main stem. Leave the spent flowers on the plant if you want seed pods to develop. Harvest the seed pods in the late summer or early fall once they mature and become dry. Cut through the pod's stem 1/4 inch above the main plant stem it connects to.
Step 7
Watch the tops and undersides of the plant's foliage and stems for white, waxy, fuzzy mealybugs, the rounded, cotton-covered shells of scale and thin webbing from spider mites. Look for white or gray whiteflies buzzing in clouds around the plant or clustering on the undersides of leaves. Check the plant's foliage for signs of shriveling, brown spotting or speckling, signs of these pests' feeding. Cover the top of the pot with plastic wrap to prevent water from reaching the soil. Wash the pests off the foliage with a steady stream of water from a watering can, shower head or faucet. Remove the plastic wrap.
Step 8
Mix 2 tablespoons of neem oil with 1 gallon of water in a spray bottle or tank sprayer if rinsing didn't get rid of the mealybugs, scale, whiteflies or spider mites. Pump the handle up and down to pressurize the sprayer, if needed. Spray an even coat of the solution over the entire plant, stopping before the solution drips off the foliage. Apply the neem oil in the morning or late afternoon when the pests remain active and the whiteflies land for feeding. Shake the bottle or sprayer every few minutes to prevent the oil from separating. Apply the neem oil every seven to 14 days until you no longer see any pests.
Step 9
Monitor the soil's surface for black, mosquitolike flies, known as fungus gnats. Place a yellow sticky trap horizontally on the soil's surface. Insert a 1/4 inch dowel vertically in the soil's surface. Hold a sticky trap against the dowel at the gnats' level, facing the sticky side towards the plant. Clip the trap to the dowel with two clothespins, one on the top and one on the bottom. Replace the traps once per week or when they become covered with dead gnats.
Step 10
Transplant the queen of the night only once its root system becomes so crowded that it begins to negatively affect growth. Slide the plant carefully from the pot. Cut off any broken, damaged, dead, shriveled or discolored, mushy roots from the plant. Select a new pot with a diameter 1 inch larger than current pot. Fill the new pot one-third full of a fast-draining mix composed of potting soil and compost. Tamp the medium down. Place the plant in the center of the pot. Fill the pot with soil to 1 inch below its top with soil, tamping it down around the root ball. Water the plant thoroughly after repotting.
Step 1
Water the queen of the night when the soil dries to a depth of 2 to 3 inches. Apply 1 inch of water from a garden hose to moisten the soil to a depth of 12 inches. Keep the water off the plant's foliage as much as possible to prevent rot or mold from forming. Water in the morning to allow any wet foliage to dry before nightfall. Never overwater to the point that the soil becomes soggy or waterlogged. Reduce watering to when the top 4 to 6 inches of soil become dry in fall and winter when plant growth slows. Never withhold water so long that the plant begins to wilt.
Step 2
Increase watering during the summer when the plant produces buds. Apply water when the top 1 inch of soil begins to dry, keeping the soil evenly moist but never soggy.
Step 3
Fertilize the plant every three weeks during the spring and summer active growing season with a solution of 1/2 teaspoon 10-10-10 water-soluble fertilizer. Reduce fertilizer applications to one per month at a rate of 1/4 teaspoon 10-10-10 fertilizer per 1 gallon of water.
Step 4
Cut off broken or damaged stems as soon as you notice them. Soak the pruning shears equal parts part 70 percent isopropyl alcohol and tap water for five minutes. Let the tool air dry before use. Cut through the broken or damaged stem 1/4 inch above a stem joint or base.
Step 5
Remove flowers when they close and wilt. Cut through the flower stem as close to the main plant stem as possible without injuring the plant. Leave the flower heads on the plant if you wish the queen of the night to form seeds.
Step 6
Check the plant's leaves and stems each time you water or weekly for the presence of gray or white whiteflies, round cottony scale insects, oval waxy white to brown mealybugs or webbing from miniscule spider mites. Look for brown stippling or shriveling on the foliage, signs of the pests' feeding. Wash the pests off the foliage with a steady stream of water, timing the rinsing as close to the regular watering time as possible to avoid waterlogging the soil. Mix 2 tablespoons neem oil with 1 gallon water in a spray bottle or tank sprayer if the pests are still there after several attempts at rinsing them off. Pressurize the container, if applicable. Spray the solution over the plant's foliage, coating both top and bottom surfaces as evenly as possible. Stop spraying before the solution begins to drip from the plant. Repeat the application every seven to 14 days to eradicate the pests.


