Bulbs
Flower Basics
Flower Beds & Specialty Gardens
Flower Garden
Garden Furniture
Garden Gnomes
Garden Seeds
Garden Sheds
Garden Statues
Garden Tools & Supplies
Gardening Basics
Green & Organic
Groundcovers & Vines
Growing Annuals
Growing Basil
Growing Beans
Growing Berries
Growing Blueberries
Growing Cactus
Growing Corn
Growing Cotton
Growing Edibles
Growing Flowers
Growing Garlic
Growing Grapes
Growing Grass
Growing Herbs
Growing Jasmine
Growing Mint
Growing Mushrooms
Orchids
Growing Peanuts
Growing Perennials
Growing Plants
Growing Rosemary
Growing Roses
Growing Strawberries
Growing Sunflowers
Growing Thyme
Growing Tomatoes
Growing Tulips
Growing Vegetables
Herb Basics
Herb Garden
Indoor Growing
Landscaping Basics
Landscaping Patios
Landscaping Plants
Landscaping Shrubs
Landscaping Trees
Landscaping Walks & Pathways
Lawn Basics
Lawn Maintenance
Lawn Mowers
Lawn Ornaments
Lawn Planting
Lawn Tools
Outdoor Growing
Overall Landscape Planning
Pests, Weeds & Problems
Plant Basics
Rock Garden
Rose Garden
Shrubs
Soil
Specialty Gardens
Trees
Vegetable Garden
Yard Maintenance
How to Protect a Garden With Bird Netting
Protect your garden by covering your plants with bird netting. It's ideal for berry bushes, grapes, fruit trees and anything else the birds attack.
Birds can do a lot of damage to your garden, especially as your crops become ready to harvest. Even if you are an avid bird lover, it doesn�t mean that you want to let them devour your fruit and veggies. Bird netting is a helpful way of keeping out the pests without doing them any harm. It�s not hard to use and it will ensure that there�s plenty of produce left for you and your family.
Drape Trees and Smaller Plants
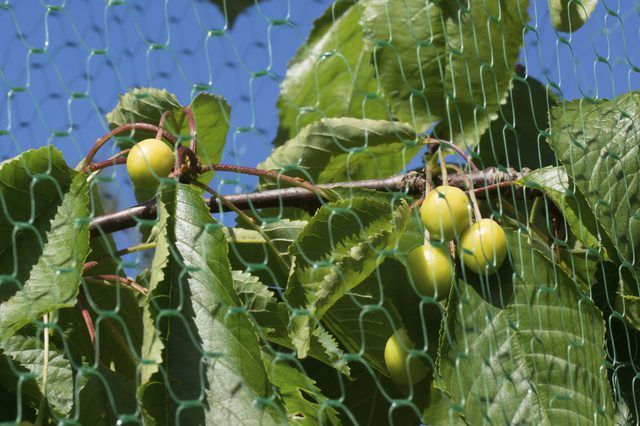
Bird netting can be draped over individual fruit trees and other plants, including a section of plants growing near one another, to protect them. The netting creates an effective physical barrier that the birds can�t get past. Unlike scarecrows and some other methods for protecting your garden from birds, this one works even if the birds get used to it.
Warning
Never use the very thin type of bird netting, as birds can get trapped in it and may die as a result.
Tip
Netting that is folded or rolled carefully when it is fully dry can last for many years, saving you the expense of needing to replace it annually. Netting that is UV-protected will last longer than netting that is not.
Cover your crops well before harvest so that the birds never have a chance to start eating them. It's also wise to install the netting before flowering occurs, or as the plant begins to form flowers buds, so the installations of the net won't damage the small forming fruits. Some birds will also peck at small developing fruits. Unroll or unfold the bird netting and drape it over the plant or plants to be protected. A long piece of netting can be used to protect an entire row of plants. Fasten the netting securely to the ground on all sides using ground stakes, ensuring there are no gaps anywhere that a bird could slip through. If you are placing the netting over a tree, tie the netting loosely all the way around the trunk so that birds can�t find a way in from underneath.
Build an Enclosure
Building an enclosure is the best way to protect some types of plants, such as blueberries, that don�t lend themselves to being draped. Ideally the enclosure you build will be high enough to cover the entire plant and to allow you to walk inside for harvest.
Things You'll Need
Clamshell-type post hole digger
Pressure-treated four-by-four posts, 10 feet long
Level
Concrete
Shovel
Empty 2-liter soda bottles
11 or 12 gauge wire
Wire cutters
Fence staples
Hammer
Bricks, minimum of 12
Bird netting
Step 1: Dig a Post Hole
Dig a 2.5-foot-deep post hole at each corner of the area you want to cover with netting. A clamshell post hole digger works well for this. The posts should be spaced anywhere from 15 to 18 feet apart, so if you are covering a large area dig extra post holes to ensure the distance between posts is no more than 18 feet.
Step 2: Set the Post
Set a pressure-treated 10-foot four-by-four post upright in each hole. Use a level on the vertical side of each post to ensure that it is straight.
Step 3: Fill the Hole
Fill the hole around the post with concrete or with the dirt you previously removed. If using dirt, pack it down as you go so that it is solid and securely holds the post in place.
Step 4: Cover the Wooden Post Tops
Cut an old 2-liter soda bottle in half and place the bottom section over the top of one fence post to protect the netting from the rough wood. Repeat this for all fence posts.
Step 5: Cut Netting Support Wires
Cut a piece of 11 or 12 gauge wire long enough to reach from one corner post to the other along one side of the enclosure, but make the wire 16 feet longer than it needs to be to reach the corner posts. Repeat for the other side, and then do the same for the distance across the ends of the enclosure. Also cut two wires long enough to cross the enclosure in the form of an X, from one corner diagonally to the other.Add 16 feet to the length of each of these wires as well before you cut them.
Step 6: Staple the Wires
Pound fence staples on top of each fence post to loosely hold the wires in place. Allow 8 feet of wire to extend past the post on each end; this is why the wires needed an extra 16 feet of length.
Step 7: Attach Brick Weights
Tie a brick to each of the hanging wires. This will hold the wires tightly across the top of the posts despite temperature fluctuations.
Step 8: Place the Netting
Lay the bird netting over the top of the entire frame of posts and wire. Adjust it until it is even on all sides. It must reach the ground all the way around to be effective.
Step 9: Secure the Netting to the Ground
Secure the bottom of the bird netting on all sides with ground stakes or with weights such as rocks or heavy pieces of wood.
Tip
If you have to use more than one piece of netting to cover an area, overlap the netting by about 6 inches and secure the entire length of the overlapped edges so that there is no place a bird can sneak through or become entangled.
For additional information on protection gardens and plants from birds, see "How to Protect Seeds From Birds."


