Bulbs
Flower Basics
Flower Beds & Specialty Gardens
Flower Garden
Garden Furniture
Garden Gnomes
Garden Seeds
Garden Sheds
Garden Statues
Garden Tools & Supplies
Gardening Basics
Green & Organic
Groundcovers & Vines
Growing Annuals
Growing Basil
Growing Beans
Growing Berries
Growing Blueberries
Growing Cactus
Growing Corn
Growing Cotton
Growing Edibles
Growing Flowers
Growing Garlic
Growing Grapes
Growing Grass
Growing Herbs
Growing Jasmine
Growing Mint
Growing Mushrooms
Orchids
Growing Peanuts
Growing Perennials
Growing Plants
Growing Rosemary
Growing Roses
Growing Strawberries
Growing Sunflowers
Growing Thyme
Growing Tomatoes
Growing Tulips
Growing Vegetables
Herb Basics
Herb Garden
Indoor Growing
Landscaping Basics
Landscaping Patios
Landscaping Plants
Landscaping Shrubs
Landscaping Trees
Landscaping Walks & Pathways
Lawn Basics
Lawn Maintenance
Lawn Mowers
Lawn Ornaments
Lawn Planting
Lawn Tools
Outdoor Growing
Overall Landscape Planning
Pests, Weeds & Problems
Plant Basics
Rock Garden
Rose Garden
Shrubs
Soil
Specialty Gardens
Trees
Vegetable Garden
Yard Maintenance
How to Calculate Acreage of an odd Shaped Plot of Land
How to Calculate Acreage of an odd Shaped Plot of Land. Aside from legal descriptions, which are Greek to most, there are some relatively easy methods of estimating the area (square feet/acreage) of an irregularly shaped piece of land. This article outlines a method of determining the acreage of such a plot. Rectangular areas are quite easy to...
Aside from legal descriptions, which are Greek to most, there are some relatively easy methods of estimating the area (square feet/acreage) of an irregularly shaped piece of land. This article outlines a method of determining the acreage of such a plot. Rectangular areas are quite easy to estimate by simply multiplying the length times the width, dimensions in feet, and dividing the result by 43560, the square feet in one acre. If an acre were an exact square then each side would be very close to 208.71 feet (208 ft. 5 1/2 inches). With just a little effort you can find the area of a weird shape to an amazing degree of accuracy. You don't have to be a RLS (registered land surveyor) to do this. The land plot used for example is an actual odd ball shaped opening in the woods and the method outlined was performed by a single person. Whether or not you can do this job alone depends on the type of measuring tools you decide to use.
Things You'll Need
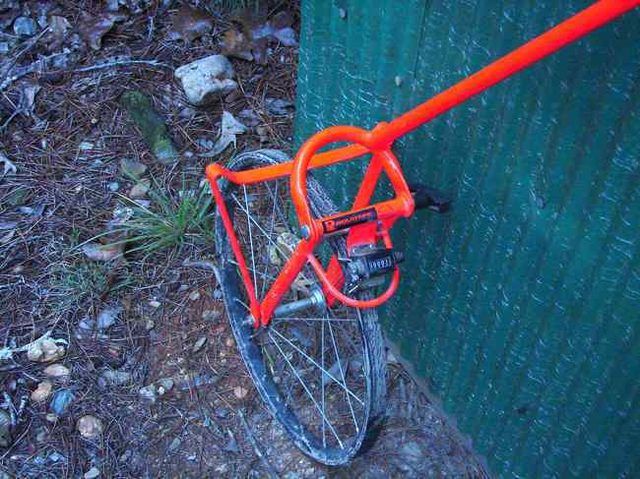
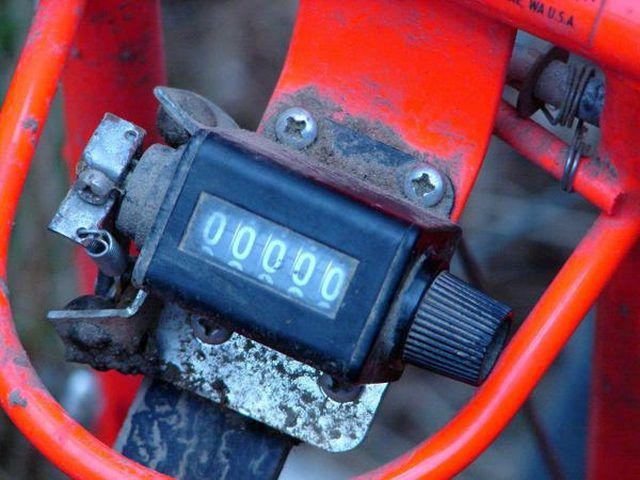
For the easiest way of getting measurements and for doing the work alone either rent or purchase a "Rolotape". This is measuring wheel with a handle and a counter that will click and register feet as
If you measure distances manually then you will need a 100ft. or 200ft. (or longer) steel tape measure. Two people will be required for using these tapes.
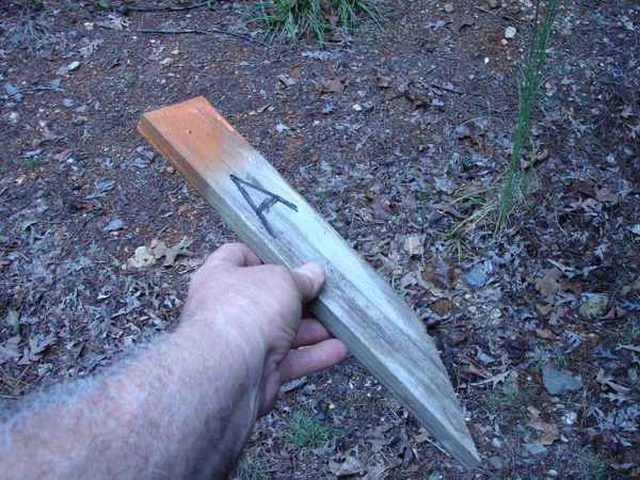
A claw hammer or 4lb. hammer
A quantity of pointed wooden stakes. The number you need depends on the area you will be measuring and how close together you place them.
A permanent marker
A can of orange spray paint
A note book or field book
A couple of lead pencils (do not use ink pens)
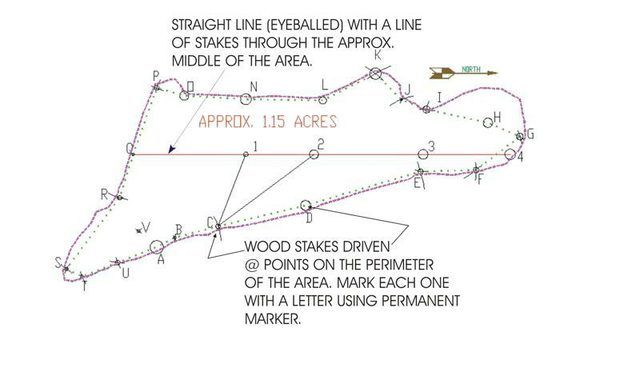
Spray paint the tops of your stakes so that they will be easy to see when you are measuring from one to another. Drive each stake at a change in plot shape, corner, a tree, edge of a ditch or etc.. For long straight edges on an area being measured, your stakes may be set farther apart. Do not set your stakes so that the distance between them is greater than the length of your measuring tape if you are using one. For these "long" straight distances set more than one stake. These can be "eyeballed" to put them in a relatively straight line. In the example shown in the drawing stakes were driven around the perimeter at convenient locations and each stake was marked with a letter, starting with 'A' and so forth.
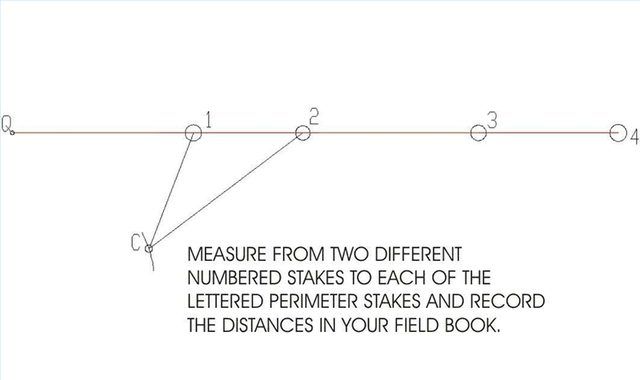
After driving all of the perimeter stakes and marking them with an identifying letter, drive a line of stakes, again eyeballing them in a straight line, down through the approx. center of the plot. These can be marked with numbers 1, 2 and so forth. Use one of the perimeter stakes as a starting point for placing the numbered stakes. The straight line in the example drawing begins at the 'Q" stake which is on the south end of that plot. The next one is 2 and on through 4. You now have the basis for gathering dimensions of the land area. Beginning with the 'A' stake, measure to 'B'. If you are using the "Rolatape" you can just roll off the distance from stake to stake. Reset the counter to zero for measuring between the next two stakes.
The dotted green line on the drawing is a line that connects the points where the stakes were driven. The magenta line is a line that approximates the real, more irregular, shape of the land plot. Additional dimensions can be taken from your driven, marked stakes to other edges, features, etc. and these added with notes and sketches in your field book. All of the information can be introduced to your layout drawing during it's development.
If you are using a steel tape then be sure that you and your helper pull the tape very tight so your accuracy will not suffer. Be sure to try and hold the tape level as you are measuring. Recording the distance in your note book or field book simply write A-B = 20' or whatever the dimension is. This method of tabulation for all distances is fine, but also make a sketch of the land shape and about where each stake is placed. This will help weed out errors and confusion when the information is reduced to a drawing.
Place as many notes and small sketches in your field book as you need. You will find that you never have too much information when you begin to transfer it onto a layout drawing. Usually you have to return for a few key missing dimensions. After measuring between all stakes on the perimeter, measure also between the numbered stakes that you placed through the center of the plot.
Take two measurements to each of the letter marked perimeter stakes, one from one of the numbered stakes and another from a separate numbered stake. This will form a triangle as indicated in the sketch. This method will give you the information to locate each perimeter stake in relation to the numbered stakes that were placed in a straight line. Each of the recorded distances will be a radius used to locate the points where the stakes are located. Being redundant here, take more dimensions than you think you will possibly need since it is rare to get every dimension you need without going back for additional measurements. Trust me on this one! This same method can be used to locate objects such as trees, fence corners, structures that do not even have a stake driven next to them.
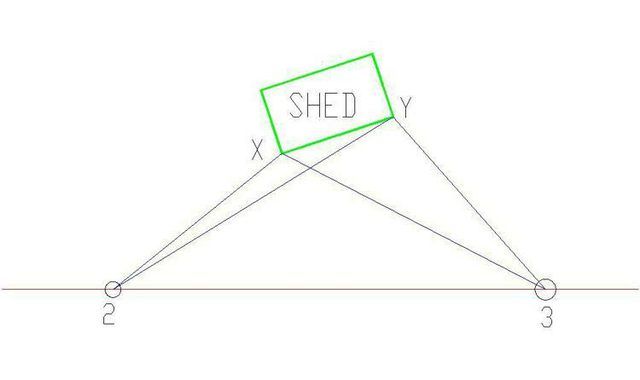
Objects such as sheds, houses or other structures can be located in a similar manner. First measure the outside dimensions of the structure and make a sketch of it in your field book or note book. Then measure to a corner from two different numbered (or lettered) stakes. Now measure to another corner from two other stakes (these can be the same two as used for the first corner. After you have all of the stake locations dimensioned you should automatically have the perimeter of your traverse (distance around all of your points). Plot areas are usually larger than this laid out traverse so you will have to do some interpolation of the actual estimated final area and perimeter.
Now that you have all of your dimensional data on hand it is time to reduce the information to a usable drawing. All of the measurements you took are to be used as radii to swing arcs with either a drawing compass, if you are making a manual drawing, or with a graphics program such as "AutoCad". Many freeware or shareware drawing programs are available so you might investigate these. It will be much easier to layout your land shape using a freebie graphics program than to make a manual drawing.
If you have a friend that is a draftsman or engineer you can probably get them to reduce your data and turn it into a drawing. If you decide to do this layout manually you will need a compass, a pencil with a sharp point, some graph paper - say 11 x 17 - and a plastic architectural scale. Set a scale using the greatest dimensions of the plot as a basis so that the drawing will fit on your paper and the scale coincides with the size of the graph paper squares.
Whichever method is used - manual or computer drawing - begin with the straight line data from the stakes placed through the center of the plot. Mark each stake point on the straight line by swinging a radius which is the distance from one point to the next. To locate a perimeter point, swing a radius (distance from your field notes) from each of two numbered stake points that dimensions were taken from. Where the two arcs cross - intersect - is the location of the lettered stake on the perimeter. Continue this procedure until all of the perimeter points have been located. Join all of your points with lines. In a drawing program these lines can be made into a "polyline", a line that is basically an endless loop that encloses the area you want to determine.
If you are using "AutoCad" or another computer drawing program, it will give you the area and the perimeter that lies within the enclosed loop. Divide the square footage of the enclosed area by 43560. This will give you the number of acres. The accuracy of the number is dependent on how good of a job you did in taking field dimensions and in laying out those dimensions. If you are working manually the area can be determined by counting the squares on the graph paper. Partial squares can be estimated.
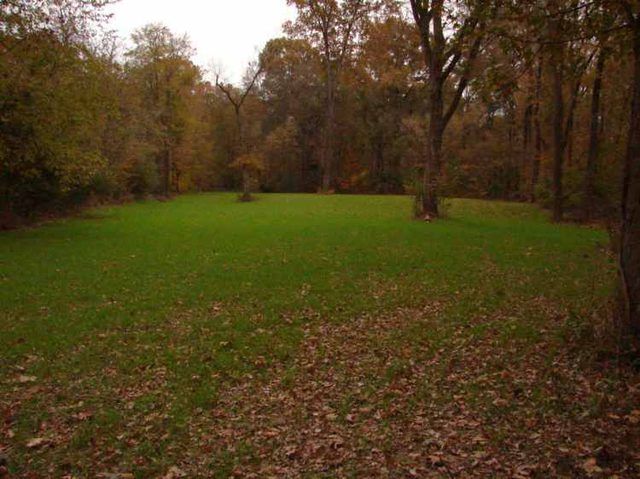
The acreage of the plot shown in the photo and the example drawing is about 1.15, approx. 50,300 square feet. The work to determine this was about four hours in the field and about two or three hours at the computer. One trip had to be made back to the plot to get a few more key dimensions that were required for clarification.


