Bulbs
Flower Basics
Flower Beds & Specialty Gardens
Flower Garden
Garden Furniture
Garden Gnomes
Garden Seeds
Garden Sheds
Garden Statues
Garden Tools & Supplies
Gardening Basics
Green & Organic
Groundcovers & Vines
Growing Annuals
Growing Basil
Growing Beans
Growing Berries
Growing Blueberries
Growing Cactus
Growing Corn
Growing Cotton
Growing Edibles
Growing Flowers
Growing Garlic
Growing Grapes
Growing Grass
Growing Herbs
Growing Jasmine
Growing Mint
Growing Mushrooms
Orchids
Growing Peanuts
Growing Perennials
Growing Plants
Growing Rosemary
Growing Roses
Growing Strawberries
Growing Sunflowers
Growing Thyme
Growing Tomatoes
Growing Tulips
Growing Vegetables
Herb Basics
Herb Garden
Indoor Growing
Landscaping Basics
Landscaping Patios
Landscaping Plants
Landscaping Shrubs
Landscaping Trees
Landscaping Walks & Pathways
Lawn Basics
Lawn Maintenance
Lawn Mowers
Lawn Ornaments
Lawn Planting
Lawn Tools
Outdoor Growing
Overall Landscape Planning
Pests, Weeds & Problems
Plant Basics
Rock Garden
Rose Garden
Shrubs
Soil
Specialty Gardens
Trees
Vegetable Garden
Yard Maintenance
How to Create a Garden Path for Reflexology
Wander through your garden, lower stress and stimulate your acupuncture meridians at the same time. A pebble path delivers wellness through your feet.
The bottoms of your feet hold the key to increased vigor for the rest of your body. That's the premise behind reflexology -- an alternative therapy in which pressure applied to points on the feet, hands and ears has a beneficial effect on internal organs and general health. A reflexology path is a reason to go barefoot in your garden. Build your own path to wellness with material that's stimulating and bumpy to walk on, and let your handiwork provide a free foot massage every time you take a stroll.
Kick Your Shoes Off
Think about alternative materials for a walkway through your shrubs and flowers that will wake up the soles of your feet. Choose what's at hand, or what you'd like underfoot, and make your own feel-good garden path. Suitable surfaces that put pressure on reflexology points as you step on them include:
Smooth gravel
Straw
Coarse sand
Bark
Softened, packed-down pine cones
Pine needles
Grasses and moss
Polished, recycled glass.
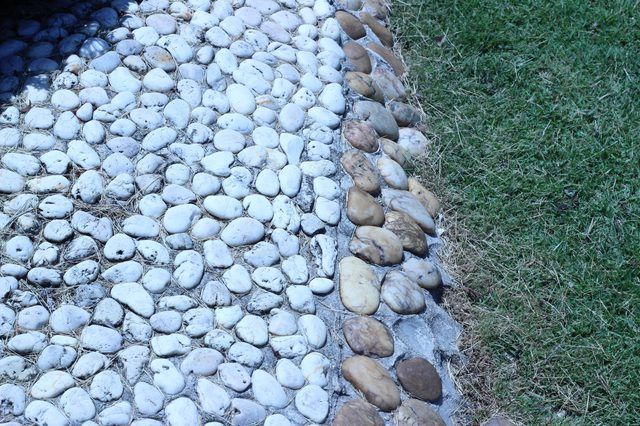
But the most reliable way to ensure a good massage each time you kick your shoes off is a mortared path of pebbles or river rocks, designed for beauty as well as therapy, in a mosaic pattern.
Frugal, Fabulous Footpath
Create your own path of smooth stones, pebbles or river rocks as a permanent addition to the peony beds and rose arbors. Working with mortar is messy and time-sensitive, but the end result is a toe-tempting, attractive walk. Select the smooth rocks or pebbles in advance, and experiment with laying them out so you can work confidently and quickly once you pour mortar into the framed, excavated pathway. Find stones at a beach, river or stone yard -- don't pillage a natural site or take stones from public, state or national parks or from private land unless you obtain permission. You need stones with smooth, not sharp or jagged, top sides, and a mosaic pattern requires at least two colors. Try your design in a frame filled with sand first so you can count the stones and estimate what you need for the entire path.
Things You'll Need
Two garden hoses, or string and wood stakes
Fine-mist hose nozzle
Yardstick or tape measure
Colored spray paint
Flat-edge shovel
Carpenter's level
2-by-6 boards
Wood stakes and hammer or mallet
Wood screws and screwdriver
Saw
Type S mortar
Container or wheelbarrow for mixing mortar
Reflexology rocks -- river rocks or smooth stones
Crushed rock or gravel
Plate or manual compactor
Weed barrier cloth (optional)
Safety mask, respirator, protective gloves, goggles
Trowel
Whisk broom or steel brush
Muriatic acid
Step 1: Mark your path.
Define the garden path -- a meandering stream or a straight shot through the flowerbeds -- with a long garden hose on either side or strings and wood stakes. A path should be at least 18 inches to 2 feet wide for a comfortable single-file stroll. Spray lines of colored paint along the path borders so your outlines will remain clear but won't be in the way as you work. Remove the string and stakes or snaked hoses.
Step 2: Dig a trench.
Make it about 5 1/2 inches deep for the length of the path. Stomp the bed of the path down, and lay a board on the soil. Place a carpenter's level on the board to be sure the trench is even.
Tip
If you have a lot of invasive roots in your garden, place a layer of weed cloth on the compacted dirt. You're building a path with concrete so this isn't strictly necessary.
Step 3: Create the form.
Line the sides of the path with 2-by-6 boards on edge, checking that they are level. The tops of the boards should be even with the top of the trench. Hammer wood stakes into the ground every 4 feet or so on the outside of the boards, and screw the boards to the stakes. Cut three boards to fit across the path trench between the side frames. These are for defining your work sections as you pour the mortar and set the stones.
Step 4: Pour a gravel base.
Dump roughly 2 1/2 inches of gravel into the trench, and even it with a plate vibrator or manual compactor. Tap the two short boards in place in a section of the walkway -- 2 to 4 feet is a good working area -- and mix the mortar. Just tap the boards in the path to the level of the gravel -- you'll be moving them as your path progresses and they only there to contain the mortar, which will start to harden as you work.
Tip
Mortar sets up less quickly in shady and cool conditions. Don't work in direct sun or on a hot day, and give yourself time to set the pebbles or river rocks properly.
Warning
Use a safety mask when working with mortar dust. Work in a well-ventilated area when mixing dry mortar, and wear protective gloves because wet mortar is tough on skin.
Step 5: Add mortar to the frame.
Shovel enough mortar into the first framed area to fill it to about 1/2 inch below the height of the framing boards. Smooth the mortar to even it -- you can use a piece of lumber on its edge for this.
Step 6: Make it pretty.
Spray your preselected stones with water so the mortar sticks to them better. Following your pattern, set the stones into the wet mortar about halfway to three-quarters -- the tops of the stones remain exposed to provide the bumpy finish you want on the path. Your path should be mostly stones, not visible mortar. Trowel away any excess mortar displaced by the stones.
Step 7: Mist the set stones.
Direct a fine mist from a garden hose over the set stones to wash away loose mortar, and gently whisk stubborn clumps of mortar away. Work with a light touch so you don't scour away the mortar base or dislodge any stones from your pattern.
Step 8: Mortar the next section.
Place a board across the path to section off your next work area. Shovel more mortar into that new frame, and remove the cross board between the just-completed section and the new mortared area. Continue setting the stones and working toward the end of the path.
Step 9: Sit and set.
It takes about a week for the mortar to cure. Once the path is dry and hard, clean any cement film off the stones with dilute muriatic acid, following safety instructions for using the highly corrosive liquid. Either plant ground cover up to and over the retaining boards at either end and along the sides of the path, or remove them carefully with a hammer and chisel before landscaping to the edges of the path.
Warning
Muriatic acid is toxic and corrosive. Always use a respirator, gloves and safety goggles when handling it. Work in a well-ventilated area. Wear old, protective clothing in case of any airborne spray. Keep children and pets far away from your work area, and dispose of any remaining acid responsibly.
Step 10: Take a walk on the wild side.
Spray the path really well with water to neutralize any acid residue. To be extra-cautious, allow it to dry and give it a final water spray before using. Then kick your shoes off and test-drive it.
Tip
See How to Build a Path in the Garden Using Sand for another foot-friendly walkway idea.


