Bulbs
Flower Basics
Flower Beds & Specialty Gardens
Flower Garden
Garden Furniture
Garden Gnomes
Garden Seeds
Garden Sheds
Garden Statues
Garden Tools & Supplies
Gardening Basics
Green & Organic
Groundcovers & Vines
Growing Annuals
Growing Basil
Growing Beans
Growing Berries
Growing Blueberries
Growing Cactus
Growing Corn
Growing Cotton
Growing Edibles
Growing Flowers
Growing Garlic
Growing Grapes
Growing Grass
Growing Herbs
Growing Jasmine
Growing Mint
Growing Mushrooms
Orchids
Growing Peanuts
Growing Perennials
Growing Plants
Growing Rosemary
Growing Roses
Growing Strawberries
Growing Sunflowers
Growing Thyme
Growing Tomatoes
Growing Tulips
Growing Vegetables
Herb Basics
Herb Garden
Indoor Growing
Landscaping Basics
Landscaping Patios
Landscaping Plants
Landscaping Shrubs
Landscaping Trees
Landscaping Walks & Pathways
Lawn Basics
Lawn Maintenance
Lawn Mowers
Lawn Ornaments
Lawn Planting
Lawn Tools
Outdoor Growing
Overall Landscape Planning
Pests, Weeds & Problems
Plant Basics
Rock Garden
Rose Garden
Shrubs
Soil
Specialty Gardens
Trees
Vegetable Garden
Yard Maintenance
How to Build a Small Storage Shed
How to Build a Small Storage Shed. Storage sheds are perfect places to keep garden tools, supplies, lawn mowers and other outdoor equipment. An 8- by 4-foot shed is easy to build and is durable. Most people with basic carpentry skills can complete it in two or three days. Lock the double doors with a hasp and padlock for access and security. Add...
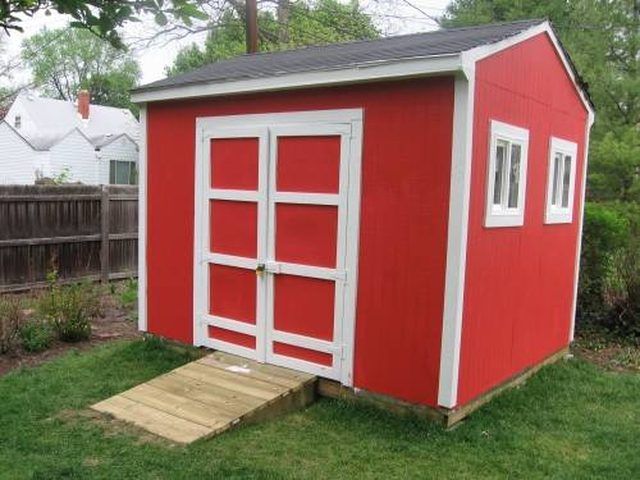
Storage sheds are perfect places to keep garden tools, supplies, lawn mowers and other outdoor equipment. An 8- by 4-foot shed is easy to build and is durable. Most people with basic carpentry skills can complete it in two or three days. Lock the double doors with a hasp and padlock for access and security. Add shelving to customize the shed to your needs.
Things You'll Need
2- x 4- x 8-inch lumber
2- x 4- x 8-inch pressure-treated lumber (3)
1- x 4-inch lumber
1- x 3-inch lumber
1- x 2-inch lumber
4- x 8-foot T-11 sheet siding
1/2-inch CDX plywood or sheathing grade OSB
3-inch framing nails
10D 1 1/2-inch connector nails
1-inch roofing nails
1 1/2-inch nails
2-inch finish nails
2 1/2-inch power nails
Green or yellow power loads
8- x 4-foot concrete slab
Exterior caulk tubes
Roofing tar in caulk tubes
Rolled roofing material
Aluminum roof edging
30-pound felt tar paper
Simpson ridge rafter connectors (14)
Simpson H1 rafter connectors (14)
Dryer-duct vent covers (2)
Power nail gun
Circular saw
Rafter square
Tape measure
Caulk gun
4-foot level
Stapler
Pencil
Sheet-metal shears
Ladder
Safety glasses
Dust mask
Hearing protection
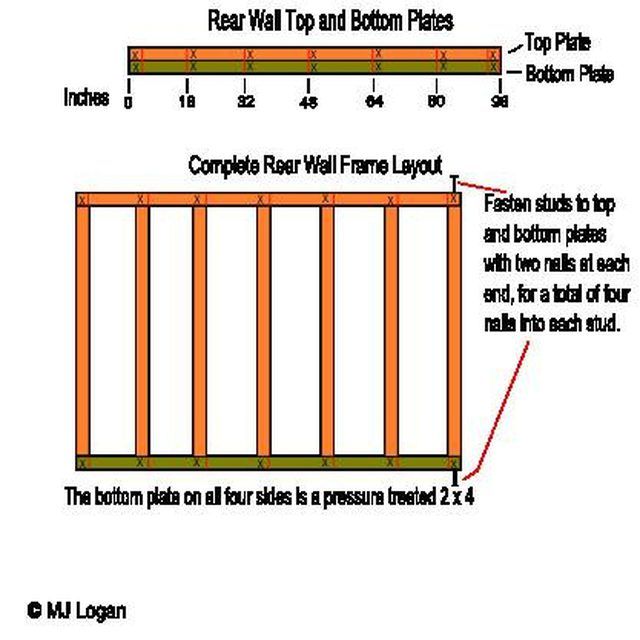
Lay out and build the rear wall 8 feet wide. Use pressure-treated 2x4 lumber for the bottom plate. Lay the two 8-foot 2x4s side by side on edge and mark stud positions every 16 inches on center. Cut the seven studs to 84 1/2 inches, lay in place between the top and bottom plates, and nail in place. Lay the wall behind the concrete slab.
Lay out and build the two sides. Use pressure-treated 2x4 lumber for the bottom plates. Cut the four top and bottom plates to 41 inches long and the eight studs to 84 1/2 inches. Lay out the wall, marking for studs 16 inches on center. Place the studs between the top and bottom plates, align and nail in place using framing nails. Lay the framed sides on either end of the slab.

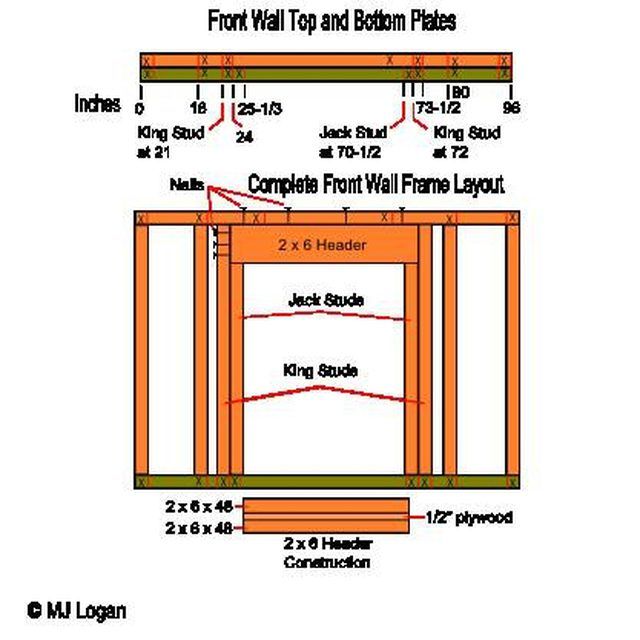
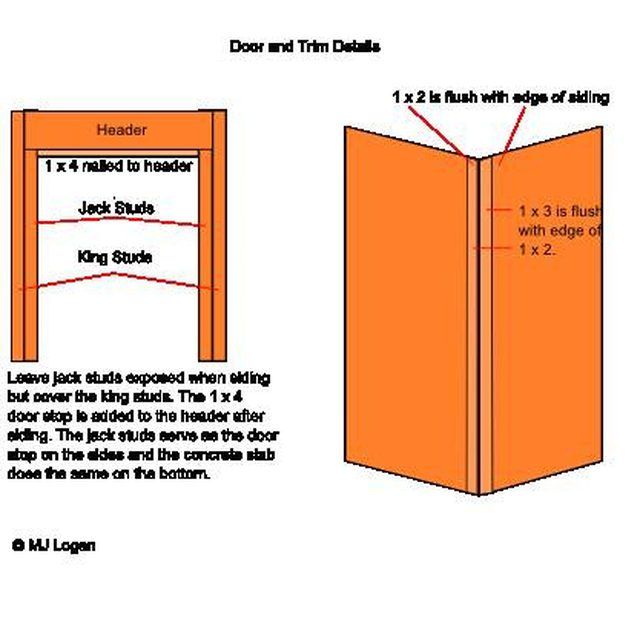
Lay out and build the front wall. Use pressure-treated 2x4 lumber for the bottom plate. Center the doorway on the wall between the two 79-inch jack studs placed 48 inches apart. Construct the 2x6 header from two pieces of 2x6x48 lumber and one piece of 1/2 x 5 1/2 x 48 plywood. Nail the header in place through the king studs with six nails on each end and to the top plate with eight more nails. See illustration for front wall details.
Cut one 4-foot-long and one 8-foot-long piece of tar paper. Fold each in half lengthwise, then cut along the creases for a total of four pieces. Lay a 1/2-inch-wide bead of roofing tar around the perimeter of the slab an inch from the edge, leaving a 48-inch gap for the doorway in front.
Lay one 8-foot length of tar paper on the rear outside of the slab. Four inches of tar paper lay on the slab, the rest hangs off the slab. Stand the rear wall up on the slab and brace with two 1x4 pieces of lumber. Square with the edges of the slab and use the level to make it plumb. Nail the bottom plate to the concrete with the power nail gun, one nail between every other stud.
Lift the tar paper up flat against the studs and staple in place.
Repeat Steps 5 and 6 for the two sides, using the shorter tar paper and shooting three power nails into the concrete to hold them in place. Add the front of the shed in the same fashion, with the last sheet of tar paper and four power nails.
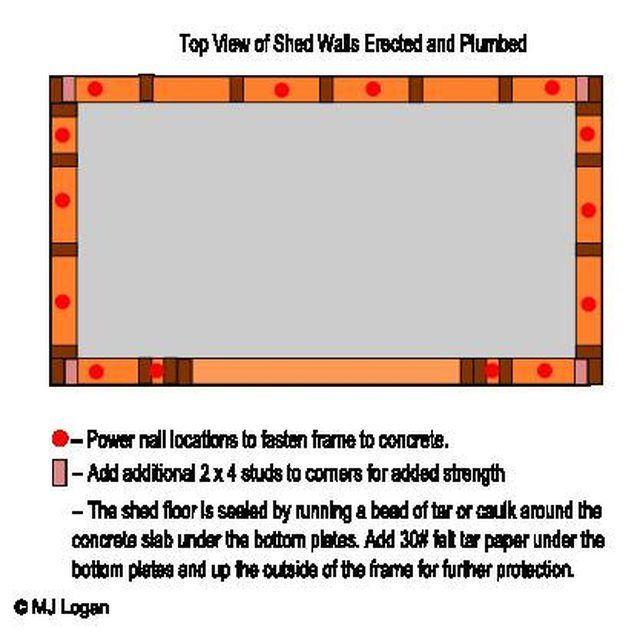
Add four additional 2x4 studs to the corners as shown. Use the level to ensure that the walls are plumb in all directions. Make any adjustments before continuing with the roof framing. Brace the walls on all four sides with 1x4 pieces of lumber so that they stay plumb. Nail the corners together, driving nails through the side-wall studs into the front- and rear-wall studs.
Framing the roof
Cut additional top plates for the four walls so they overlap. The two end walls will have top plates 48 inches long that overlap the front and back walls. The front- and back-wall top plates will be 89 inches long. Make final adjustments to the walls and nail the top plates in place with two nails every 12 inches.
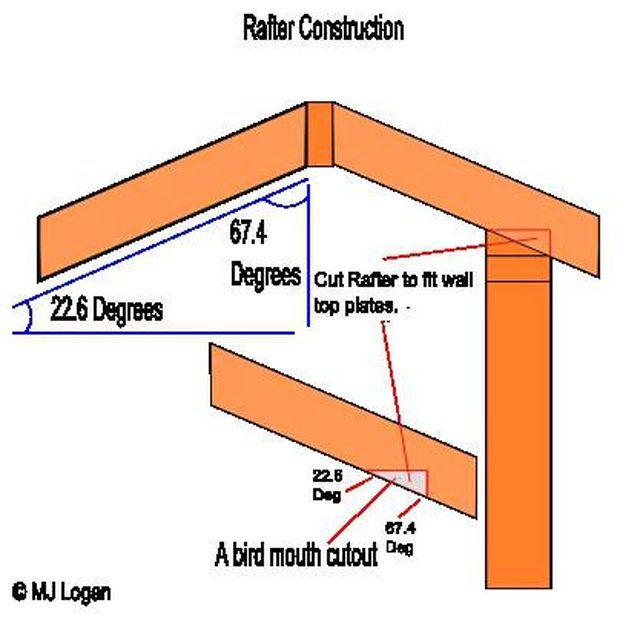
Cut the 14 rafters for a 5/12 roof pitch with a 6-inch roof overhang using a ridge rafter. The length of each rafter will be 31 3/16 inches. The angle at the ridge rafter (top of roof) will be 67.4 degrees. The angle to cut on the opposite end is 22.6 degrees. Cut a bird's mouth where the rafters join the wall top plates. See illustration.
Cut two supports from the scrap 2x4 blocks at 6 1/8 inches. Stand these on the side framing in the center and temporarily nail in place. Cut one 8-foot 2x4 and lay it on edge on the two blocks, tacking it in place. This is the ridge rafter.
Connect each rafter to the ridge rafter using ridge-rafter connectors and 10D 1 1/2-inch nails. The rafters are spaced 16 inches on center. Connect each rafter to the wall framing with an H1 connector and 10D 1 1/2-inch nails.
Sheathing the shed
Lay a single sheet of T11 siding against one end of the shed. If you kept the shed plumb, it should line up perfectly. Use blocks to hold it off the ground but overhanging the concrete slightly. Mark the sheet cutting at the top of the wall frame. Remove the sheet and cut straight across the top. Run a 1/2-inch bead of caulk around the sheet 3/4 inch from the edge. Put the sheet back in place and nail to the side of the shed. Do the same for the other end.
Measure the remaining roof height. Use this measurement to mark and cut a piece of T11 siding. Lay this piece against the outside rafters, cut edge up and mark it along the top edge of the rafters. Remove it and cut off the two triangles. Run a 1/4-inch bead of caulk around the edges an inch in from the edge. Add a 1/8-inch bead along the bottom edge. Place the cut piece against the rafters, align and nail in place. Wipe away any caulk that squeezes out along the bottom edge. Do this step for both ends.
Measure and cut two pieces of T11 sheathing for the back of the shed the same as for the sides. Caulk around the edges, put in place and nail. Before putting the second piece in place, add a 1/8-inch bead of caulk along the edge of the first piece to be butted up against the edge of the second piece. Wipe away any caulk that squeezes out.
Measure and cut two pieces of T11 for the front of the shed. These pieces measure from the side of the shed to the far side of the king studs. Do not cover the jack studs with this siding. Caulk around the edges and nail in place. Cut one additional piece for over the door, caulk and nail in place.
Measure and cut two pieces of plywood to 8 feet by 32 inches. Lay one piece on the rafters flush with the ends. The top ridge will be slightly past the end of the rafter, but when two pieces are placed, leave a 1/8-inch gap. Nail both pieces in place to the rafters.
Use a hand saw to cut through the 2x4 bottom plate in the door opening. Cut the board on both sides flush with the jack studs and remove it. This 2x4 kept the door aligned and is no longer needed.
Roofing the shed
Lay aluminum edging along the roof edges and nail in place with roofing nails. Cut the pieces to length with sheet-metal shears.
Cut a sheet of tar paper slightly more than 8 feet long. Lay along the bottom edge of the roof and staple in place. Do the same for the other side. Cut a third piece and lay over the peak of the roof with equal portions on both sides of the peak. The third piece should overlap the first two pieces.
Cut a piece of rolled roofing to 8 feet, 4 inches. Turn it upside down and place it on the front roof edge with the granulated side closest to the roof edge. Nail in place. Do the same for the back side of the roof.
Cut and lay a third and fourth piece of roofing, this time right-side up, with the granulated side closest to the roof edge. Nail in place but do not nail below the chalked nail line. Cut additional pieces of roofing and go up the roof in this manner. Do the same for the back side of the roof.
Cut one 8-foot length of roofing, then cut in half down along the edge of the granulation. Drape this piece over the roof peak and nail in place on both sides of the roof with two rows of nails on each side. Cover each nail hole completely with a dollop of tar and smooth with a plastic disposable putty knife.
With a roofing knife, trim the overhanging edges of roofing back to the aluminum edging.
Adding doors
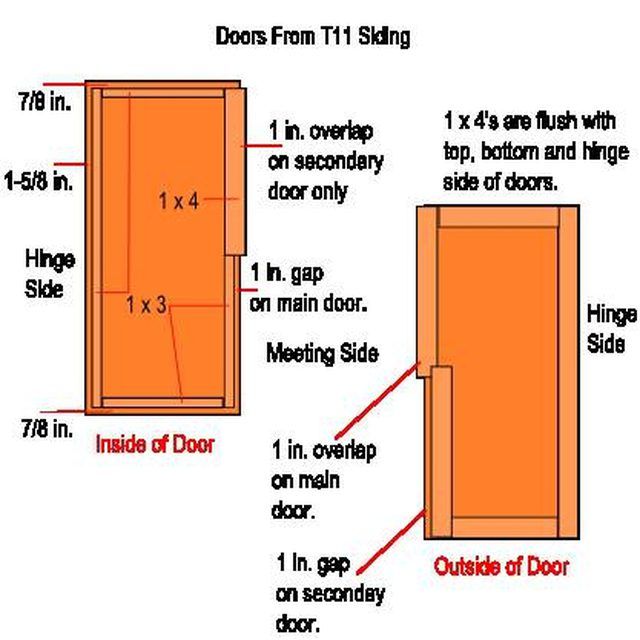
Measure the final door opening and cut a piece of T11 to size, then cut it in half lengthwise. Keep the cuts straight and use a straight edge if necessary.
Measure and cut a piece of 1x4 lumber to use as a door stop at the top of the rough door opening. Flush to the edge of the header and nail in place. The jack studs will serve as door stops on the sides.
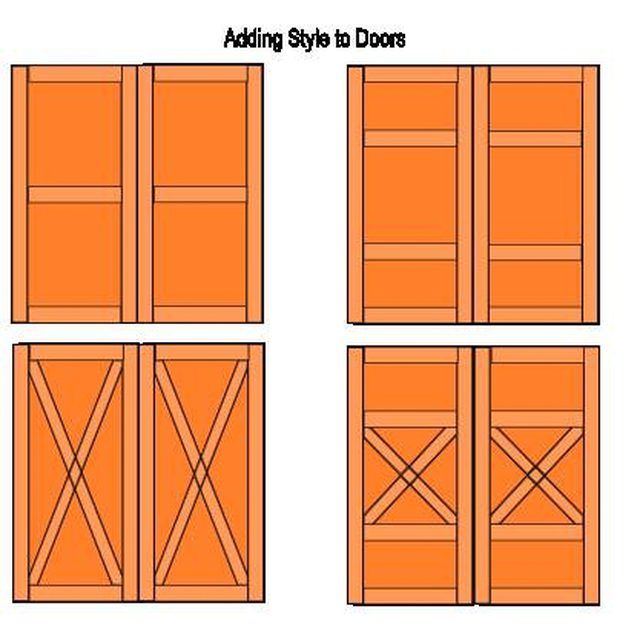
Measure and cut pieces of 1x3 lumber to stiffen the doors along all four edges. See the illustration for placement to measure and cut accordingly. Measure and cut pieces of 1x4 lumber to trim the outside edges of the doors on all sides. If desired, additional pieces can be added for a different look.
Attach four hinges to each door. Set a door in the opening with the bottom resting on two 1/16-inch shims. Have a helper hold the second door in place to make sure both doors fit right. Screw the hinges into the frame of the shed on both doors.
Add a handle, hasp and padlock to lock to the doors. A second heavy-duty bolt on the inside will keep the second door secure unless you need to open it.
Final touches
Measure and cut a piece of 1x4 lumber for fascia and nail to the exposed ends of the rafters. Use the long scraps of plywood cut from the roof to cut two pieces of soffet to place under the rafters. Cut 3-inch vent holes in the gable ends and install dryer-duct vent covers over them.
Measure and cut 1x3 and 1x2 lumber pieces to trim the corners. Run a 1/4-inch bead of caulk down both sides of the corner and where the two pieces of siding meet. Flush a 1x2 piece with the corner of the shed and nail in place. Flush a 1x3 piece with the 1x2 piece and nail in place. Repeat for all four corners.
Give the entire shed a coat of exterior-grade primer paint and two coats of exterior-grade enamel or latex paint. You can also use stain and sealer.
Add L brackets and boards to make shelving. The attic space over the rafters can be used for longer storage items, but don't overload them.
Install lighting and outlets inside to complete the shed before moving all your tools and supplies inside.
Tips & Warnings
Many localities require a building permit before you build a structure like this.
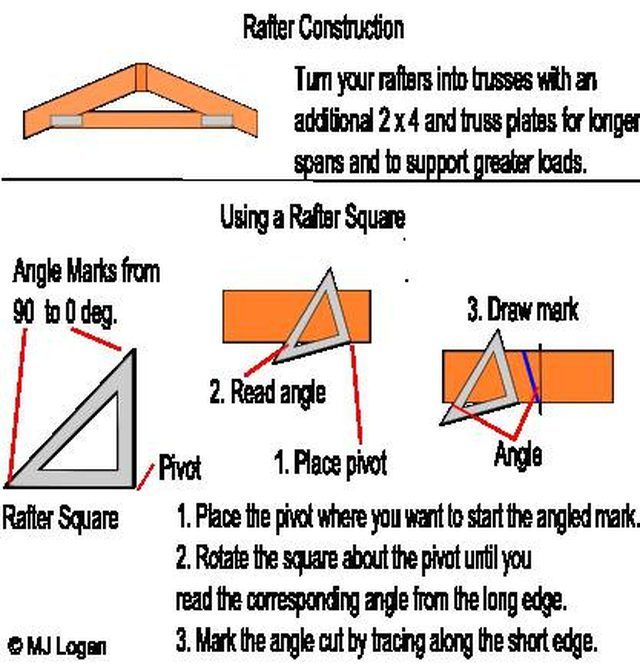
This project is for an 8x4 shed, but you can make it any size you want. Just draw it out and use the basics shown here. Constructing the rafters might be intimidating, but it is simple geometry at work. For spans greater than 4 feet, add horizontal pieces cut to fit underneath the rafters, creating your own trusses. Use truss-type mending plates to join them.
Rafter squares are often called carpenter's squares. They speed the measurement of angles from zero to 90 degrees. Place the pivot point at the point you want to start the mark. Rotate the square until you read the angle off the long edge of the square. Make your mark along the edge of the square adjacent to the pivot point. See the illustration for clarity.
After cutting the T11 siding, place the cut edge at the bottom of the wall so imperfections in the cut will not be as apparent.
Seal all siding joints with caulk, especially at the bottom around the slab.
A piece of rubber garage-door seal tacked onto the bottom of each door will help keep rain out.
Cutting the rafters can be a challenge. It is a good idea to start the bird-mouth cuts with a circular saw and stop short. Then finish with a regular hand saw or jig saw so you don't have to overcut and weaken the rafters. This is especially important in areas that receive significant snowfalls.
Here's a tip for cutting rafters: You can make an angle cut greater than 45 degrees on a miter saw by reversing the piece and setting the saw for the complementing angle. For example, if the angle you need is 67 degrees, the cutoff would be 23 degrees. So flip the board, set the angle at 23 and cut. The result will be 67 degrees on the work piece and 23 on the waste piece.
For long perfect cuts on plywood or siding, use a fence. You can buy a circular saw fence for long cuts or make one yourself. Use the factory edge of a 6-inch by 8-foot by 3/4-inch piece of plywood for long cuts on plywood or siding. Just clamp it to the piece you're cutting after adding or subtracting for the saw foot.
You might consider cutting the siding 3 1/2 inches short and using pressure-treated 1x4 lumber around the bottom edge to prevent rot. Wait a month or so for it to dry before you paint or stain it.
Wear the appropriate safety gear--safety glasses at all times, a dust mask when cutting and hearing protection when using the power nail gun as the blank charges can be extremely loud.
Cutting angles with a circular saw is a little tricky. Keep a good grip on the saw at all times and clamp your work down so it doesn't move.
An experienced carpenter could complete this job alone, but he'd appreciate a helper. Get someone to help you work on this, especially when raising the side framing, working on the roof framing and installing the doors. You'll finish safer and easier and get the job done faster.
Don't skip securing the framed walls with braces during construction. This is a safety measure as much as a construction technique. The bracing keeps the walls from falling on you should you bump them by accident.


