Bulbs
Flower Basics
Flower Beds & Specialty Gardens
Flower Garden
Garden Furniture
Garden Gnomes
Garden Seeds
Garden Sheds
Garden Statues
Garden Tools & Supplies
Gardening Basics
Green & Organic
Groundcovers & Vines
Growing Annuals
Growing Basil
Growing Beans
Growing Berries
Growing Blueberries
Growing Cactus
Growing Corn
Growing Cotton
Growing Edibles
Growing Flowers
Growing Garlic
Growing Grapes
Growing Grass
Growing Herbs
Growing Jasmine
Growing Mint
Growing Mushrooms
Orchids
Growing Peanuts
Growing Perennials
Growing Plants
Growing Rosemary
Growing Roses
Growing Strawberries
Growing Sunflowers
Growing Thyme
Growing Tomatoes
Growing Tulips
Growing Vegetables
Herb Basics
Herb Garden
Indoor Growing
Landscaping Basics
Landscaping Patios
Landscaping Plants
Landscaping Shrubs
Landscaping Trees
Landscaping Walks & Pathways
Lawn Basics
Lawn Maintenance
Lawn Mowers
Lawn Ornaments
Lawn Planting
Lawn Tools
Outdoor Growing
Overall Landscape Planning
Pests, Weeds & Problems
Plant Basics
Rock Garden
Rose Garden
Shrubs
Soil
Specialty Gardens
Trees
Vegetable Garden
Yard Maintenance
How to Grow Milkweed From Seeds
How to Grow Milkweed From Seeds. Attract hummingbirds and create an oasis for butterflies by planting milkweed (*Asclepias* spp.). With more than 100 different species, this flowering perennial is generally hardy in U.S. Department of Agriculture plant hardiness zones 3 through 9, although hardiness varies depending on species. For example, common...
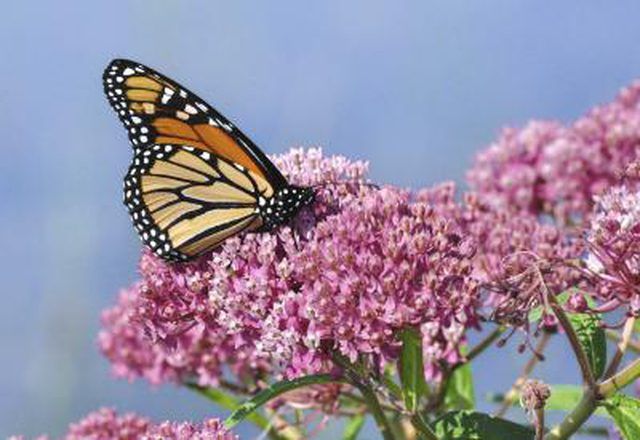
Attract hummingbirds and create an oasis for butterflies by planting milkweed (Asclepias spp.). With more than 100 different species, this flowering perennial is generally hardy in U.S. Department of Agriculture plant hardiness zones 3 through 9, although hardiness varies depending on species. For example, common milkweed (Asclepias syriaca) is hardy in USDA zones 3 through 8, while one of the only species that grows in wet soil, swamp milkweed (Asclepias incarnata), is hardy in USDA zones 3 through 9.
Collecting Seeds
Seed catalogs and online vendors sell milkweed seeds, but you can also easily collect them on your own. The Monarch Lab recommends searching for milkweed plants along roadways, railroad tracks, bike paths, parks and vacant lots where it typically grows wild. Milkweed seeds are usually ready to harvest in mid to late fall.
Collect the seeds once the seedpods split and open slightly to reveal the seeds within. Pluck the seedpod from the plant, hold one end in one hand and gently pull the seeds away from the fluff. Transfer the seeds to a paper bag. If the seedpods are more mature and have already burst wide open to release the seeds and fluff, the Native Plant Society of Texas recommends placing the seeds and fluff in a paper bag and shaking it vigorously to release the ripe seeds from the fluff.
Stratifying the Seeds
Milkweed seeds require stratification -- cold treatment -- for three weeks to three months for optimal germination. Exposing the seeds to cold temperatures for a short time simulates the natural cycle of dormancy.
*To stratify the seeds in potting mix, place a handful of soilless potting mix or a mix of 4 parts peat moss mixed with 1 part vermiculite or horticultural sand in a bowl. Dampen the mixture slightly and add the milkweed seeds to the mix. Cover it with another inch or so of potting mix and transfer it all to a resealable plastic bag. Set the bag aside, leaving it sit at room temperature for three days while the seeds absorb the moisture. Then, transfer the bag to a drawer in your refrigerator. Shake it once weekly to aerate the mixture.
*To stratify the seeds without the potting mix, store the seeds between several moist paper towels placed in a resealable bag. Keep the bag in the refrigerator for at least three weeks.
*Sow unstratified seeds into a mulched planting bed after the first killing frost in fall. Scatter them in the planting area and cover them with approximately 1/4 inch of soil. The cold winter temperatures chill the seeds to prepare them to grow in the spring.
Preparing the Seeds for Planting
To optimize the germination of the seeds, shock them or rough up the exterior coating. Scarification -- breaking down the outer coating of the seeds -- can help improve the milkweed's germination rate. Place the stratified seeds in a jar or a container with a lid, along with 1/4 cup or so of coarse sand. Shake the container for 30 to 60 seconds.
Alternatively, transfer the chilled seeds to a bowl or container filled with warm water to shock the seeds and improve the germination rate. Let them soak for 24 hours before planting.
Starting Milkweed Seeds Indoors
Start seeds indoors approximately six weeks before your region's last frost date. Sow three or four milkweed seeds in a 4-inch peat pot filled three-quarters full with potting mix. Cover the seeds lightly -- ?-inch or less -- with potting mix. Water the peat pot before placing it in a sunny window. Maintain temperatures of 65 to 70 degrees Fahrenheit for optimal germination. Germination typically takes seven to 10 days.
Transplant the milkweed seedlings outside -- or in individual pots if you are growing them in containers -- once they reach heights of 3 inches. Two weeks before you plan to plant them in the ground, start hardening the plants to prepare them for the transition. Start by placing the young plants in a sheltered spot outside for a few hours before bringing them back inside. Gradually increase the sun exposure and time spent outside. Plant them in the ground after the danger of frost has passed.
Planting Tips
Plant milkweed seedlings outdoors, spacing them 1 to 2 feet apart in an area with well-drained soil and full sun exposure. If you need to improve your soil's drainage or if you have heavy clay soil, amend it by adding 4 inches of sand spread over the planting area. Work the sand into the soil to a depth of about 9 inches.
Add 1 teaspoon of a balanced, slow-release granular fertilizer such as a 14-14-14 blend to the planting hole before setting the milkweed seedling in the hole; application rates can vary by brand, so follow label instructions. Beginning in the second year, apply approximately 1 tablespoon of the same fertilizer for each square foot of your plant bed each spring. Water the area thoroughly after applying fertilizer.
Add a 3-inch layer of hardwood mulch around the young plants to help conserve soil moisture, and water the plants regularly to maintain even moisture, adding at least 1 inch of water weekly between rainfall and supplemental watering.


