Bulbs
Flower Basics
Flower Beds & Specialty Gardens
Flower Garden
Garden Furniture
Garden Gnomes
Garden Seeds
Garden Sheds
Garden Statues
Garden Tools & Supplies
Gardening Basics
Green & Organic
Groundcovers & Vines
Growing Annuals
Growing Basil
Growing Beans
Growing Berries
Growing Blueberries
Growing Cactus
Growing Corn
Growing Cotton
Growing Edibles
Growing Flowers
Growing Garlic
Growing Grapes
Growing Grass
Growing Herbs
Growing Jasmine
Growing Mint
Growing Mushrooms
Orchids
Growing Peanuts
Growing Perennials
Growing Plants
Growing Rosemary
Growing Roses
Growing Strawberries
Growing Sunflowers
Growing Thyme
Growing Tomatoes
Growing Tulips
Growing Vegetables
Herb Basics
Herb Garden
Indoor Growing
Landscaping Basics
Landscaping Patios
Landscaping Plants
Landscaping Shrubs
Landscaping Trees
Landscaping Walks & Pathways
Lawn Basics
Lawn Maintenance
Lawn Mowers
Lawn Ornaments
Lawn Planting
Lawn Tools
Outdoor Growing
Overall Landscape Planning
Pests, Weeds & Problems
Plant Basics
Rock Garden
Rose Garden
Shrubs
Soil
Specialty Gardens
Trees
Vegetable Garden
Yard Maintenance
How to Build a Simple Decorative Garden Arbor for About $50
How to Build a Simple Decorative Garden Arbor for About $50. A simple arbor covered with roses or flowering vines is a lovely accent at the end of your front walk or in a garden bed. Creating your own is easier and less expensive than you think.
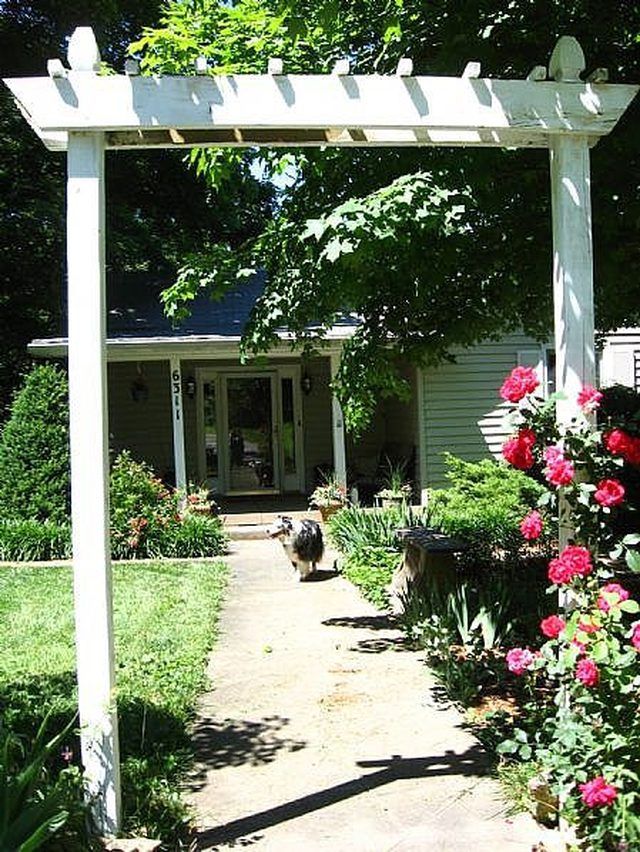
A simple arbor covered with roses or flowering vines is a lovely accent at the end of your front walk or in a garden bed. Creating your own is easier and less expensive than you think.
Things You'll Need
2 8ft treated 4X4 posts
1 10-12 foot treated 2X6 or 2X8 boards
8ft piece treated 2X2 boards
2 treated decorative post finials (optional)
1 bag quick-setting concrete
1 bag of gravel
shovel
power drill
Circular saw
galvanized nails
ladder
Measure the width of your walk to determine whether you need to purchase a 10- or 12-foot piece of 2X6 lumber - When cut in half, the board (which will form the decorative header) needs to be at least a foot and a half longer than your walk is wide - so you can cut the board at an angle and have some overhang on each side. For instance, my walk is just over 4 feet wide, so I purchased a 12-foot piece.
Visit your local home improvement store and purchase lumber, decking nails, gravel and concrete. Pressure treated lumber is your best choice for this outdoor project. A quick check of the Home Depot website shows total cost for needed supplies (excluding tools) at about $40.
Dig a hole about 8 inches in diameter and a bit over a foot deep on either side of your walk. Make sure they line up directly across from each other and are an even depth. Check the depth by placing the post and marking the spot that is even with the top of the hole - then move the post over to the other hole to check it is the same.
Drill a starter hole at the top end of each post and screw in your finials if using.
Grab a friend or relative to help place your posts (you can do it alone but another person makes this much easier). Put the post in the center of the hole and pour in 4-5 inches of gravel. Use a level to determine when the post is straight and have your helper hold it in place.
Pour in the dry concrete mix and add water according to bag instructions. It sets up very quickly, 10-15 minutes, and doesn't require any bracing.
Repeat steps 5 and 6 on the second post and let stand overnight.
While your concrete is hardening, cut your header pieces. Using the circular saw, cut your 2X6 in half at an angle. Now your angle on one end of each piece will exactly match up when the other piece is turned over. Now trace the angle (using the cut end as a pattern) onto the other end of each piece and cut. I'm sure there is a more technical way of doing this, but I was just working with a standard circular saw (and am a rank amateur woodworker). Cut your 2X2 into nine 10-inch pieces.
When your concrete is dry, it is time to attach the header pieces. Hold up one board and mark where it will need to be nailed to the posts. Drill two guide holes one above the other (slightly offset). Nail in the first nail on one side. Either get someone to hold the other side or lightly tack in a nail on the other side just enough to keep it in place. Get a level an make sure the board is straight, then hammer in the remaining nails. Repeat with the second board on the other side of the posts - making sure the 2X6 boards line up exactly.
Place one of the 2X2 pieces in the center of the header - going straight across the 2X6s - you should have a 1-inch overhang on each end. Nail in place. Evenly space 4 pieces on each side of the center and nail in place.
Step back an admire. Paint with an exterior latex if desired.
Tips & Warnings
If you're going to paint your arbor, it is much easier to paint all sides of the 2X6 and 2X2 pieces either before you even cut them, or before you nail them in place.
To train my rose up the arbor, I screw in large cup hooks to hold the cane as it grows.
My project cost even less, as I primarily used recycled lumber from a deck my neighbor tore down and discarded.


