Bulbs
Flower Basics
Flower Beds & Specialty Gardens
Flower Garden
Garden Furniture
Garden Gnomes
Garden Seeds
Garden Sheds
Garden Statues
Garden Tools & Supplies
Gardening Basics
Green & Organic
Groundcovers & Vines
Growing Annuals
Growing Basil
Growing Beans
Growing Berries
Growing Blueberries
Growing Cactus
Growing Corn
Growing Cotton
Growing Edibles
Growing Flowers
Growing Garlic
Growing Grapes
Growing Grass
Growing Herbs
Growing Jasmine
Growing Mint
Growing Mushrooms
Orchids
Growing Peanuts
Growing Perennials
Growing Plants
Growing Rosemary
Growing Roses
Growing Strawberries
Growing Sunflowers
Growing Thyme
Growing Tomatoes
Growing Tulips
Growing Vegetables
Herb Basics
Herb Garden
Indoor Growing
Landscaping Basics
Landscaping Patios
Landscaping Plants
Landscaping Shrubs
Landscaping Trees
Landscaping Walks & Pathways
Lawn Basics
Lawn Maintenance
Lawn Mowers
Lawn Ornaments
Lawn Planting
Lawn Tools
Outdoor Growing
Overall Landscape Planning
Pests, Weeds & Problems
Plant Basics
Rock Garden
Rose Garden
Shrubs
Soil
Specialty Gardens
Trees
Vegetable Garden
Yard Maintenance
How to Propagate Camellias
How to Propagate Camellias. Camellias (Camellia japonica) thrive in partially shady areas when planted in acidic, well-drained soil. Camellias, which grow in U.S. Department of Agriculture plant hardiness zones 7 through 9, propagate easily. If you are trying to clone the mother plant, use cuttings or air layering. If you don’t mind that...
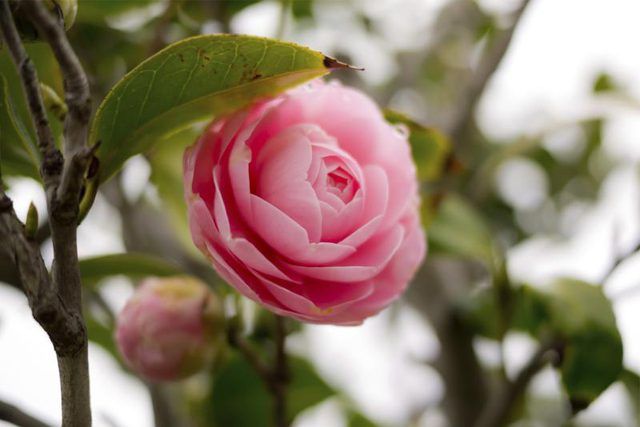
Camellias (Camellia japonica) thrive in partially shady areas when planted in acidic, well-drained soil. Camellias, which grow in U.S. Department of Agriculture plant hardiness zones 7 through 9, propagate easily. If you are trying to clone the mother plant, use cuttings or air layering. If you don�t mind that your new camellia is different from the parent plant, try your hand at growing it from seed.
Your Level of Patience
Growing camellias from seed is the propagation process that takes the longest from start to flower production: six to eight years. While propagation of a camellia cutting isn�t difficult, it, too may take several years to mature and bloom. If you�re feeling the need for speed in your propagation efforts, consider air layering your camellia. This process produces a larger plant more quickly than the other methods, with plants often producing flowers the first year. Unlike using a cutting, air layering requires that you leave the stem or limb on the camellia bush.
Air Layering
Choose a healthy stem and measure 12 inches back from the tip. Use a sharp knife to remove a ring of the outer bark that measures two times the diameter of the stem. Before you make the cut, wipe the blade with a cloth soaked in rubbing alcohol to sterilize it. Make sure you�ve removed all of the cambium, or green tissue just under the bark. Use a small paintbrush to apply rooting hormone to the area and then cover it with moist sphagnum moss. Cover the moss with plastic wrap and then aluminum foil. If you start the process in spring, you should see roots through the moss by fall. At that time cut the stem from the camellia and plant it in a pot filled with moist potting soil. Use a pot that has drainage holes. Keep it in a shady area until spring and then plant it in the garden.
Taking Cuttings
The best cuttings are taken when the stems are just starting to turn brown. This typically happens in midsummer. From the tip of the stem, count back to the fifth leaf node and use sharp, sterilized shears to make the cut 1/4 inch below the node. Leave three leaves at the top of the cutting and remove the rest. Fill a pot with drainage holes to 1 inch below the rim with sterile potting mix. Moisten the bottom 1 inch of the cutting and roll it in rooting hormone powder before sticking it into the planting medium until half the cutting is buried. Covering the pot into a plastic bag will hasten the rooting process, which typically takes around six weeks.
Grow Camellia from Seeds
Camellia seeds have a hard outer coat that makes it difficult for moisture to penetrate to the embryo within. Soak the seeds in room temperature water for 24 hours and remove any that float to the surface of the water. These seeds aren�t viable. Place the remaining seeds in an empty nursery flat or other shallow container and leave them in the sun, misting with water to keep them damp. Plant the camellia seeds as soon as you notice a crack in the seed coats into a pot of moist vermiculite. You�ll notice an "eye" on one end of the seed. Plant the seed 1 inch deep with the eye pointing toward the side of the pot. Place the pot in a shaded area and keep the vermiculite moist. It may take up to two months for the seed to sprout. Use pots with drainage holes so the seeds don't rot.


