Bulbs
Flower Basics
Flower Beds & Specialty Gardens
Flower Garden
Garden Furniture
Garden Gnomes
Garden Seeds
Garden Sheds
Garden Statues
Garden Tools & Supplies
Gardening Basics
Green & Organic
Groundcovers & Vines
Growing Annuals
Growing Basil
Growing Beans
Growing Berries
Growing Blueberries
Growing Cactus
Growing Corn
Growing Cotton
Growing Edibles
Growing Flowers
Growing Garlic
Growing Grapes
Growing Grass
Growing Herbs
Growing Jasmine
Growing Mint
Growing Mushrooms
Orchids
Growing Peanuts
Growing Perennials
Growing Plants
Growing Rosemary
Growing Roses
Growing Strawberries
Growing Sunflowers
Growing Thyme
Growing Tomatoes
Growing Tulips
Growing Vegetables
Herb Basics
Herb Garden
Indoor Growing
Landscaping Basics
Landscaping Patios
Landscaping Plants
Landscaping Shrubs
Landscaping Trees
Landscaping Walks & Pathways
Lawn Basics
Lawn Maintenance
Lawn Mowers
Lawn Ornaments
Lawn Planting
Lawn Tools
Outdoor Growing
Overall Landscape Planning
Pests, Weeds & Problems
Plant Basics
Rock Garden
Rose Garden
Shrubs
Soil
Specialty Gardens
Trees
Vegetable Garden
Yard Maintenance
How to Install Stone Landscape Edging
How to Install Stone Landscape Edging. If instant curb appeal is what you’re after, install stone edging around your property to visually define your planting beds. Edging not only provides a clean, finished look to your landscaping, but it helps keep unwanted grass and weeds from spreading. Stone edging can complement whatever garden style...
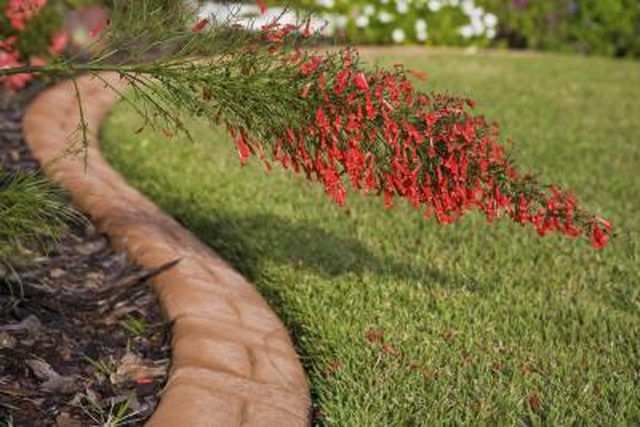
If instant curb appeal is what you�re after, install stone edging around your property to visually define your planting beds. Edging not only provides a clean, finished look to your landscaping, but it helps keep unwanted grass and weeds from spreading. Stone edging can complement whatever garden style you have -- contemporary, rustic or formal. Most do-it-yourself homeowners can complete this project in one day with minimal tools and supplies.
Things You'll Need
Garden hose
Landscaping spray paint
Tape measure
Work gloves
Flat-edge shovel
Hand tamper
Short two-by-four (optional)
Coarse sand
Wooden mallet
Carpenter's level
Safety glasses
Chisel
Plan and Prepare
Mark the location for the edging with a garden hose. Adjust it until you have the desired look, which might be a straight line or a boundary with gentle curves. Avoid tight curves because this type of design involves a lot of cutting to get the stones to fit snugly together. Once you've achieved the best shape, spray alongside the hose with landscaping spray paint. Remove the hose.
Measure several stones to get an average size and decide how high above the surrounding ground you want the stones to sit. Subtract this above-ground measurement from the stone's total height and add 1 inch to get the depth of the trench. The extra inch allows room for a bed of coarse sand. For example, if the stone is 3 inches high and you want it to sit 1 inch above the ground, make the trench 3 inches deep.
Protect your hands with work gloves. Refer to your measurements and use a flat-edge shovel to dig the trench along the sprayed line. Make the trench width 1 inch wider than the stones. Remove the dirt and save it to use later. Tamp the bottom of the trench with a hand tamper. If the trench isn't wide enough for the tamper, use the butt end of a small two-by-four.
Install and Finish
Pour 1 inch of coarse sand into the bottom of the trench. Compact and flatten it with the tamper. The sand helps with drainage and makes leveling the stones easier.
Place the first stone into one end of the trench. Tap it lightly with a wooden mallet to set it into the sand. Place the next stone as close as possible to the first and tap it into place until it is the same height as the first. If the stones are not uniform in size and shape, try to use stones that fit well together to avoid big gaps.
Resize stones or use partial stones for a better fit, if necessary. To do this, put on safety glasses and make a score line on all sides of the stone with a chisel and mallet. Continue to pound the chisel deeper into the score lines until the stone breaks.
Install three or four stones and then use a carpenter's level to ensure the stones are level with each other. Make any adjustments and repeat the process to the end of the trench.
Fill in any gaps around the stones with the dirt you removed when digging the trench, evening things up with the surrounding soil. Compact the dirt in front and behind the stones to keep them from shifting. Lightly water the stones to help the dirt settle. If necessary, add more dirt around the stones.
Tips & Warnings
If you find resizing the stones too difficult with a chisel and hammer, use a circular saw equipped with a diamond blade.


