Bulbs
Flower Basics
Flower Beds & Specialty Gardens
Flower Garden
Garden Furniture
Garden Gnomes
Garden Seeds
Garden Sheds
Garden Statues
Garden Tools & Supplies
Gardening Basics
Green & Organic
Groundcovers & Vines
Growing Annuals
Growing Basil
Growing Beans
Growing Berries
Growing Blueberries
Growing Cactus
Growing Corn
Growing Cotton
Growing Edibles
Growing Flowers
Growing Garlic
Growing Grapes
Growing Grass
Growing Herbs
Growing Jasmine
Growing Mint
Growing Mushrooms
Orchids
Growing Peanuts
Growing Perennials
Growing Plants
Growing Rosemary
Growing Roses
Growing Strawberries
Growing Sunflowers
Growing Thyme
Growing Tomatoes
Growing Tulips
Growing Vegetables
Herb Basics
Herb Garden
Indoor Growing
Landscaping Basics
Landscaping Patios
Landscaping Plants
Landscaping Shrubs
Landscaping Trees
Landscaping Walks & Pathways
Lawn Basics
Lawn Maintenance
Lawn Mowers
Lawn Ornaments
Lawn Planting
Lawn Tools
Outdoor Growing
Overall Landscape Planning
Pests, Weeds & Problems
Plant Basics
Rock Garden
Rose Garden
Shrubs
Soil
Specialty Gardens
Trees
Vegetable Garden
Yard Maintenance
How to Start Hibiscus From a Cutting (Propagation)
How to Start Hibiscus From a Cutting (Propagation). Your garden hibiscus (Hibiscus spp.) displays your love of bold, brilliant blooms. They dominate their surroundings with luxuriously stamened trumpet flowers, some the size of dinner plates. Suitable for U.S. Department of Agriculture plant hardiness zones 4 through 11, depending on variety,...
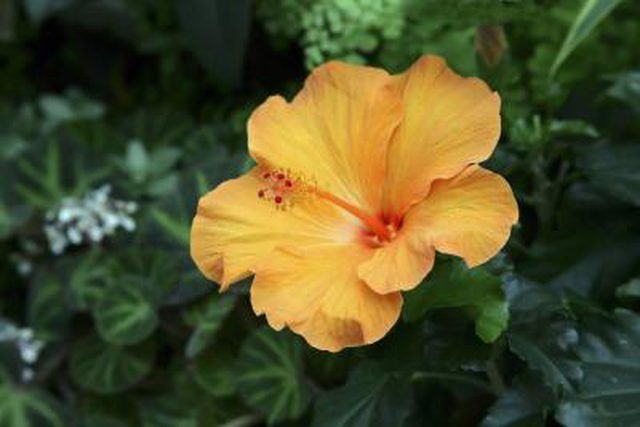
Your garden hibiscus (Hibiscus spp.) displays your love of bold, brilliant blooms. They dominate their surroundings with luxuriously stamened trumpet flowers, some the size of dinner plates. Suitable for U.S. Department of Agriculture plant hardiness zones 4 through 11, depending on variety, hibiscus have the added virtue of rooting easily from cuttings. Done between late spring and early summer, this propagation technique forms a new plant that's genetically identical to your favorite hibiscus.
Preparing the Pot
In a plastic bag, make a rooting medium of equal parts peat moss and perlite moistened by working in 1/4 cup of water for each 1 cup of dry ingredients. Squeeze out the excess water. Just before taking the cutting, add the damp mixture to a rooting pot with drainage holes. Fill it to within 1/4 inch of the pot�s rim and firm it lightly.
Harvesting a Cutting
Root your hibiscus from a softwood cutting -- flexible new growth that bends without breaking -- or from a semi-hardwood one that snaps when bent. In early morning, when its moisture level is highest, take an 8- to 12-inch stem cutting from a pest- and disease-free hibiscus plant. Using sharp, sterilized bypass pruners, make your cut just below a leaf node. Sterilize the pruners by spraying them with household disinfectant spray.
Sectioning the Cutting
Strip the side shoots, buds, and blooms from your original cutting and divide it into two or three 4-inch sections, making the cuts just below leaf nodes, where the new roots emerge. Keep at least two leaf nodes on each section. To limit water loss, remove the lower one-third of their leaves and cut their largest remaining leaves in half. Moisten their lower ends with water, dip them in powdered rooting hormone and shake off the excess. Purdue University Department of Horticulture recommends 0.1 percent powder for softwood and 0.3 percent for semi-hardwood cuttings.
Planting the Sections
Insert a pencil, eraser-end down, into the rooting medium to make a hole for each of the sections. Plant them with their lowest leaves above the surface and firm the medium around their bases for support. Space three 8-inch wooden florist�s sticks evenly around the lip of the pot. Set the pot in a clear plastic bag, slide the bag up and over the sticks and seal it with a twist tie to create a temporary greenhouse. Move the cuttings to a warm, brightly lit area out of direct sun.
Rooting the Sections
To release excess humidity, open the plastic bags for five minutes each day. Mist the medium with a spray bottle to keep it evenly moist, and pour off water that collects inside the bag. When new hibiscus leaves sprout, tug gently on the cuttings. If they resist, they've begun to root.
Caring for New Hibiscus
Acclimate the new hibiscus plants to drier air by opening and gradually sliding the bag down the support sticks over the next week. Once they've adjusted to the lower humidity, transplant the new hibiscus to individual pots of high-quality, lightweight potting soil. Carefully loosen the medium so you don't damage the new roots. Lift the plants gently, move them quickly to their new containers, water them and keep them moist. After they have plenty of new leaves, gradually move them into full sun.


