Bulbs
Flower Basics
Flower Beds & Specialty Gardens
Flower Garden
Garden Furniture
Garden Gnomes
Garden Seeds
Garden Sheds
Garden Statues
Garden Tools & Supplies
Gardening Basics
Green & Organic
Groundcovers & Vines
Growing Annuals
Growing Basil
Growing Beans
Growing Berries
Growing Blueberries
Growing Cactus
Growing Corn
Growing Cotton
Growing Edibles
Growing Flowers
Growing Garlic
Growing Grapes
Growing Grass
Growing Herbs
Growing Jasmine
Growing Mint
Growing Mushrooms
Orchids
Growing Peanuts
Growing Perennials
Growing Plants
Growing Rosemary
Growing Roses
Growing Strawberries
Growing Sunflowers
Growing Thyme
Growing Tomatoes
Growing Tulips
Growing Vegetables
Herb Basics
Herb Garden
Indoor Growing
Landscaping Basics
Landscaping Patios
Landscaping Plants
Landscaping Shrubs
Landscaping Trees
Landscaping Walks & Pathways
Lawn Basics
Lawn Maintenance
Lawn Mowers
Lawn Ornaments
Lawn Planting
Lawn Tools
Outdoor Growing
Overall Landscape Planning
Pests, Weeds & Problems
Plant Basics
Rock Garden
Rose Garden
Shrubs
Soil
Specialty Gardens
Trees
Vegetable Garden
Yard Maintenance
How to Repot a Phalaenopsis Orchid
How to Repot a Phalaenopsis Orchid. A phalenopsis orchid needs repotting about every two years. Also called a moth orchid, this plant is hardy outdoors in U.S. Department of Agriculture plant hardiness zones 10 through 12, but is usually grown indoors. Depending on the variety, the moth orchid grows 9 to 36 inches tall and 7 to 24 inches wide....
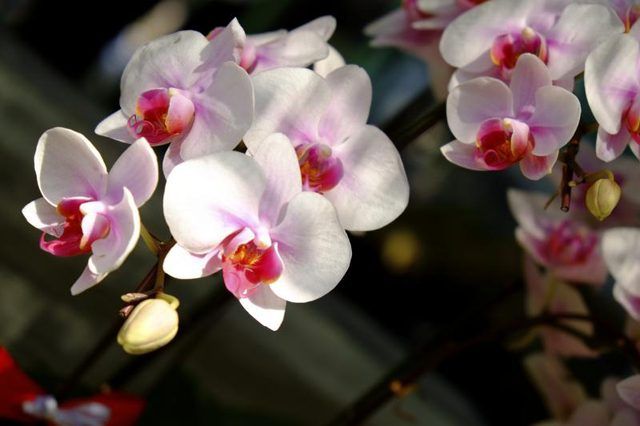
A phalenopsis orchid needs repotting about every two years. Also called a moth orchid, this plant is hardy outdoors in U.S. Department of Agriculture plant hardiness zones 10 through 12, but is usually grown indoors. Depending on the variety, the moth orchid grows 9 to 36 inches tall and 7 to 24 inches wide. Flower colors include purple-pink, light yellow, cream and white, and blooms last four months or longer.
Time to Repot
A moth orchid should be repotted when it outgrows its container -- look for roots growing through the base of the container or appearing on the potting soil surface. This usually occurs every two years, but can also occur after one year, or three years.
The best time for repotting a moth orchid is usually late spring, after the main flowering season and when the plant is actively growing. An actively growing moth orchid sprouts new leaves, and new roots appear. Repotting a moth orchid at the wrong time can prevent the plant from flowering the next year.
Container for a Moth Orchid
A container for a moth orchid should snugly fit the root ball of the plant. A new pot for a moth orchid should be no more than 1 inch wider than the previous pot. Sitting in wet soil causes root rot in this plant, and growing it in a container that just fits the root ball helps reduce wet potting soil around its roots. A container for a moth orchid must have drainage holes.
Plant containers are often made of clay or plastic. A clay container allows water to evaporate from a moth orchid's roots, and air to circulate, but the plant needs frequent watering. A plastic container can be used for a moth orchid, but the potting soil should be allowed to dry before watering, or the plant could develop root rot.
Potting Material
Potting material for a moth orchid must be very free-draining. A suitable homemade potting soil for a moth orchid is a mix of 6 parts medium fir bark, 2 parts perlite and 2 parts sphagnum peat moss. Other suitable materials include medium grade redwood bark chips and hardwood charcoal, mixed in equal parts with perlite and sphagnum moss. Another option is to buy a commercial specialized orchid potting mix.
Moth Orchid Hygiene
Shrivelled or yellow leaves, faded flowers and stems and decayed roots must be pruned when repotting a moth orchid, to help prevent diseases. Gently twist as you remove moth orchid from its pot, to help ease the root ball out. Shake off the old potting mix, and rinse the plant's roots in tepid water.
Sterilize pruning shear blades by wiping them with a cloth that was dipped in rubbing alcohol, and trim any dying or decayed plant parts. Decayed roots are soft and often dark colored. Sterilize the pruning shears again when you've finished.
The New Pot
Fresh potting mix fills the spaces in and around a moth orchid's roots in its new pot. Spread a layer of potting mix on the base of the new container, and place the moth orchid in the container. The base of the plant's leaves should sit at the same level it was growing in its old container. You may need to add or remove potting mix to achieve the correct depth.
Sprinkle potting mix between the moth orchid's roots and the inner edges of the container, and gently firm the plant in place. Lightly shaking the container helps settle the potting mix.
After Care
Water and warm, even temperatures help establish a moth orchid in a new container. Pour tepid water over the potting mix surface until it flows through the drainage holes, and leave the plant to drain thoroughly.
Place the moth orchid in a moderate or low light spot in the home, such as an east- or north-facing window. Keep the plant at temperatures from 55 to 60 degrees Fahrenheit at night and 65 to 75 degrees Fahrenheit during the day.


