Bulbs
Flower Basics
Flower Beds & Specialty Gardens
Flower Garden
Garden Furniture
Garden Gnomes
Garden Seeds
Garden Sheds
Garden Statues
Garden Tools & Supplies
Gardening Basics
Green & Organic
Groundcovers & Vines
Growing Annuals
Growing Basil
Growing Beans
Growing Berries
Growing Blueberries
Growing Cactus
Growing Corn
Growing Cotton
Growing Edibles
Growing Flowers
Growing Garlic
Growing Grapes
Growing Grass
Growing Herbs
Growing Jasmine
Growing Mint
Growing Mushrooms
Orchids
Growing Peanuts
Growing Perennials
Growing Plants
Growing Rosemary
Growing Roses
Growing Strawberries
Growing Sunflowers
Growing Thyme
Growing Tomatoes
Growing Tulips
Growing Vegetables
Herb Basics
Herb Garden
Indoor Growing
Landscaping Basics
Landscaping Patios
Landscaping Plants
Landscaping Shrubs
Landscaping Trees
Landscaping Walks & Pathways
Lawn Basics
Lawn Maintenance
Lawn Mowers
Lawn Ornaments
Lawn Planting
Lawn Tools
Outdoor Growing
Overall Landscape Planning
Pests, Weeds & Problems
Plant Basics
Rock Garden
Rose Garden
Shrubs
Soil
Specialty Gardens
Trees
Vegetable Garden
Yard Maintenance
How to Build Raised Vegetable Beds
How to Build Raised Vegetable Beds. As soon as spring hits and the days get longer, many people start planting vegetables. Maybe you are a die-hard gardener and have always had a garden or maybe you are a newbie, just starting out in your vegetable growing endeavors. Whatever the case, building a raised vegetable bed is a convenient way to pop a...
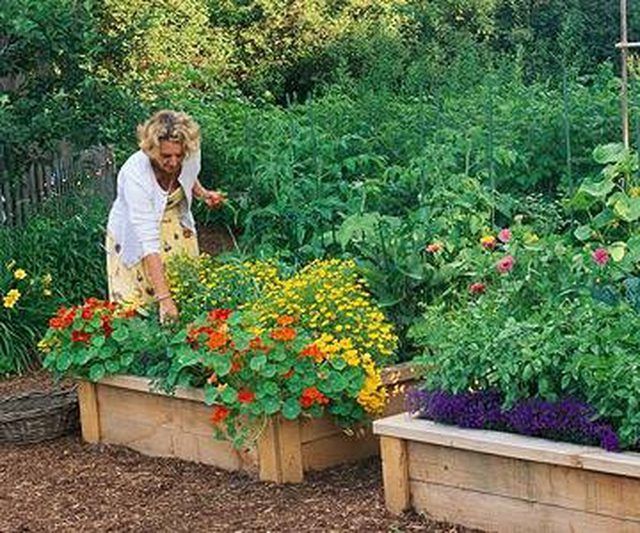
As soon as spring hits and the days get longer, many people start planting vegetables. Maybe you are a die-hard gardener and have always had a garden or maybe you are a newbie, just starting out in your vegetable growing endeavors. Whatever the case, building a raised vegetable bed is a convenient way to pop a garden in your yard, without having to till and dig up your soil.
Things You'll Need
Landscaping ties
Garden soil
Shovel
Rake
Hoe
Garden gloves
Seeds
Garden hose
Level
Cotton string
Garden stakes
Preparing the Site
Choose a sunny spot in your yard that gets at least 6 hours of sunshine every day, facing south if possible. Remove any obstacles like large rocks and mow down any grass. If you are building on soil that has questionable qualities, you can lay down a barrier mat to prevent contamination of your garden.
Measure the angle of your slope, if any, by using a level and some garden stakes. Pound two or three garden stakes into the ground at the lowest side of your raised garden site, and again at the highest side. Tie a string at the base of the low side stakes and run it across your garden to the high side. Hold a level on top of the string to make it straight and mark the garden stake with a line where the string should go. Now you can see how high you will need to build your wall on that side.
Walk around your proposed raised vegetable garden site and clip off any branches that might produce shade or have your trees pruned back if they are towering over your garden space. Keep in mind that the sun goes from east to west and the longest hours of light will be focused on a site that has a good view to the eastern and western horizons.
Constructing the Framework
Choose any material that's suitable to your yard decor or available to you, and use this as the framework for your raised vegetable bed. Landscape (railroad) ties are convenient as they are designed for this kind of construction, but materials like stone, logs or wooden planks can also be considered.
Lay out the materials around the site of the raised bed. You will need more on the lower side to bring it up to the level mark. If you are using stone, you consider using four piles, one on each side, instead of laying out the stone.
Put down the first layer of your wall. A good working size is a 4-by-8 foot raised bed. You don't want to make it much larger or you might have trouble reaching into the center. Build the layers up to the height you desire from 6 inches to 18 inches. Secure each layer to the previous one either with hardware (for wood beds) or mortar (for stone beds). Simple corner braces make attaching lumber sections easy.
Straighten the frame by measuring from corner to corner. Adjust it as necessary so the measurements are even. You don' t want to get all the dirt in and then find out it is crooked. If you are working with stone, measure before applying mortar.
Stabilize the bed from shifting by hammering garden stakes into the ground at the edges of the bed. Leave 6 inches above the ground or level with the top of the sides if you are doing a low wall.
Adding Soil
Choose a source of good garden soil. Many communities have public garden areas that offer large piles of garden compost. This is one of the best sources of dirt for a garden, but it will take a little work to shovel it and get it home. Bagged soil is fine for small raised vegetable beds, but impractical and expensive for larger ones. Landscaping supply yards have garden soil you can buy by the yard and have delivered. Look at it to make sure it is not filled with rocks and sticks, though.
Pour in the dirt. If your raised vegetable bed is any larger than a 3-foot square, you will find it much easier to work with a pickup truck load of garden soil. Back the truck up to the edge of the raised bed, being careful not to hit the newly constructed walls, and push the dirt in with a shovel.
Fill the raised vegetable bed with at least 10 inches of soil at the high end and more at the lower end. The soil should come all the way up to the top of your walls and even heaping just a little over. As the soil settles with watering it will drop down.
Planting
Water your newly constructed vegetable bed thoroughly. It should drain well since it is above ground. Let the water drain and the soil dry out a little before continuing.
Mark some rows in your soil with stakes and strings for straight rows. Drag a hoe through the dirt to make a shallow ditch that's 1 inch in depth. Mound up piles of soil for plants like cucumbers or melons and poke 1-inch holes for them.
Place your seeds in the rows and cover lightly. Each seed will have planting directions on the package. Typically, larger seeds are planted deeper than tiny seeds. Tamp down the soil over the seeds to prevent them from blowing in the wind or being seen by birds. This will also help them to make contact with the moist soil.
Sprinkle the planted bed with a fine mist of water until it is thoroughly wet. Allow 6 to 12 days for your seeds to sprout, depending on what you planted.


