Bulbs
Flower Basics
Flower Beds & Specialty Gardens
Flower Garden
Garden Furniture
Garden Gnomes
Garden Seeds
Garden Sheds
Garden Statues
Garden Tools & Supplies
Gardening Basics
Green & Organic
Groundcovers & Vines
Growing Annuals
Growing Basil
Growing Beans
Growing Berries
Growing Blueberries
Growing Cactus
Growing Corn
Growing Cotton
Growing Edibles
Growing Flowers
Growing Garlic
Growing Grapes
Growing Grass
Growing Herbs
Growing Jasmine
Growing Mint
Growing Mushrooms
Orchids
Growing Peanuts
Growing Perennials
Growing Plants
Growing Rosemary
Growing Roses
Growing Strawberries
Growing Sunflowers
Growing Thyme
Growing Tomatoes
Growing Tulips
Growing Vegetables
Herb Basics
Herb Garden
Indoor Growing
Landscaping Basics
Landscaping Patios
Landscaping Plants
Landscaping Shrubs
Landscaping Trees
Landscaping Walks & Pathways
Lawn Basics
Lawn Maintenance
Lawn Mowers
Lawn Ornaments
Lawn Planting
Lawn Tools
Outdoor Growing
Overall Landscape Planning
Pests, Weeds & Problems
Plant Basics
Rock Garden
Rose Garden
Shrubs
Soil
Specialty Gardens
Trees
Vegetable Garden
Yard Maintenance
How to Grow Vidalia Onions
How to Grow Vidalia Onions. Vidalia onions are well known for their culinary uses thanks to their unusual sweetness. This is largely the result of the locale in which they are grown--Vidalia, Georgia--an area without sulfur in the soil, which typically gives onions their pungent flavor and governs their acidity. Technically, according to government...
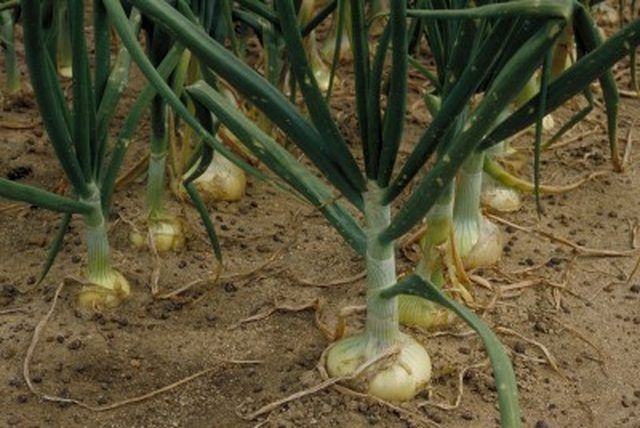
Vidalia onions are well known for their culinary uses thanks to their unusual sweetness. This is largely the result of the locale in which they are grown--Vidalia, Georgia--an area without sulfur in the soil, which typically gives onions their pungent flavor and governs their acidity. Technically, according to government legislation, you cannot grow Vidalia onions unless you are living in a certain counties in Georgia. For that same reason, one cannot purchase Vidalia seeds. They don�t really exist. However if you were to grow onions in a low sulfur environment from Granex onion seeds, you would have your own onions completely indistinguishable from the real thing.
Things You'll Need
Granex onion seeds
Shovel
Hoe
Water sprinkler
Sevin
Powdered limestone
Super phosphate or banding phosphorous
Knife
Begin by preparing your soil in early September. You will need to first neutralize the sulfur in the soil before you plant your seeds in order to get that characteristic sweetness that Vidalia onions are known for. You will need about 30 lbs. of powdered limestone per 100 square feet of soil. Spread the limestone over the soil and then mix it into the ground as deeply and thoroughly as you can with a hoe and shovel (or roto-tiller).
Water the soil until it�s become a muddy mess and leave it for about a month. Over time the sulfur in the soil will bind with the limestone, preventing the sulfur from being capable of being absorbed by your onions.
Dig trenches in the soil, about 3 inches deep and spaced 1 foot apart from one another. Into each trench pour granulated super phosphate, also known as banding phosphorous. This will be all the fertilizer your onions will ever need. Studies have shown that seeds that have been fertilized in this way sprout faster and produce larger onions. You should use 1 cup for every 20 feet of trench. Cover the trenches back over when you�re done.
Plant your seeds in early October, placing each seed ? inch deep into the soil following the lines of your buried fertilizer. Place one seed every 6 inches. Water your rows lightly once a day and you should have sprouts within a week.
Decrease your watering over the winter as your seedlings will not grow much. If you live in a tropical or sub-tropical climate the onion�s stalks will likely not wither. If they do, do not panic. The seedling is still viable and has already been germinated; it will survive the winter and continue its normal growth with the onset of spring. If you live in climates which drop below 40 degrees F, you may notice buds forming on the sides of the onion sprouts. This is a process called bolting, by which your onion is producing more onion plants. This is a good thing; the downside is that the primary onion will only grow to about half its normal size before it�s ripe for harvesting. So you end up trading size for quantity.
Watch for small flies buzzing around your onions in great quantities. This is a sign of one of the only pest problems called whitefly, also known as screwfly for the odd patterns they make in the air. The best way to get rid of them and any other possible pests is to spray your onions with a safe pesticide known as Sevin once a month. Remember that even a farm safe pesticide such as Sevin can still have negative effects if ingested, so you always want to wash you onions thoroughly after harvesting.
Begin harvesting in late summer only when the tops of the onion stalks have withered and fallen off. Simply uproot the onions with your hands, shake the dirt off and wash them well. Cut off the roots and the top inch of each onion. From here you can use them immediately in cooking or store them separately in a cool, dry, lightless environment. If you do this they can last up to 6 months before rotting.


