Bulbs
Flower Basics
Flower Beds & Specialty Gardens
Flower Garden
Garden Furniture
Garden Gnomes
Garden Seeds
Garden Sheds
Garden Statues
Garden Tools & Supplies
Gardening Basics
Green & Organic
Groundcovers & Vines
Growing Annuals
Growing Basil
Growing Beans
Growing Berries
Growing Blueberries
Growing Cactus
Growing Corn
Growing Cotton
Growing Edibles
Growing Flowers
Growing Garlic
Growing Grapes
Growing Grass
Growing Herbs
Growing Jasmine
Growing Mint
Growing Mushrooms
Orchids
Growing Peanuts
Growing Perennials
Growing Plants
Growing Rosemary
Growing Roses
Growing Strawberries
Growing Sunflowers
Growing Thyme
Growing Tomatoes
Growing Tulips
Growing Vegetables
Herb Basics
Herb Garden
Indoor Growing
Landscaping Basics
Landscaping Patios
Landscaping Plants
Landscaping Shrubs
Landscaping Trees
Landscaping Walks & Pathways
Lawn Basics
Lawn Maintenance
Lawn Mowers
Lawn Ornaments
Lawn Planting
Lawn Tools
Outdoor Growing
Overall Landscape Planning
Pests, Weeds & Problems
Plant Basics
Rock Garden
Rose Garden
Shrubs
Soil
Specialty Gardens
Trees
Vegetable Garden
Yard Maintenance
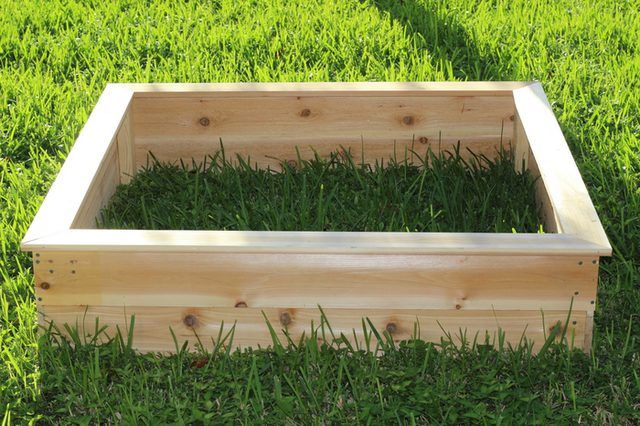
How to Make an Outdoor Garden Box
The following tutorial explains step by step how to create an outdoor garden box that fits your space and needs.
A trip to the hardware store is all it takes for a weekend DIYer to build a garden box. Whether you are looking to plant a small herb garden or want to start to growing your own vegetables, the steps are basically the same for any size box, big or small.
The following tutorial will show you how to make a simple 4-by-4, bottomless outdoor garden box, 1 foot deep.
For a bigger or smaller box, adjust material and cuts dimensions as necessary.
Warning
When working with power tools, always exercise caution and follow all warnings and instructions.
Things You'll Need
Miter saw
1-by-6 cedar boards, 8 feet long, 4
Waterproof exterior/interior wood glue, 1 bottle
Nail gun
Nails
Cordless drill (can be used with a driver bit too)
1/8 inch drill bit, 1
Torx drive bit (sometimes included in the screws box), 1
No. 8 by 1 5/8 star drive coated screws, 1 box
2 -by- 4 premium kiln dried whitewood board, 8 feet long, 1
1 -by- 4 whitewood furring strip board, 12 feet long, 1
Chicken wire (optional)
Fencing slats (optional)
Assemble the Frames
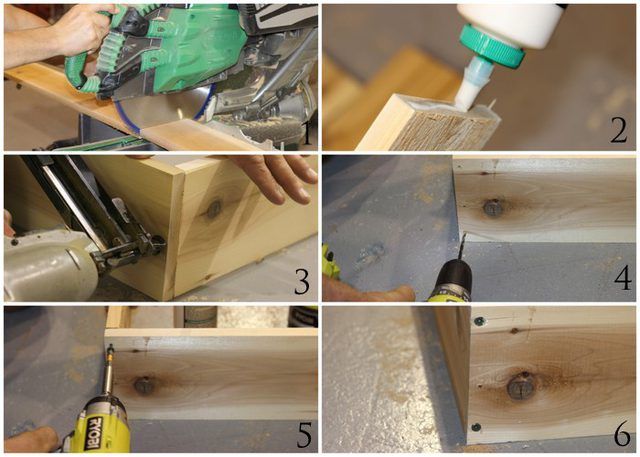
Step 1: Cut the Boards
Using the saw, cut four pieces 48 inches long out of two one-by-six cedar boards and four pieces 46.5 inches long out of the other two one-by-sixes.
Step 2: Attach the Boards
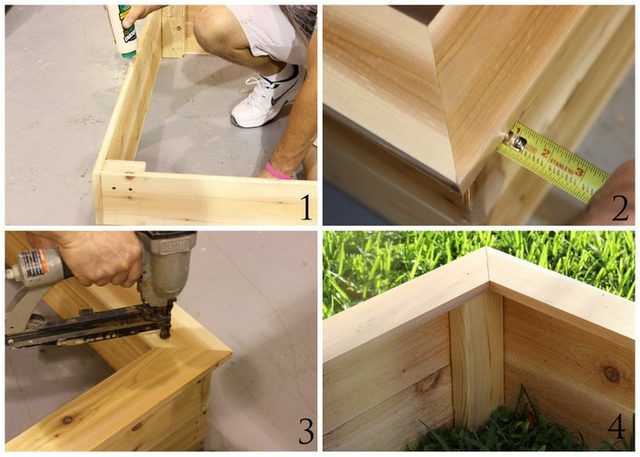
Add a line of glue on the narrow side of the board and attach one 46.5-inch piece on the inside corner of one 48-inch piece, making a 90-degree angle. Adding the shorter piece on the inside of the board will make the total length of the box 47.5 inches because we are adding the thickness of the other board to that length (46.5 inches + 1 inch = 47.5 inches).
After the boards are aligned in a perfect 90-degree angle, tack nail them with the nail gun. We do this to keep the boards in place while handling.
Take the drill and perforate the attached boards to make holes for the screws.
Change the bit on the drill to a driver bit (the one included in the screws box) and proceed to insert the screws in the drilled holes as shown in frame no. 4 in the picture collage.
The corner of the box will look like shown in frame no. 6 in the picture collage.
Step 3: Repeat Step 2
Repeat Step 2 for the next three corners, making sure that you are attaching the next 46.5-inch piece on the opposite side of the other 46.5-inch piece, always placing it toward the inside of the box.
When all four sides are attached, you will have a 48-by-47.5-by -6 inch box. Repeat the process a second time. You will have two boxes 48 by 47.5 by 6 inches each.
Tip
Although the look of attached boards is more traditional in outdoor garden boxes, if available, two 8-foot common cedar one-by-12s can be used. In that case, the previous process should be done only one time.
Attach the Two Frames Together
Using a wide floor space, place one of your assembled boxes on top of the other to make a box 1 foot deep. Align all four corners.
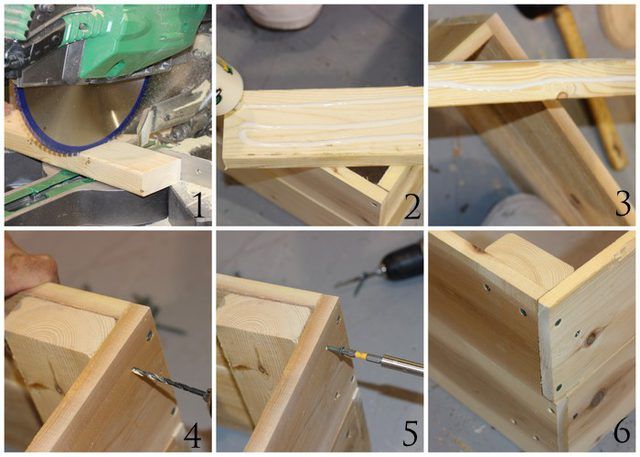
Step 1: Cut the Braces
Using the saw, cut four 12-inch pieces out of one 8-foot premium kiln dried whitewood two-by-four, as shown in frame no. 1 in the picture collage. These will be the bracing pieces to combine the two boxes.
Step 2: Attach the Braces
Take one 12-inch piece of two-by-four and add a generous amount of waterproof glue to one of the 4-inch sides of the board, as shown in frame no. 2 in the picture collage.
Add a line of waterproof glue on the 2-inch side of that same board, as shown in frame no. 3 in the picture collage.
Attach the piece to one of the corners of the box (glue sides facing the box). Hold tight with one hand and drill the external sides. Refer to the next tip.
Secure with six screws. Verify that the screws go through the box and the braces.
Each box corner will look like shown in frame no. 6.
Tip
When attaching the brace, drill six holes: two (top and bottom) on the 2-inch side of the brace board and four (two on top and two on the bottom) on the 4-inch side of the brace board.
Step 3: Repeat Steps 1 and 2
Repeat Steps 1 and 2 for the next three corners. When all four braces are attached, the outdoor garden box is done.
Build the Top Lip
To give the box a nice finished look, build a mitered picture frame to attach to the top.
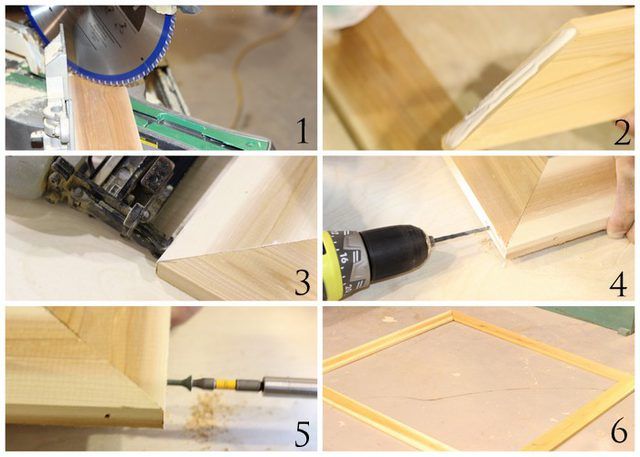
Step 1: Cut the Strips
Calibrate the saw to cut 45-degree angles. When in place, cut four pieces 49.5 inches long out of one 12-foot long one-by-four strip board.
Tip
When cutting the 45-degree angles, always consider the outside dimension (OD) of the frame. In this case the OD is 49.5 inches
Step 2: Attach the strips
Take one 49.5-inch mitered piece and add a strip of waterproof glue to the thickness side, as shown in frame no. 2 in the picture collage.
Attach this piece to the end of another 49.5-inch mitered piece to form a 90-degree angle. Secure with nails.
Step 3: Drill and Secure
Using the drill, make one hole on each top side of the boards. Change the drill bit to a screw bit and screw in two screws (one on each side).
Step 4: Repeat Steps 2 and 3
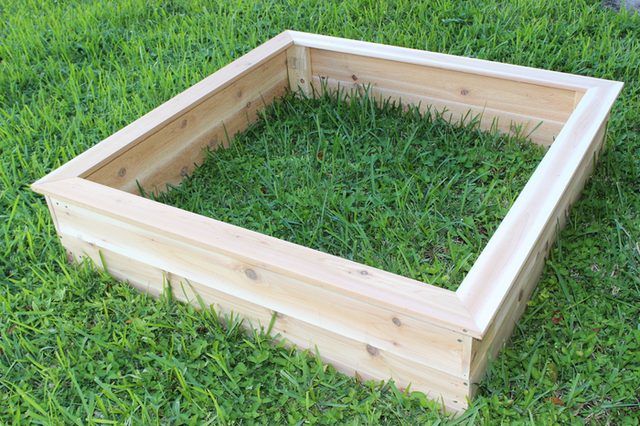
Repeat Steps 2 and 3 with the other two boards to create a square frame, as shown in no. 6 in the picture collage.
Attach the Top Lip
Step 1: Apply Glue
Add a generous amount of waterproof wood glue over the entire (top) perimeter of the garden box.
Align the frame on top of the box, leaving a 3/4-inch reveal (refer to frame no. 2 in the picture collage).
Step 2: Nail the Frame
Tack nail all four corners and at the 24 3/4-inch point of the board, 1 1/8 inches from the outside edge. This will hold the frame in place until the glue dries.
The top frame will look like shown on frame no. 4 in the picture collage.
Step 3: Locating and Filling
Your outdoor garden box with a top lip (frame) is done. Decide on a location before filling with dirt and plants.
If placing directly on soil, you can deter pest (such as gophers) to get through it by adding a layer of hardware lining such as chicken wire at the bottom of the bed before filling with soil.
If placing on a concrete slab or patio, turn garden box upside down and attach fencing slats to the bottom of it. The cracks between the slats will permit the water to drain.
Fill the inside with a 50/50 mixture of compost and planting soil. Plant your garden.


