Bulbs
Flower Basics
Flower Beds & Specialty Gardens
Flower Garden
Garden Furniture
Garden Gnomes
Garden Seeds
Garden Sheds
Garden Statues
Garden Tools & Supplies
Gardening Basics
Green & Organic
Groundcovers & Vines
Growing Annuals
Growing Basil
Growing Beans
Growing Berries
Growing Blueberries
Growing Cactus
Growing Corn
Growing Cotton
Growing Edibles
Growing Flowers
Growing Garlic
Growing Grapes
Growing Grass
Growing Herbs
Growing Jasmine
Growing Mint
Growing Mushrooms
Orchids
Growing Peanuts
Growing Perennials
Growing Plants
Growing Rosemary
Growing Roses
Growing Strawberries
Growing Sunflowers
Growing Thyme
Growing Tomatoes
Growing Tulips
Growing Vegetables
Herb Basics
Herb Garden
Indoor Growing
Landscaping Basics
Landscaping Patios
Landscaping Plants
Landscaping Shrubs
Landscaping Trees
Landscaping Walks & Pathways
Lawn Basics
Lawn Maintenance
Lawn Mowers
Lawn Ornaments
Lawn Planting
Lawn Tools
Outdoor Growing
Overall Landscape Planning
Pests, Weeds & Problems
Plant Basics
Rock Garden
Rose Garden
Shrubs
Soil
Specialty Gardens
Trees
Vegetable Garden
Yard Maintenance
How to Grow Potatoes in a Garbage Bag
How to Grow Potatoes in a Garbage Bag. Historically, potatoes have only been grown on farms and in vegetable gardens with lots of space. However, even those people in the smallest of urban lots can grow healthy and tasty potatoes with the garbage bag method.
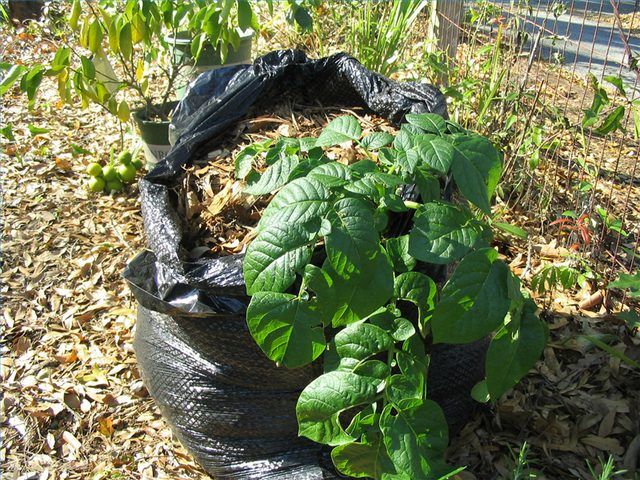
Historically, potatoes have only been grown on farms and in vegetable gardens with lots of space. However, even those people in the smallest of urban lots can grow healthy and tasty potatoes with the garbage bag method.
Things You'll Need
Potatoes
Organic fertilizer
Garbage bags
Chit your potatoes, which means preparing them for planting. You can use potatoes from your pantry, even if they have already sprouted. Cut potatoes into at least two pieces, making sure that there is at least two eyes in each piece. A potato eye is an indentation or spot where a growing sprout will form. Leave potato pieces out to dry on a paper towel for at least 24 hours.
Prepare your soil mixture. The soil mixture must be light and airy to allow potato roots and shoots to form and grow easily. Mix potting soil with peat moss, vermiculite or chopped dead leaves, or a mixture of all of them. Fill a garbage bag 4 inches full of the soil mixture. Roll the edges of the garbage bag down to within 2 inches of the top of the soil layer. Punch holes into the garbage bag below the soil level to allow drainage.
Plant your potatoes. Plant five potato chits per garbage bag, one in the center and four in a circle near the outside edge of the garbage bag. Plant potato chits deep enough to just be barely covered with soil. Water thoroughly.
Maintain your potatoes. First, the potato chits will grow roots. This is a time when there will be little visible activity. Then the chits will send up sprouts. When the sprouts get 4 inches high, add soil mixture to the garbage bag until the shoot is almost completely covered again. Roll out the edges of the garbage bag to keep up with the soil being added. Water thoroughly. Continue to add soil mixture as the shoot grows to encourage it to continue to grow upwards. Water the bags regularly so that the soil does not dry out. When the shoots have reached the top of the garbage bag, stop adding soil and allow them to bloom and mature.
Harvest your potatoes. When the potato plant has withered and the leaves have turned brown, it's time to harvest the potatoes. Dump out or cut open the garbage bag and pull the potatoes off of the underground shoots. Brush off as much dirt as possible but do not wash. Allow skins to firm up in open air out of sunlight for at least two days. Wash potatoes only when ready to use to prolong the storage life.


