Bulbs
Flower Basics
Flower Beds & Specialty Gardens
Flower Garden
Garden Furniture
Garden Gnomes
Garden Seeds
Garden Sheds
Garden Statues
Garden Tools & Supplies
Gardening Basics
Green & Organic
Groundcovers & Vines
Growing Annuals
Growing Basil
Growing Beans
Growing Berries
Growing Blueberries
Growing Cactus
Growing Corn
Growing Cotton
Growing Edibles
Growing Flowers
Growing Garlic
Growing Grapes
Growing Grass
Growing Herbs
Growing Jasmine
Growing Mint
Growing Mushrooms
Orchids
Growing Peanuts
Growing Perennials
Growing Plants
Growing Rosemary
Growing Roses
Growing Strawberries
Growing Sunflowers
Growing Thyme
Growing Tomatoes
Growing Tulips
Growing Vegetables
Herb Basics
Herb Garden
Indoor Growing
Landscaping Basics
Landscaping Patios
Landscaping Plants
Landscaping Shrubs
Landscaping Trees
Landscaping Walks & Pathways
Lawn Basics
Lawn Maintenance
Lawn Mowers
Lawn Ornaments
Lawn Planting
Lawn Tools
Outdoor Growing
Overall Landscape Planning
Pests, Weeds & Problems
Plant Basics
Rock Garden
Rose Garden
Shrubs
Soil
Specialty Gardens
Trees
Vegetable Garden
Yard Maintenance
How to Transplant Hollyhocks
How to Transplant Hollyhocks. Whether you’re planning a cottage garden or have an ugly wall you’d like to camouflage, the hollyhock (Alcea rosea) should be your go-to plant. Planted in groups, they make short work of hiding unattractive features in the garden. Most hollyhocks are biennial and grow best in U.S. Department of Agriculture...
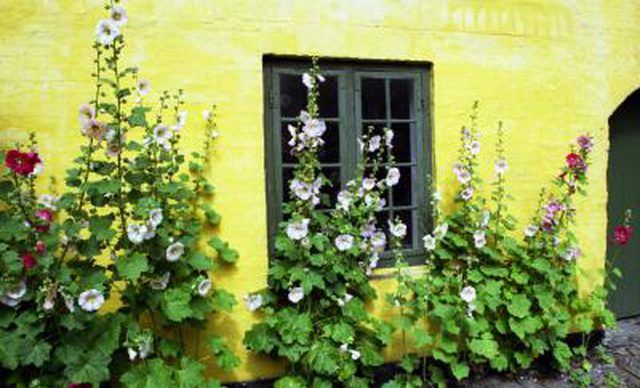
Whether you�re planning a cottage garden or have an ugly wall you�d like to camouflage, the hollyhock (Alcea rosea) should be your go-to plant. Planted in groups, they make short work of hiding unattractive features in the garden. Most hollyhocks are biennial and grow best in U.S. Department of Agriculture plant hardiness zones 3 through 9. Although it is possible to transplant an established hollyhock, because of its long taproot, you run the risk of killing it.
When and Where to Transplant
Transplant seedlings any time during spring or in early fall. If you�re transplanting an established hollyhock, wait until after it finishes blooming and cut the stalk to within 5 or 6 inches of the soil. Choose a sunny site that is sheltered from high winds to keep the taller hollyhocks from snapping or falling over.
Prepare the Soil
Hollyhocks will grow in almost any soil, as long as it drains quickly. Test the soil in your chosen spot by digging a 1-foot-deep hole and filling it with water. After the water drains, refill the hole with water. Use a ruler to measure the depth of the water and make note of it. Check the depth again in one hour. If less than 1 inch of the water drained, you�ll need to find another site. Find one where the water drains at the rate of 1 to 6 inches an hour. Once you�ve found the right spot to plant the hollyhock, give it a healthy start by incorporating a 2-inch layer of compost into the top 4 inches of the garden soil.
Digging Up the Hollyhock
Water both the container-grown and garden-grown hollyhock the day before transplanting. This helps plump the roots with water so they are less likely to dry out while transplanting. It will also ease the removal of the established hollyhock. Dig up the hollyhock, taking as much of the root system as possible. Set the plant in a bucket and pour in enough water to cover the roots while you dig the new planting hole. Remove the container-grown hollyhock by tipping over the pot and sliding it out. Handle the roots as little as possible.
Planting
Dig a hole the same depth at which the hollyhock is currently growing and twice the width. When planting more than one hollyhock, space them at least 18 inches apart. Place the roots into the hole and backfill with soil. Use your hands or feet to firm the soil around the plant's roots.
Care After Transplanting
Water the hollyhock to the depth at which it was planted immediately after transplanting. You�ll need to provide it with at least 1 inch of water a week for the first month, if it doesn�t rain. If the weather turns particularly warm, spread a 3-inch layer of mulch on the soil around the hollyhock. Don�t allow the mulch to touch the plant's stems because it encourages rot. The mulch will insulate the roots from the heat and conserve soil moisture.


