Bulbs
Flower Basics
Flower Beds & Specialty Gardens
Flower Garden
Garden Furniture
Garden Gnomes
Garden Seeds
Garden Sheds
Garden Statues
Garden Tools & Supplies
Gardening Basics
Green & Organic
Groundcovers & Vines
Growing Annuals
Growing Basil
Growing Beans
Growing Berries
Growing Blueberries
Growing Cactus
Growing Corn
Growing Cotton
Growing Edibles
Growing Flowers
Growing Garlic
Growing Grapes
Growing Grass
Growing Herbs
Growing Jasmine
Growing Mint
Growing Mushrooms
Orchids
Growing Peanuts
Growing Perennials
Growing Plants
Growing Rosemary
Growing Roses
Growing Strawberries
Growing Sunflowers
Growing Thyme
Growing Tomatoes
Growing Tulips
Growing Vegetables
Herb Basics
Herb Garden
Indoor Growing
Landscaping Basics
Landscaping Patios
Landscaping Plants
Landscaping Shrubs
Landscaping Trees
Landscaping Walks & Pathways
Lawn Basics
Lawn Maintenance
Lawn Mowers
Lawn Ornaments
Lawn Planting
Lawn Tools
Outdoor Growing
Overall Landscape Planning
Pests, Weeds & Problems
Plant Basics
Rock Garden
Rose Garden
Shrubs
Soil
Specialty Gardens
Trees
Vegetable Garden
Yard Maintenance
How to Build a Cold Frame
How to Build a Cold Frame. Cold frames help gardeners overwinter tender perennials, harden off seedlings, and extend the growing season for leafy greens and root vegetables. A glass cover of 3 by 6 feet is a standard size for cold frames. If you already have an old window sash to use as the cold-frame lid, you can adapt your cold frame size to be...
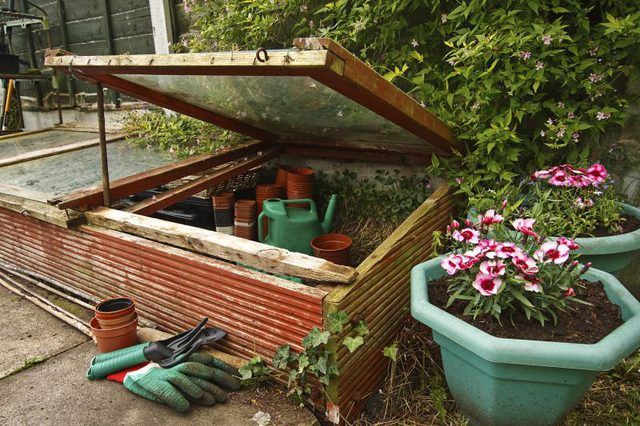
Cold frames help gardeners overwinter tender perennials, harden off seedlings, and extend the growing season for leafy greens and root vegetables. A glass cover of 3 by 6 feet is a standard size for cold frames. If you already have an old window sash to use as the cold-frame lid, you can adapt your cold frame size to be the same width as the sash and about 4 inches shorter than the length.
Things You'll Need
Tape measure
Shovel or spade
Gravel or coarse sand
Circular saw
2-by-12-inch lumber
2-by-6-inch lumber
2-by-4-inch lumber
No. 8 exterior wood screws, 2 1/4 inches long
Glass sash, 3 by 6 feet, with wood frame
2 hinges
Find a 68-by-36-inch space for the cold frame, with the 36-inch sides as the front and back. Select a location that's naturally well drained and has southern sun exposure, preferably beside an existing structure to provide a windbreak on the box's north side. Dig out the 68-by-36-inch space to a depth of about 12 inches.
Add a 4-inch layer of gravel or coarse sand to the excavated site. This helps provide good drainage.
Cut 2-by-12-inch lumber to make two 68-inch lengths and two 33-inch lengths, to form the base of the cold frame. With the 33-inch lengths between the 68-inch lengths, the resulting box should fit in the 68-by-36-inch excavated site -- 2-by-12 lumber actually measures 1 1/2 inches thick.
Assemble the cut 2-by-12-inch pieces of lumber to create a rectangular box that will rest on top of the gravel or sand inside the excavated site. Attach the lumber pieces at the corners with exterior wood screws. This completes the base of the cold frame.
Cut four corner posts from 2-by-4-inch lumber. Two of the corner posts should measure 18 inches long, and the other two corner posts should measure 12 inches long.
Place each 12-inch-long post vertically on the coarse sand or gravel in the inside corners of the south-facing side of the cold frame, and place the 18-inch corner posts vertically in the inside corners of the north-facing side of the cold frame. Attach those posts to the 33-inch and 68-inch lengths of wood using wood screws.
Cut 2-by-6-inch lumber to make one 68-inch length and one 33-inch length. Cut the 2-by-6-by-68-inch piece in half along a diagonal to create two triangular pieces. The 33-inch length will form the back of the cold frame, and the triangles will form the sloping sides.
Attach the 2-by-6-by-33-inch lumber piece to the top of the 2-by-12-by-33-inch piece on the north-facing side of the cold frame using wood screws. Also attach this back piece to the 18-inch corner posts.
Set the 2-by-6-by-68-inch triangular wood pieces on top of the 68-inch lengths of wood so the frame slopes downward toward the south-facing side. Attach the 6-inch sides of the triangular pieces to the back and sides of the cold frame, and to the 18-inch corner posts, using wood screws. This task completes the sides and back of the cold frame
Attach the 3-by-6-foot glass sash's wood frame to the taller, north-facing side of the cold frame using two hinges. The sash will extend over the front edge of the cold frame.
Add a 6- to 8-inch-deep layer of weed-free garden soil on top of the layer of gravel or coarse sand so you can plant in the cold frame. Alternatively, you can place pots or seedling flats directly into the cold frame to sit on top of the coarse sand or gravel.
Heap the soil that was excavated from the cold frame hole up around the outside walls of the cold frame to provide insulation.
Tips & Warnings
To water the plants inside the cold frame, simply open the glass sash lid. Watering in the morning is best so the water has time to work into the soil or evaporate. The sash can also be propped open to provide ventilation on warm days and get seedlings used to cooler temperatures.
The size of a cold frame can be expanded in multiples of 3 feet by increasing the excavation area and adding additional glass sashes. When making a larger cold frame, use 2-by-4-inch lumber as a bracing piece every 3 feet to support the sashes.
To help prevent the wood from rotting, choose rot-resistant redwood or cedar, or lumber treated with a nontoxic preservative.
If you want to use treated lumber, choose only wood treated with a chemical that is not toxic to plants. Wood treated with creosote, pentachlorophenol or chromated copper arsenate is not suitable.
Exercise caution when using power tools to cut lumber and build the cold frame.


