Bulbs
Flower Basics
Flower Beds & Specialty Gardens
Flower Garden
Garden Furniture
Garden Gnomes
Garden Seeds
Garden Sheds
Garden Statues
Garden Tools & Supplies
Gardening Basics
Green & Organic
Groundcovers & Vines
Growing Annuals
Growing Basil
Growing Beans
Growing Berries
Growing Blueberries
Growing Cactus
Growing Corn
Growing Cotton
Growing Edibles
Growing Flowers
Growing Garlic
Growing Grapes
Growing Grass
Growing Herbs
Growing Jasmine
Growing Mint
Growing Mushrooms
Orchids
Growing Peanuts
Growing Perennials
Growing Plants
Growing Rosemary
Growing Roses
Growing Strawberries
Growing Sunflowers
Growing Thyme
Growing Tomatoes
Growing Tulips
Growing Vegetables
Herb Basics
Herb Garden
Indoor Growing
Landscaping Basics
Landscaping Patios
Landscaping Plants
Landscaping Shrubs
Landscaping Trees
Landscaping Walks & Pathways
Lawn Basics
Lawn Maintenance
Lawn Mowers
Lawn Ornaments
Lawn Planting
Lawn Tools
Outdoor Growing
Overall Landscape Planning
Pests, Weeds & Problems
Plant Basics
Rock Garden
Rose Garden
Shrubs
Soil
Specialty Gardens
Trees
Vegetable Garden
Yard Maintenance
How to Build a Dry Stack Stone Wall
How to Build a Dry Stack Stone Wall. Building a dry-stacked stone wall in your garden area is an easy way to incorporate dimension and architecture into the existing landscaping. Rocks can be purchased at local landscape retail centers or can be collected from local creek beds.
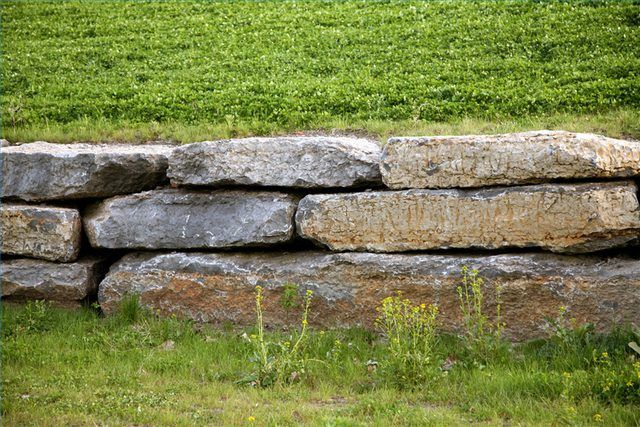
Building a dry-stacked stone wall in your garden area is an easy way to incorporate dimension and architecture into the existing landscaping. Rocks can be purchased at local landscape retail centers or can be collected from local creek beds.
Things You'll Need
Shovel
Spray paint
Level
Garden hose
Hammer
Measuring tape
Stone or rock
Safety glasses
Choose the location to build the dry-stacked stone wall and use landscape marking spray paint to outline the location and shape of the rock wall.
Use a shovel (a square tipped spade works best) to edge around the painted line. Continue using the shovel to dig out the base for the wall (this should resemble a narrow trench with the width matching the width of the base rocks). The depth of the base should be approximately ? times the width of the stone being used to build the dry-stacked rock wall. Use a level to make sure the base is level and a measuring tape to make sure that the width of the base will accommodate the rocks being used for the first layer.
Select rocks for the base layer of the rock wall. These rocks should be slightly larger than the rest of the stones being used for the additional layers. Use the level to ensure the base layer of rock is level. Use small pieces of stone to shim areas of the rocks to make them level.
Start laying out the first course of rocks to be placed on the base layer. Make sure the rocks overlap the butt-joints on the base layer; this will add to the structural integrity of the decorative rock wall. Use the level and small pieces of broken stone to level the layer. Break larger rocks with a hammer to fit in smaller voids.
Backfill with soil behind each layer of stone and tamp down with the shovel handle.
Continue adding courses of stone, ensuring that each course is level and that the rocks continue to overlap the butt-joints below, until the desired height is achieved.
Tips & Warnings
Use existing topographical features in the yard to enhance the dry-stacked rock wall. Incorporate the wall into a gentle slope or create a raised planting bed and use the rock wall to retain the elevated soil.
Try and stick with odd numbered layers of rock. Building a wall with even numbered rows will give the decorative wall a patterned appearance.
Always wear eye protection when breaking rocks with a hammer or other means.


