Bulbs
Flower Basics
Flower Beds & Specialty Gardens
Flower Garden
Garden Furniture
Garden Gnomes
Garden Seeds
Garden Sheds
Garden Statues
Garden Tools & Supplies
Gardening Basics
Green & Organic
Groundcovers & Vines
Growing Annuals
Growing Basil
Growing Beans
Growing Berries
Growing Blueberries
Growing Cactus
Growing Corn
Growing Cotton
Growing Edibles
Growing Flowers
Growing Garlic
Growing Grapes
Growing Grass
Growing Herbs
Growing Jasmine
Growing Mint
Growing Mushrooms
Orchids
Growing Peanuts
Growing Perennials
Growing Plants
Growing Rosemary
Growing Roses
Growing Strawberries
Growing Sunflowers
Growing Thyme
Growing Tomatoes
Growing Tulips
Growing Vegetables
Herb Basics
Herb Garden
Indoor Growing
Landscaping Basics
Landscaping Patios
Landscaping Plants
Landscaping Shrubs
Landscaping Trees
Landscaping Walks & Pathways
Lawn Basics
Lawn Maintenance
Lawn Mowers
Lawn Ornaments
Lawn Planting
Lawn Tools
Outdoor Growing
Overall Landscape Planning
Pests, Weeds & Problems
Plant Basics
Rock Garden
Rose Garden
Shrubs
Soil
Specialty Gardens
Trees
Vegetable Garden
Yard Maintenance
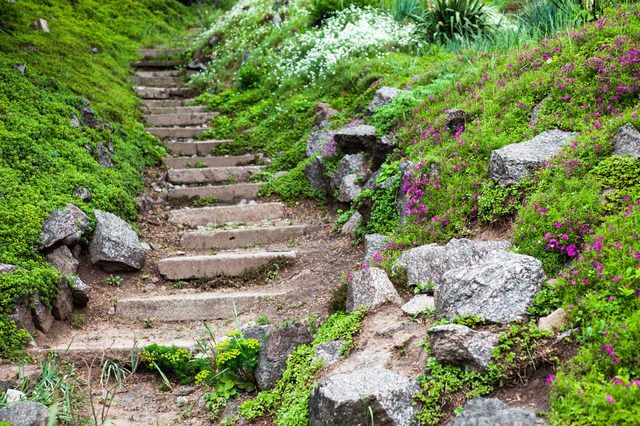
Creating a Rock Garden on a Slope
Create a rock garden on a slope with local rocks in a range of sizes. Place the largest rocks at the bottom of the slope.
A slope is one of the best locations for a rock garden. Most rock garden plants thrive in the freely draining conditions a slope provides, and the terrain helps recreate the natural look of a rocky mountainside. A slope that receives at least four hours of direct sunlight provides adequate growing conditions for many rock garden plants, though some grow best in full sun, which is at least six hours of direct sunlight. In hot climates, a slope that receives shade in the hottest part of the afternoon helps many rock plants thrive.
Preparing the Slope
Thoroughly preparing the slope before creating the rock garden provides the best chances of success. Rock garden plants are compact and slow-growing, and easily swamped by weeds. Before creating a rock garden, all the weeds, grasses or other vegetation and the roots must be completely cleared from the area.
Digging up all the vegetation on a slope is hard work, but it's the fastest method for preparing the area for a rock garden. Start at the top of the slope and work downward, digging up the plants with a garden fork. Dig as deeply as needed to remove all the roots from the soil, and take care to pick out every last piece of root. Some weeds can sprout from a small piece of root.
Another option is to spray the area with a systemic herbicide, such as glyphosate. Systemic herbicides control weeds by moving through the plants to their roots. Put on a long-sleeved shirt, long pants, safety goggles and gloves, and spray the slope with a ready-to-use 2 percent glyphosate herbicide on a dry, still day when the weeds are actively growing. After two weeks, dig up the dead vegetation.
Warning
Glyphosate and other herbicides harm most plants. Don't spray herbicides near plants you wish to keep, or protect the plants with cardboard before spraying.
Selecting Rocks
For a natural-looking rock garden on a slope, select one type of local, weathered rock in a range of sizes. Local rock usually fits in best with the surrounding landscape. Several large rocks weighing 200 pounds or more provide the structure for the garden. Smaller rocks should be placed around and between them.
Designing the Rock Garden
Think carefully about where you will place the rocks before creating a rock garden to avoid having to move heavy rocks more than once. The rock garden design will depend on the size and angle of the slope and the sizes and shapes of the rocks, but the overall effect should be natural. Bear in mind that the rocks will be buried to at least one-third their own depth.
In nature, rock formations often run along roughly horizontal, slightly tilted lines, with some rocks that have broken off and tumbled into different positions. The largest rocks should be at the bottom of a slope to prevent them from being a safety hazard. Rocks separated by areas of soil look more aged and weathered than densely packed rock, and the soil provides growing spots for rock plants. When large rocks are in short supply, you can create the look of a large, cracked rock, by placing the flattest sides of two similar rocks face to face, and filling the gap with soil.
Tip
Study professionally landscaped rock gardens and naturally rocky landscapes for ideas on designing a rock garden.
Creating the Rock Garden
Things You'll Need
Long pants, long-sleeved shirt, thick leather gloves and boots with steel toecaps
Spade
Dolly, 4-inch PVC pipes or other equipment for moving heavy rocks
Crowbar
Step 1
Put on protective clothing, including long pants, a long-sleeved shirt, leather gloves and boots with steel toecaps.
Step 2
Dig holes in the base of the slope at least one-third the depth of the largest rocks.
Step 3
Move the rocks to the garden by dragging them on a dolly or rolling them over 4-inch PVC pipes. Other options are flipping or rolling the stones.
Warning
Take frequent rests and stretches when moving rocks, and don't lift any so heavy they cause you to strain.
Step 4
Place the rocks in the holes, with the widest, heaviest side downward. Tilt flat-topped rocks toward the slope to direct rainwater toward plants and reduce erosion. Place some flat-topped stones where they can be stood on for watering and weeding the garden. Expose the weathered side of the rocks.
Step 5
Pack soil around the rocks until they're stable.
Tip
A good test for rock stability is to stand on the rock. A stable rock will not move.
Step 6
Dig holes for the next layer of rocks above the lowest layer, and place the rocks and firm them in with soil in the same way. Continue digging holes and placing rock up the slope to the desired height.
Planting the Garden
After three or four weeks, when the rocks and soil have had time to settle, plant rock garden plants. Compact, dwarf, slowly spreading plants that thrive in freely draining conditions grow best in a rock garden. Plant the plants around and near the rocks, in gaps and crevices and under rocks. Water the plants regularly for the first growing season, but don't water so much that the soil becomes soggy -- most rock garden plants don't tolerate wet soil.


